Before you begin
- Connect Google services in Next Matter with a service account and share data with this account. Learn more…
Want to check which account was used to connect your integration? Check which account is connected.
- Check the required scopes to learn more about which data is shared between the apps.
Integrate with Sheets
- Click Workflows > + Create new… > Create a new workflow and give your workflow a name. If you have a workflow ready, click … > Edit workflow.
- Click + Add step and select Integrations > Google Sheets (Low Code).
- Click the step and click Configure integration.
Add a single row (no JSON body required)
- Select Add single row in the Google Sheets operation drop-down as is and select the spreadsheet you will be updating. Note that you need editor access to the spreadsheet to use it in the integration.
- Select the spreadsheet and worksheet.
- Enter the number of the row, where you have header values. This doesn’t need to be row 1.
-
Add the column number and the value you want to place in this column. A new row will be created under the existing rows.
When any of the specified columns is missing in the worksheet when the step runs, the step will fail.
- (Optional) Select and add your variables.
- Save changes.
Add row
-
Select Add row in the Google Sheets operation drop-down as is and select the spreadsheet you will be updating. Note that you need editor access to the spreadsheet to use it in the integration.
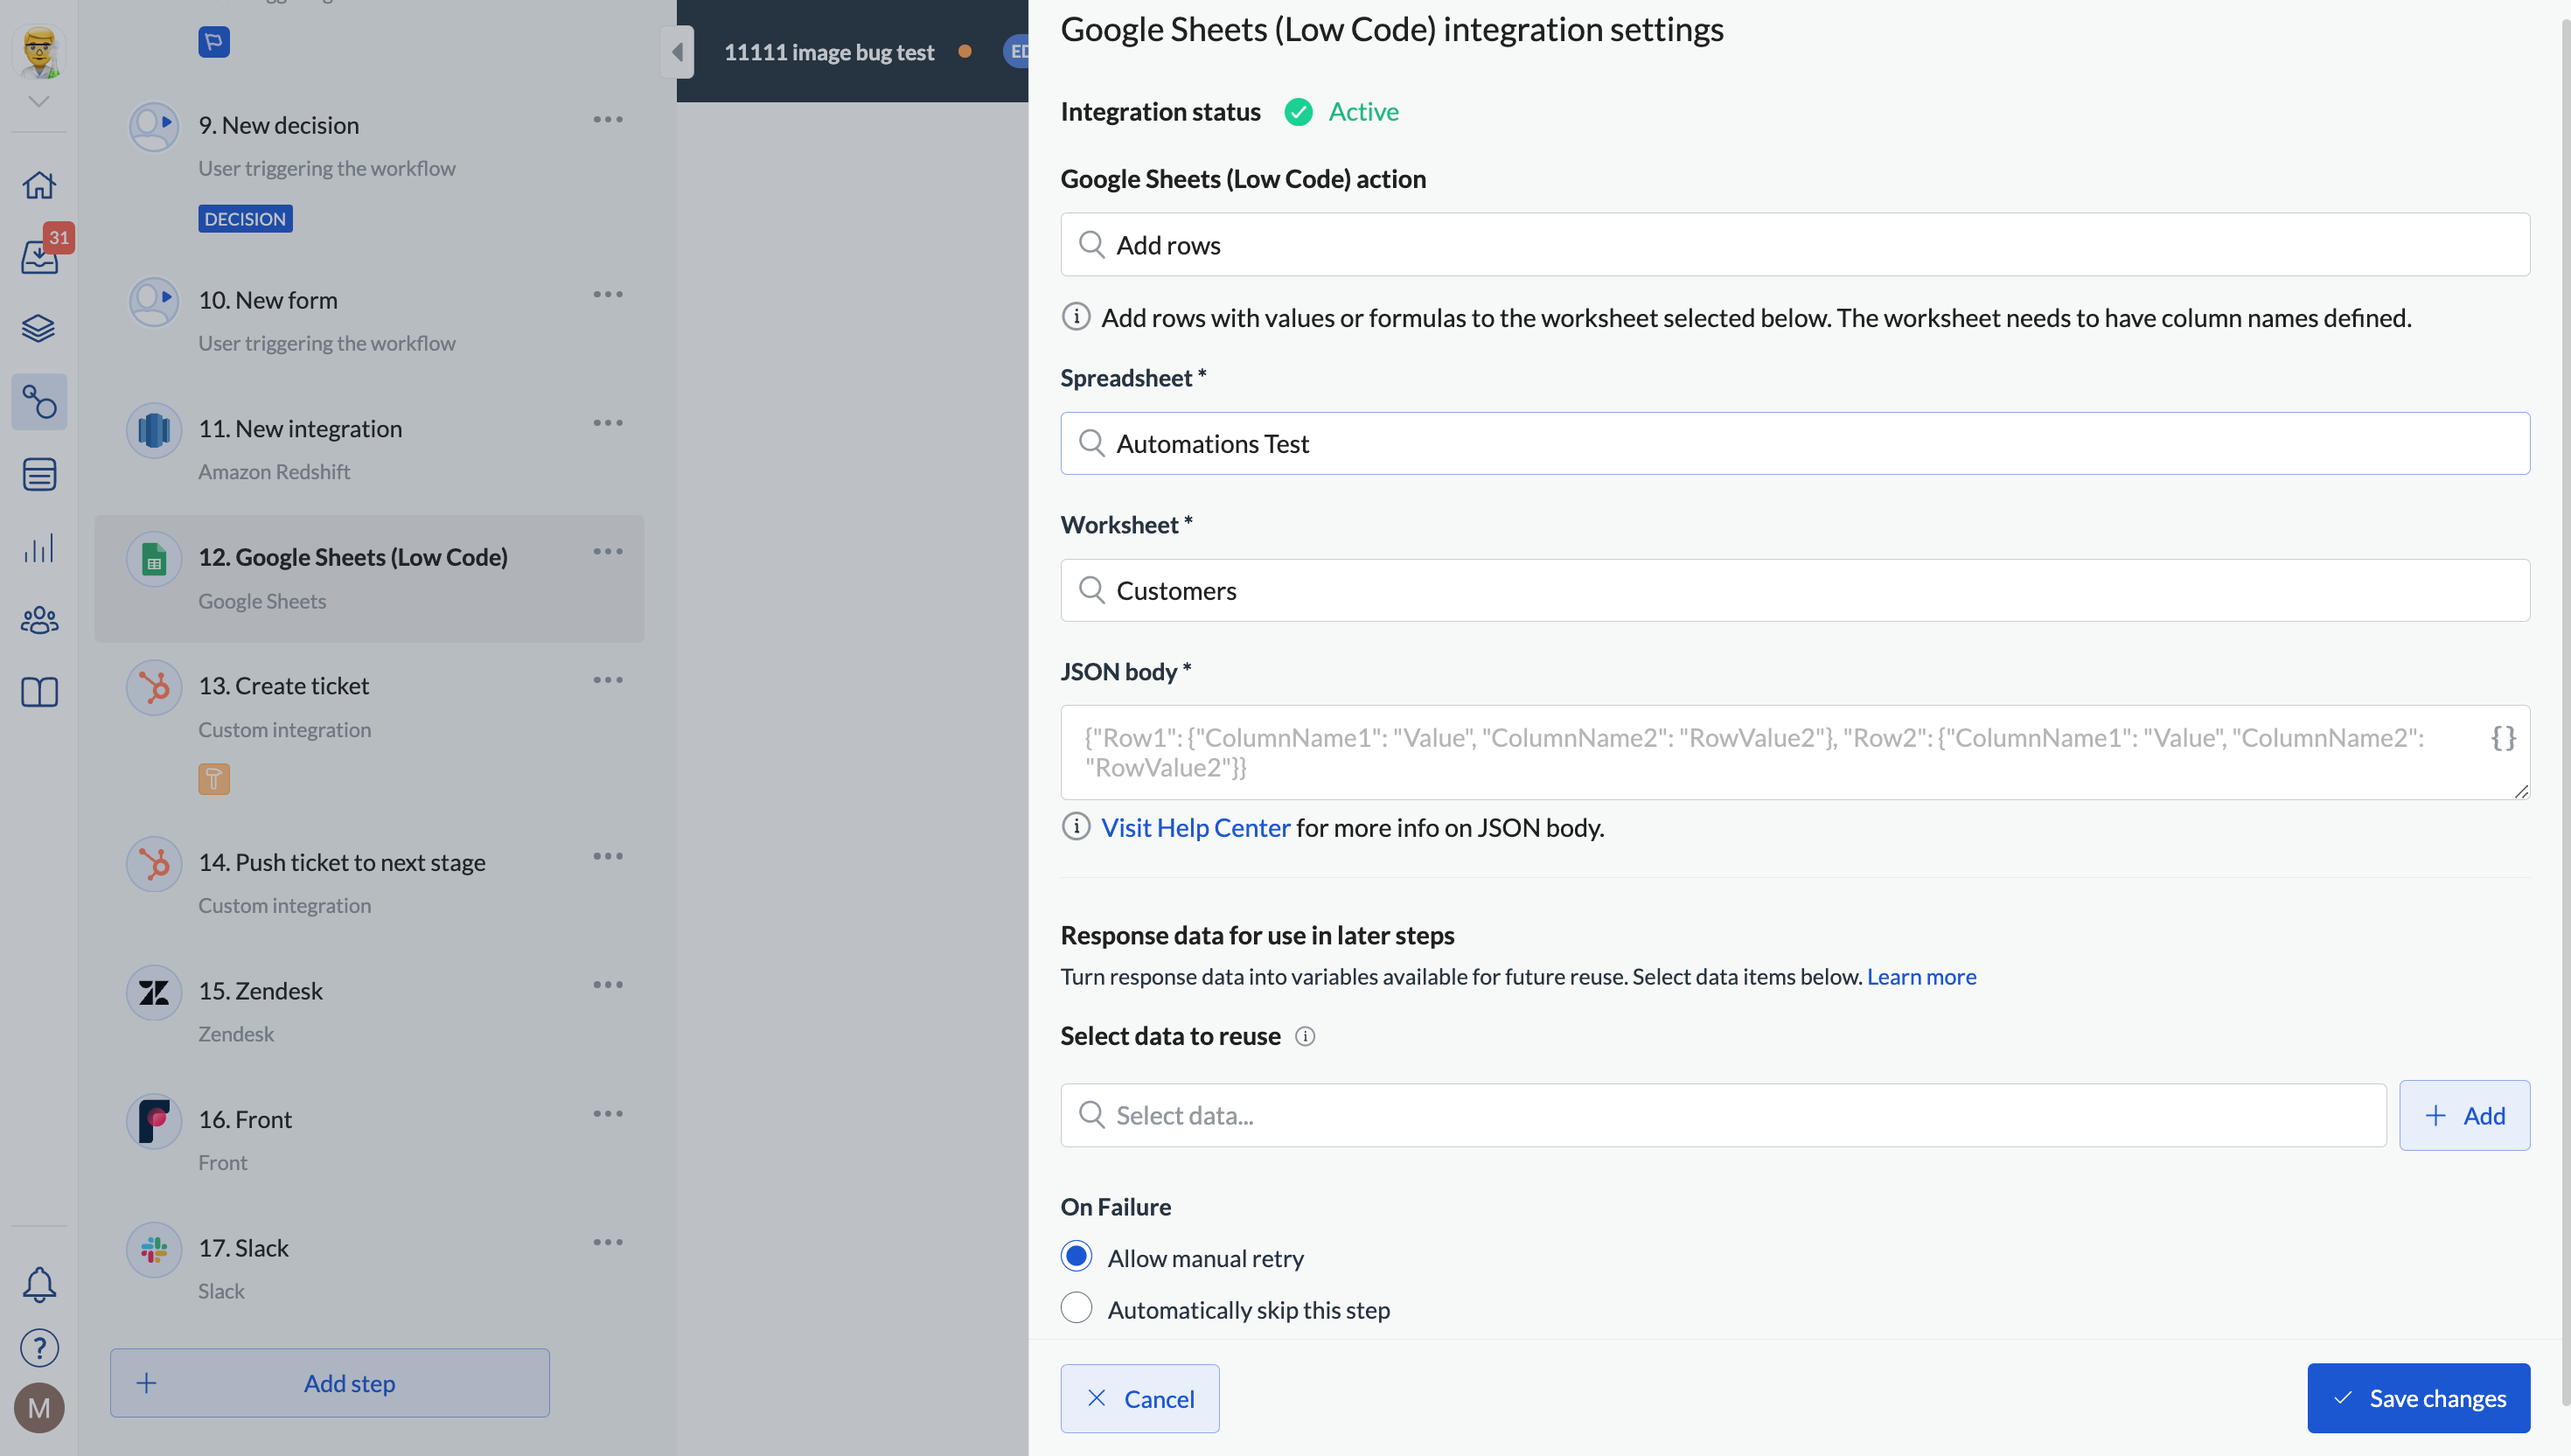
- Enter or select the worksheet name. This is the worksheet to which you want to add rows.
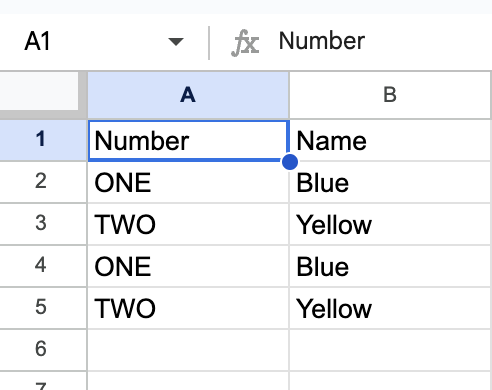
- In the JSON body field, enter the rows, names of columns, and values in the JSON format.
- When everything is correct, click Save changes.
Update rows
- Select Update rows in the Google Sheets operation drop-down as is and select the spreadsheet you will be updating. Note that you need editor access to the spreadsheet to use it in the integration.
- Enter or select the spreadsheet and worksheet. This is the worksheet to which you want to update rows.
- In the Start with row field, enter the number of the row which should be the first one to update. We’ll update values in this row, and, if specified in Body, the following rows.
-
Enter Body. It might look like the following
Note that Row1 or Row2 is only used for sequencing rows and are not the actual row numbers. For example, if you’ve entered 13 in the Start with row field then your Row1 changes will apply to row 13 in the worksheet, and Row2 changes to row 14, etc.
- Save your changes.
Create spreadsheet
- Select Create spreadsheet in the Google Sheets operation drop-down and provide the spreadsheet with a meaningful name. Note that the name doesn’t have to be unique but, we still advise it so that the sheet can easily be recognized. Tip: to make the name unique, you can use the data reference in the Name field, or add it to the entered phrase. For example, the instance ID will always be a unique number.
- Save your changes.
Delete spreadsheet
- Select Delete spreadsheet in the Google Sheets operation drop-down and provide the ID of the spreadsheet to delete. Note that the deletion is permanent. Tip: you can use data references in the Spreadsheet ID field. This is less error-prone than typing.
- Save your changes.
Where do I find Spreadsheet ID
Where do I find Spreadsheet ID
You can find the IS in your Google spreadsheet URL - it’s a combination of numbers and letters between /d/ and /editFor example:
docs.google.com/spreadsheets/d/[Spreadsheet_ID]/editIf the spreadsheet ID you provided doesn’t exist the step will fail.
Create worksheet
- Select Create worksheet in the Google Sheets operation drop-down and select the name of the spreadsheet to which you are adding a worksheet.
- Provide a name for the worksheet.
- Select data you might want to reuse as variables (see the Variables section below).
- Save your changes.
Delete worksheet
- Select Delete worksheet in the Google Sheets operation drop-down and select the name of the spreadsheet from which you are deleting a worksheet.
- Provide a name for the worksheet. Make sure it’s correct or else the step will fail.
- Select data you might want to reuse as variables (see the Variables section below).
- Save your changes.
Match values (Vlookup)
You can match a single search value with multiple corresponding values.- Select Search and find values in the Google Sheets operation drop-down.
- Select the spreadsheet and worksheet.
- Decide which row is the header row. It doesn’t need to be row 1. We will offer the values from this row as column names you can select.
- Enter the value you want to search for and the column where this value should be located (Search column).
- In the match columns, select the columns where you want to find corresponding values. You can add multiple columns.
- Select your Match preference. First match is the default.
- Enable the toggle to differentiate between uppercase and lowercase letters during comparisons and offer only matches when the letter case is the same.
- (Optional) Add variables. Tip: We return an array, in which the returned results follow the order of the input columns. To create variables from the results, use numbers, for example,
$.'Search results'.values.[0](for the first search result),$.'Search results'.values.[1](for the second), and so on. - Save your changes.
When a selected match column doesn’t return any results, we show
null for this column in the output Search results.JSON formatting
For the integration to work, you need to provide the Body in JSON format. For example, it might look like the following:- The names of the columns need to already exist in the sheet. If you try to add rows to an empty sheet, the step will complete but the sheet will remain empty.
- The value can be a direct value or a formula, for example:
=SUM(A1:A3). - If you leave the column name empty but will enter the value, the value will be skipped. In the example below, the
Commentvalue will not be added to the sheet.
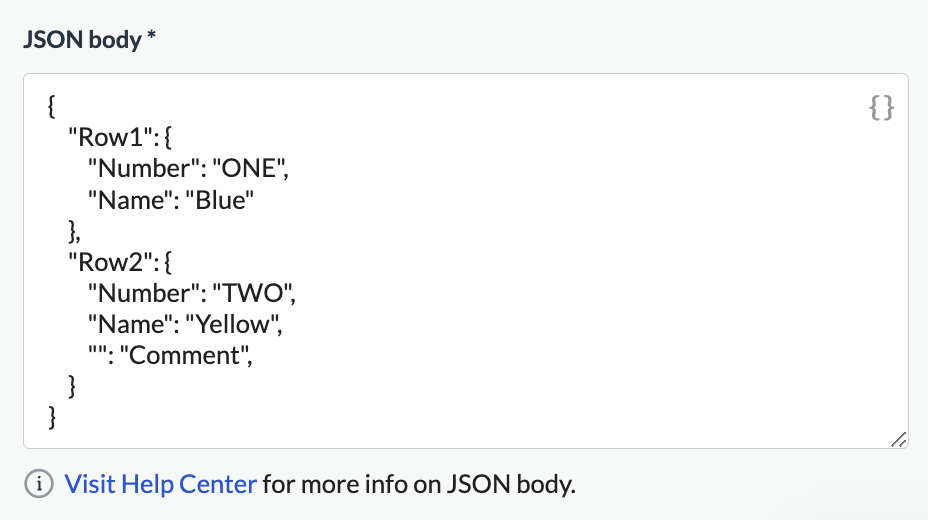
- Make sure to number the rows so that all the values are transferred. The numbers define the sequence of rows (so row 1 should precede row 2, and so on). If you’re adding the following JSON:
- If you use data references, make sure to wrap them in quotes, for example:
- You can use formulas - for formula details, see Google Sheet formulas (external page).
Variables
You can add variables to your step configuration. Variables are chunks of data that we take from the Response of the step and turn into reusable items. We extract the data chunks you can reuse for you. To add variables, select them from the Select data to reuse drop-down and click + Add. Tip: You can still add custom variables. Simply add a pre-defined one, clear the fields, and enter the desired variable.User variables are not displayed in the output. However, they are visible in the data reference dropdown if you want to use them in further steps.