Integrate with Freshdesk

You can trigger a Next Matter workflow directly from Freshdesk or send Next Matter workflow data to a Freshdesk ticket.

Before you begin

  • You need to have a base64-encoded Freshdesk API key. You can find the key in your Freshdesk portal by going to Profile settings. Copy the key and base64-encode the string by using a tool like https://base64encode.org.

  • You need to have your Freshdesk ticket ID handy. You can find it in the notifications that the customer and agent receive about the ticket updates. The ticket ID is normally in the subject line.

  • You need the Next Matter API Key. If you don't have it, contact your organization admin, or, if you're an admin, generate the key in Next Matter by going to Company > Next Matter API keys.

  • Understand how data references work. See Use data references. This will help you use the captured data in the workflow steps.

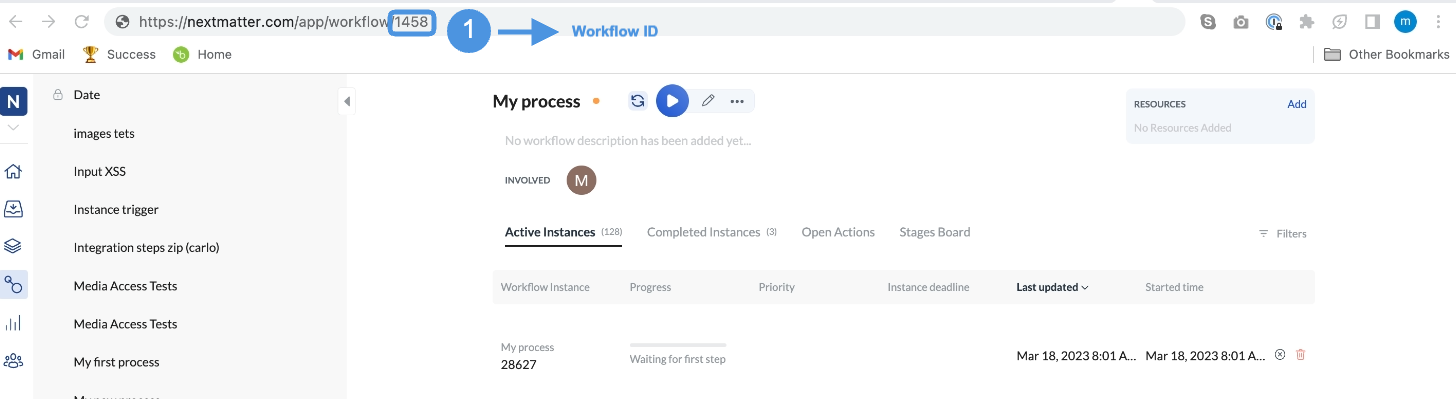
  • You need the ID of the workflow that should be started from Freshdesk. You can get the ID by clicking the workflow and copying the number from the URL in your browser.

🚧

Good to know: Check out our ready-made templates available when you add a step and select Templates > 3rd party templates. You can use the templates to create a set of pre-configured steps.
Need a specific template? Click the Contact us button in the top right of the page and let us know.

Add process-related data to Freshdesk ticket

Set up custom fields In Freshdesk

  1. In Freshdesk, go to Admin > General Settings > Ticket Fields.
  2. From the left side drag a Single-line text field into the field list. Click on the new field and label it "Next Matter URL". This will create a custom field for Next Matter-related information and will help your agents identify tickets that have already been sent to Next Matter.

Set up automation rule In Freshdesk

  1. Create an automation rule in Freshdesk and decide when a Next Matter process should be launched. To create a rule, go to Access Admin > Helpdesk Productivity > Automations.
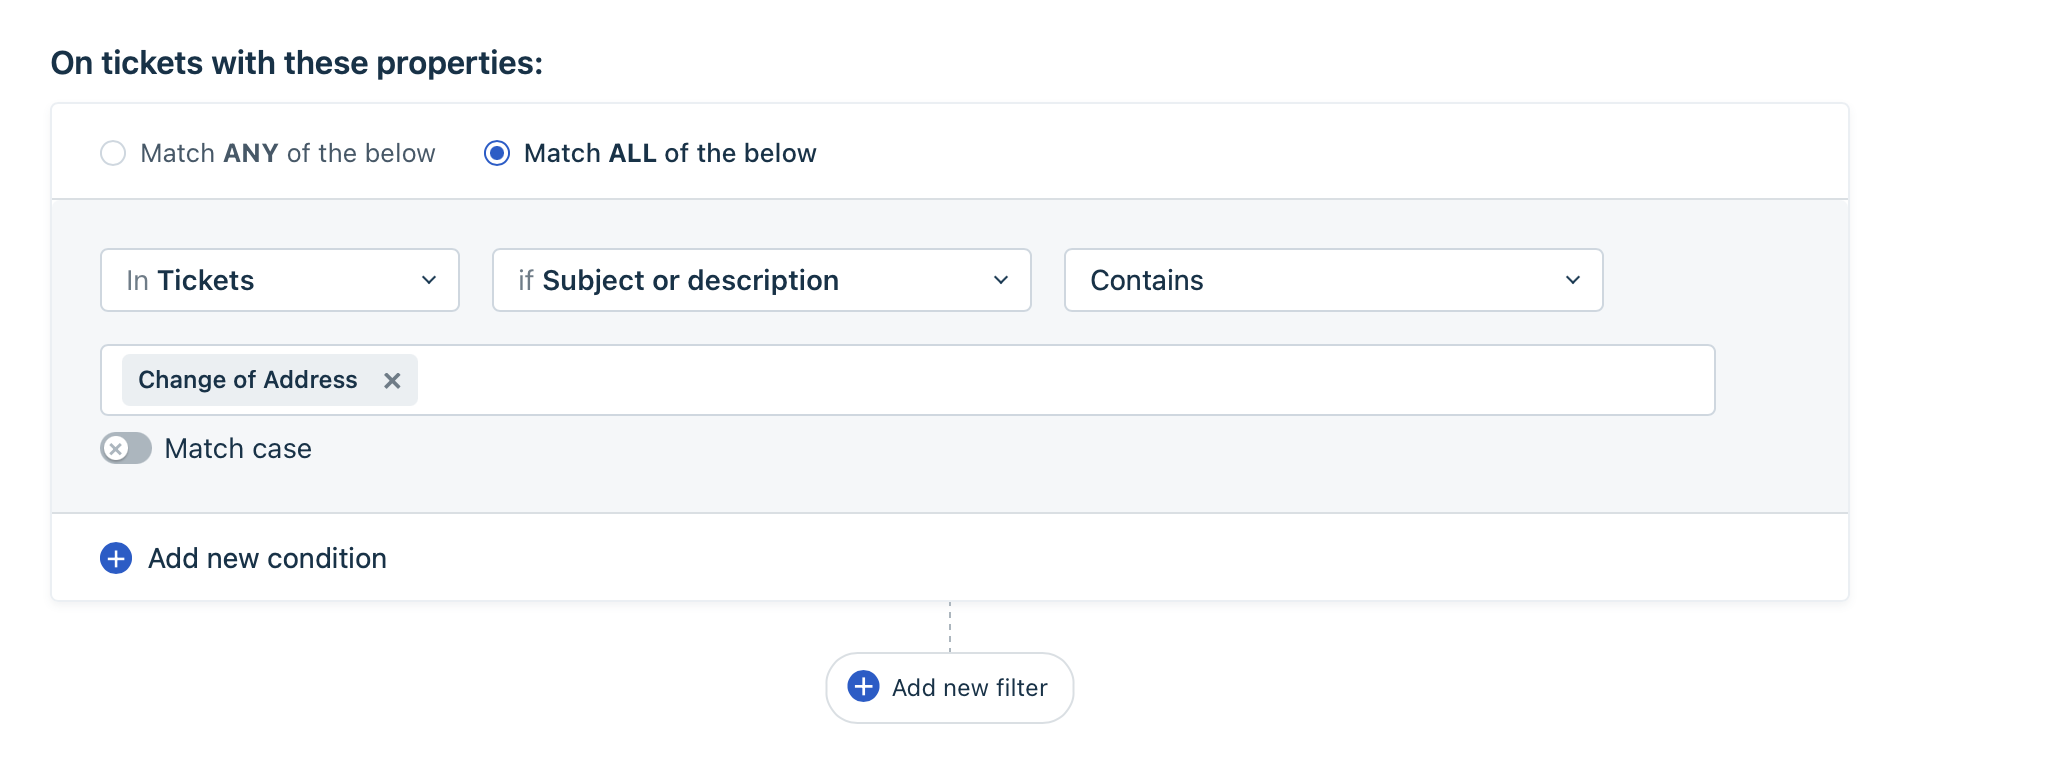
  2. Go to the Ticket Creation tab and click New Rule. Set the conditions for triggering the workflow.
    View a configuration example
    In this example a Next Matter workflow is launched whenever a new ticket with the subject "Change of Address" is created.

A screenshof of Freshdesk page to set automation

  1. In Perform these actions select Trigger Webhook and fill in the Form with the following data:
    • URL: https://core.nextmatter.com/api/instances/
    • Request type: POST
    • Enable custom headers:
    {
    	"Authorization": "NextMatter_API_KEY"
    }
    
    • Encoding: JSON
    • Content : Advanced
    {
    	"process": "https://core.nextmatter.com/api/processes/NEXTMATTER_WORKFLOW_ID/",
    	"name": "{{ticket.id}}"
    }
    

Update ticket with Next Matter data

This part is optional, however, it will give your agents full visibility of the workflow and an understanding of whether the automation works as expected.

For example, if you want to update the "Next Matter URL" custom field in your Freshdesk ticket with the URL of the Next Matter workflow instance, do the following:

  1. Open your process and add a new integration step right after the start of the workflow.
  2. Configure the step with the following data:
  • Method: PUT
  • URL: https://YOUR_FRESHDESK_DOMAIN.freshdesk.com/api/v2/tickets/TICKET_ID/
  • Headers: Content-Type:
  • Headers:: Authorization: FRESHDESK_ENCODED_API_KEY
  • Body: {"custom_fields":{"cf_next_matter_url":"{{instance_url}}"}}

The generic JSON example is the following:

{ 
         "custom_fields": {
                     "ID_OF_CUSTOM_FIELD": "INSERT_DATA"
           }, 
           "ID_OF_STANDARD_FIELD": "INSERT_DATA"
}

If you want to display internal notes in the ticket, do the following:

  1. Open your workflow and create a step with a form and create a "Text Input" form field. Use this text input to define the text that you want to update the ticket with.
  2. Add a new integration step.
  3. Configure the step with the following data:
  • Method: PUT
  • URL: https://YOUR_FRESHDESK_DOMAIN.freshdesk.com/api/v2/tickets/{{instance_name}}/notes
  • Headers: Content-Type:
  • Headers:: Authorization: FRESHDESK_ENCODED_API_KEY
  • Body: {"body": "DATA_REFERENCE"}

Display Freshdesk ticket information in your workflow

Do the following:

  1. Add a new integration step.
  2. Configure the step with the following data:
  • Method: GET
  • URL: https://next-matter.freshdesk.com/api/v2/tickets/TECKET_ID

You can use data reference to get the ticket ID from previous workflow steps.

  • Headers: Content-Type:
  • Headers:: Authorization: FRESHDESK_ENCODED_API_KEY
  • Leave the Body empty but add a variable for the description with the following value $.description
  1. To display the ticket information, create a new step and select Form as the step type.
  2. Add an Instruction form field.
  3. Click Settings on the form field.
  4. Use the data reference in the Body to access any ticket information you mapped in the previous step. For example {"body": "{2. Ticket Summary - Respond to ticket - Text}"}