> ## Documentation Index
> Fetch the complete documentation index at: https://help.nextmatter.com/llms.txt
> Use this file to discover all available pages before exploring further.
# Use Twilio verification system
> Connect Next Matter and Twilio to use the One-Time-Password SMS Verification.
In this task, you'll need to complete the following tasks:
1. Activate Twilio Verify Service.
2. Configure the Next Matter integration (the main workflow and the sub-workflow).
## Before you begin
* Have your Twilio API key at hand. If you don't have it, [read how to generate it](/docs/integrate-with-twilio).
* Make sure you know where to find step ID, form field ID, and process ID in Next Matter.
1. In your left-hand navigation, click the **Workflows** icon.
2. Hover over the follow-up workflow and click on the menu icon.
3. Click **Edit workflow**.
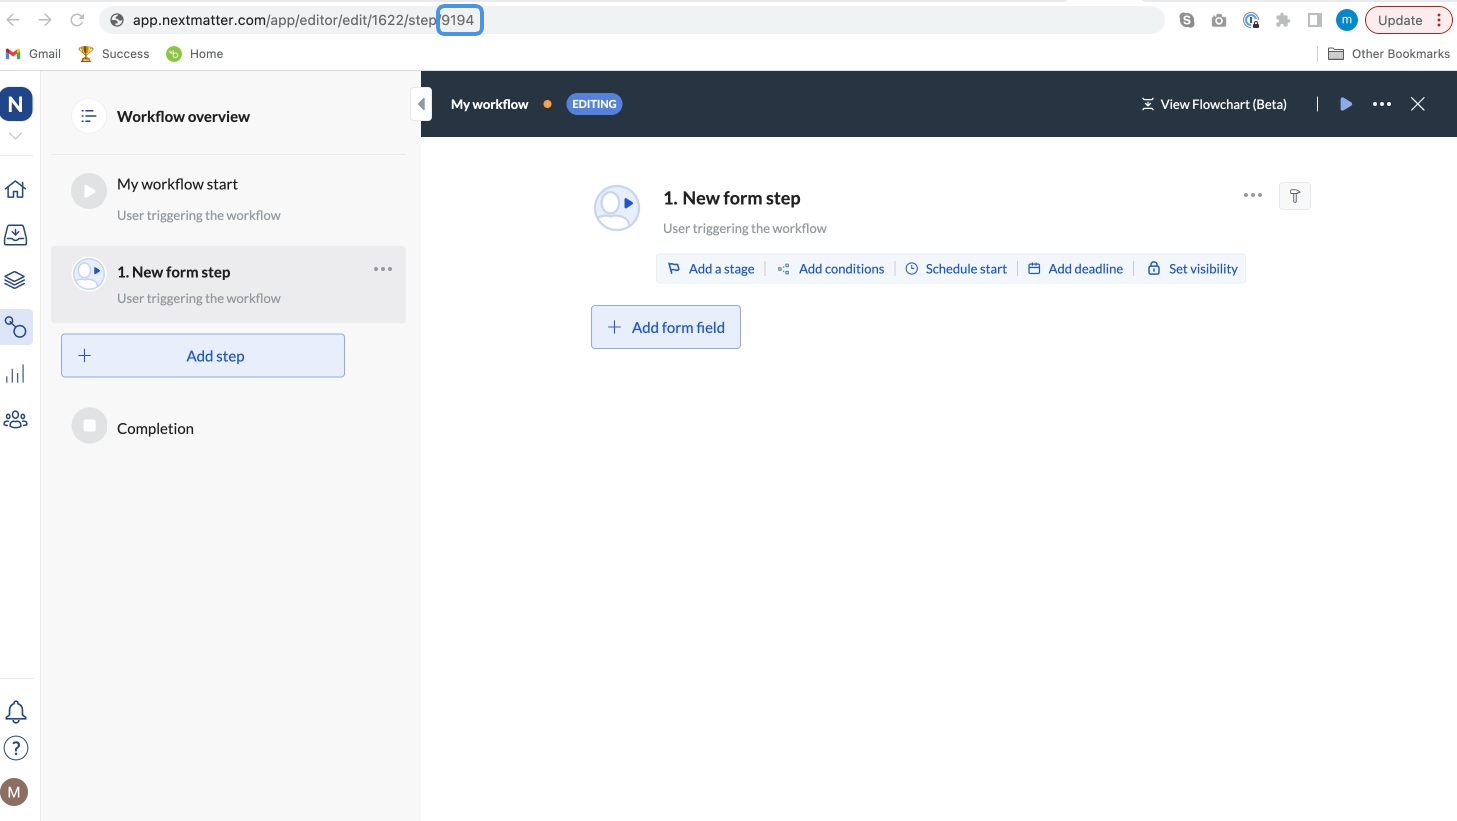
4. Click the step to which you'd like to send data.
5. Copy the step ID. It's the last number in the URL you see in your browser.
 1. In your left-hand navigation, click the **Workflows** icon.
2. Hover over the follow-up process and click on the menu icon.
3. Click **Edit workflow**.
4. Click the step to which you'd like to send data.
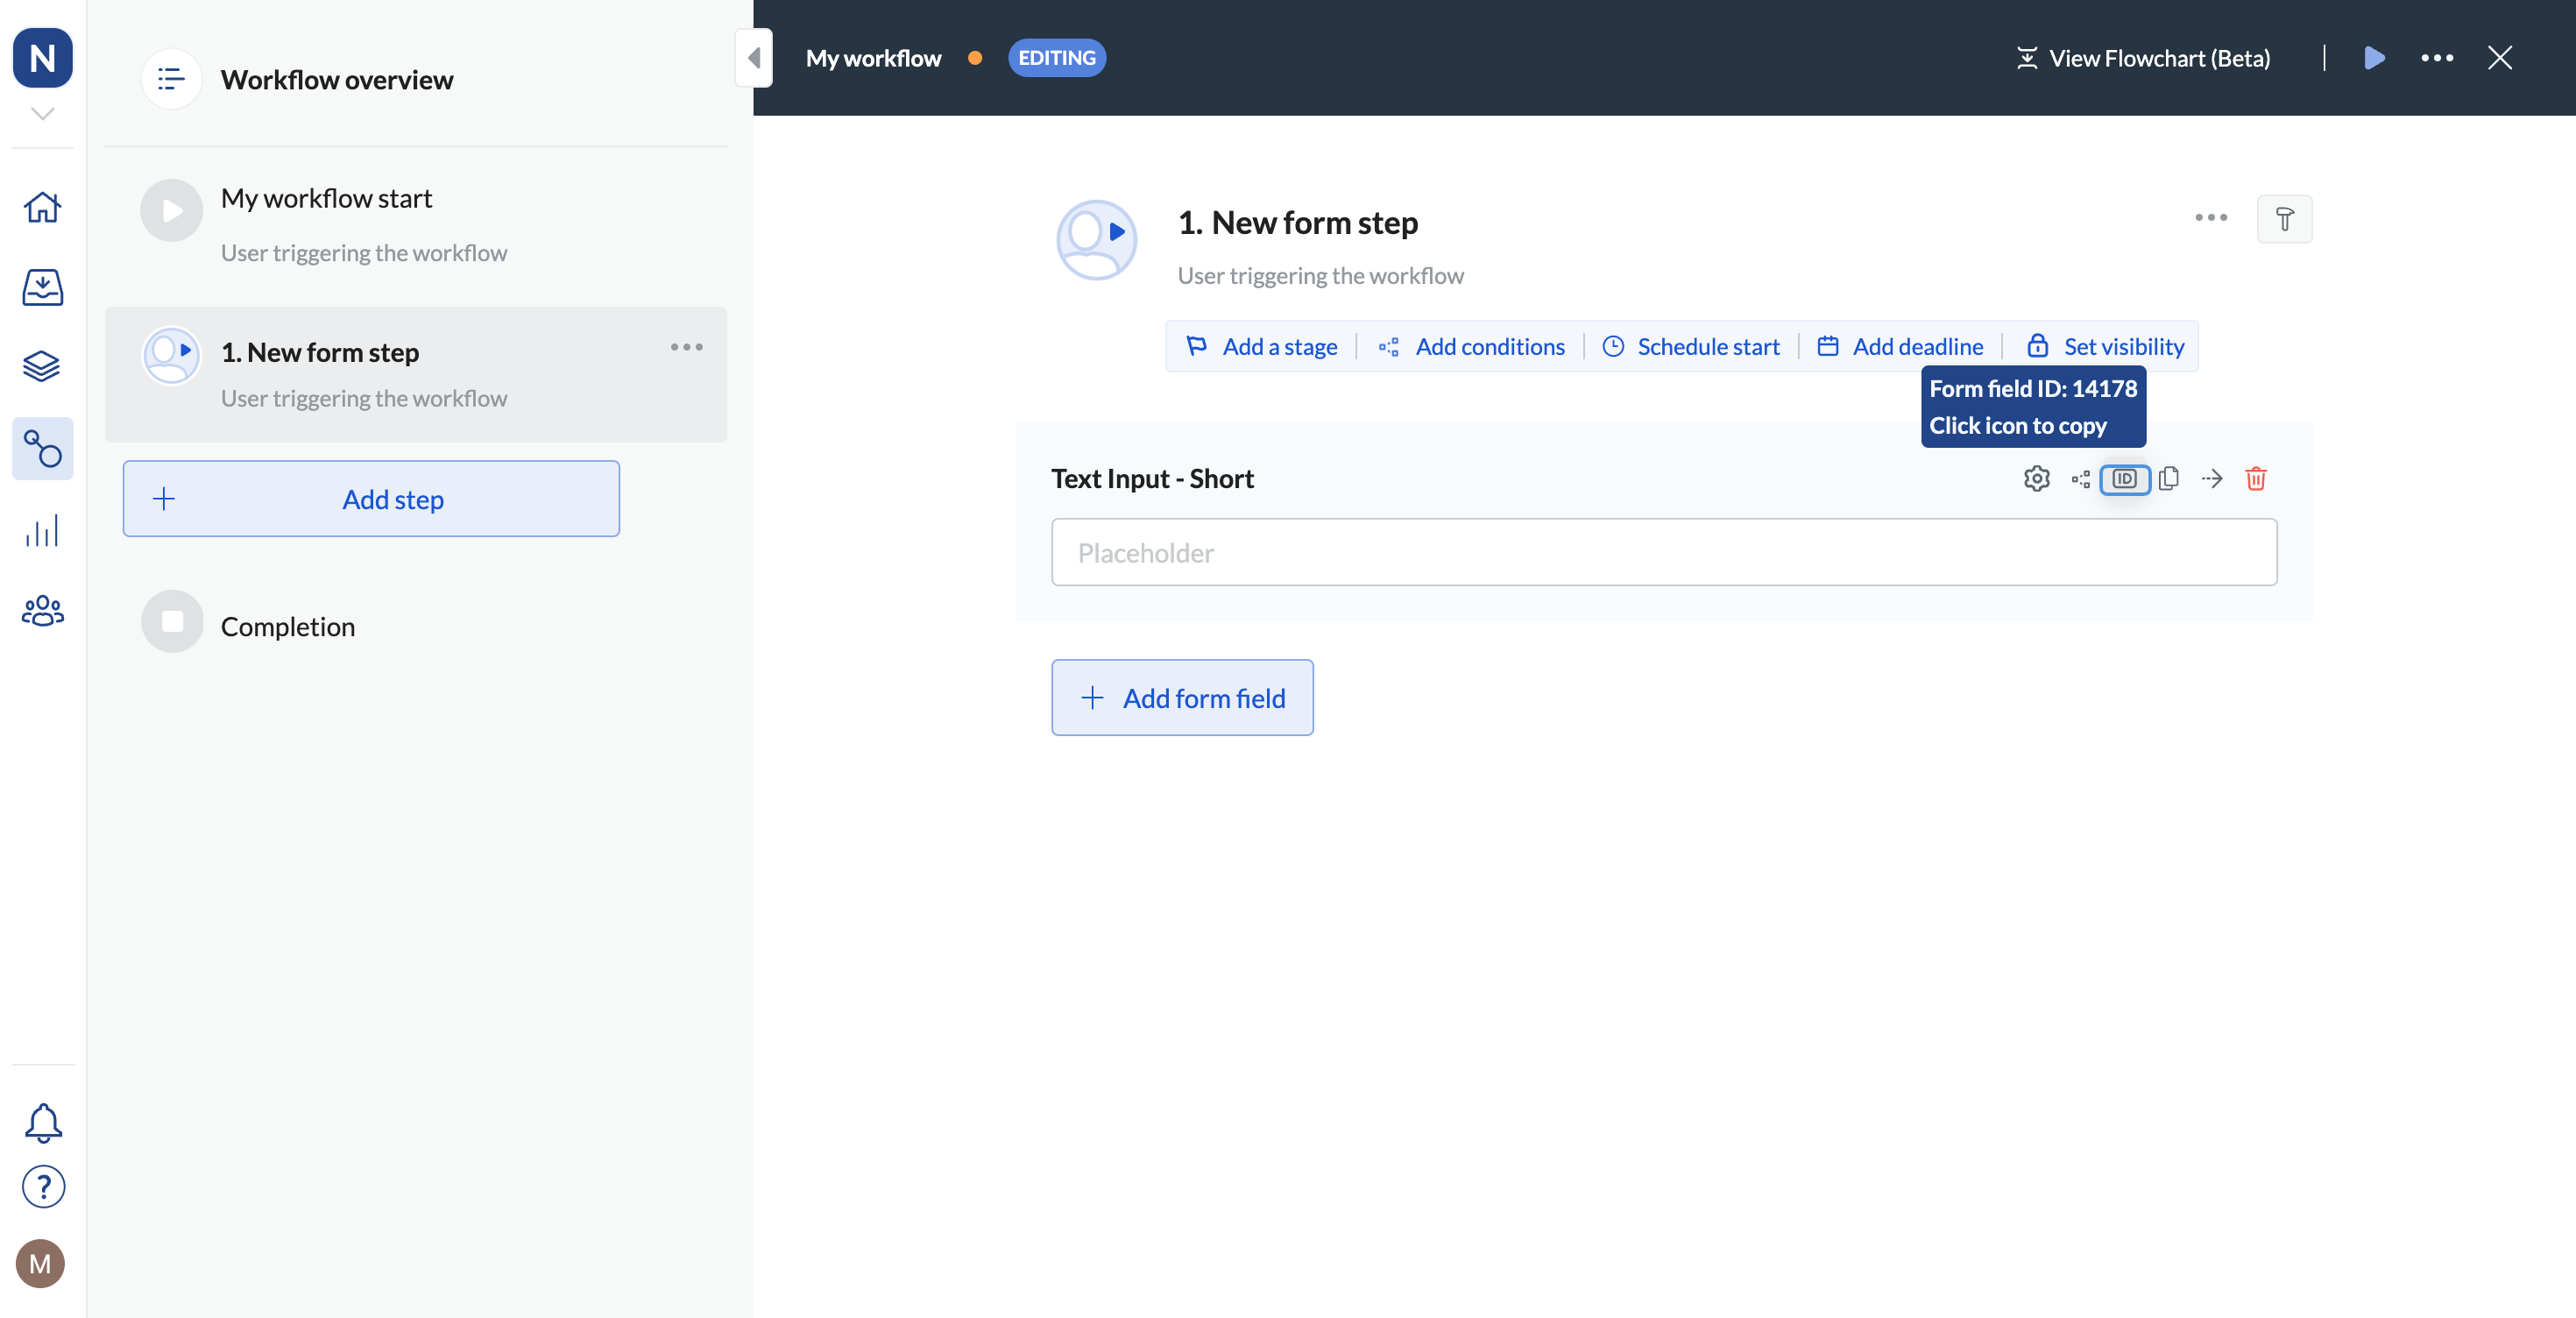
5. Click the ID icon for the field to which you want to copy data.
6. Copy **Form field ID**.
1. In your left-hand navigation, click the **Workflows** icon.
2. Hover over the follow-up process and click on the menu icon.
3. Click **Edit workflow**.
4. Click the step to which you'd like to send data.
5. Click the ID icon for the field to which you want to copy data.
6. Copy **Form field ID**.
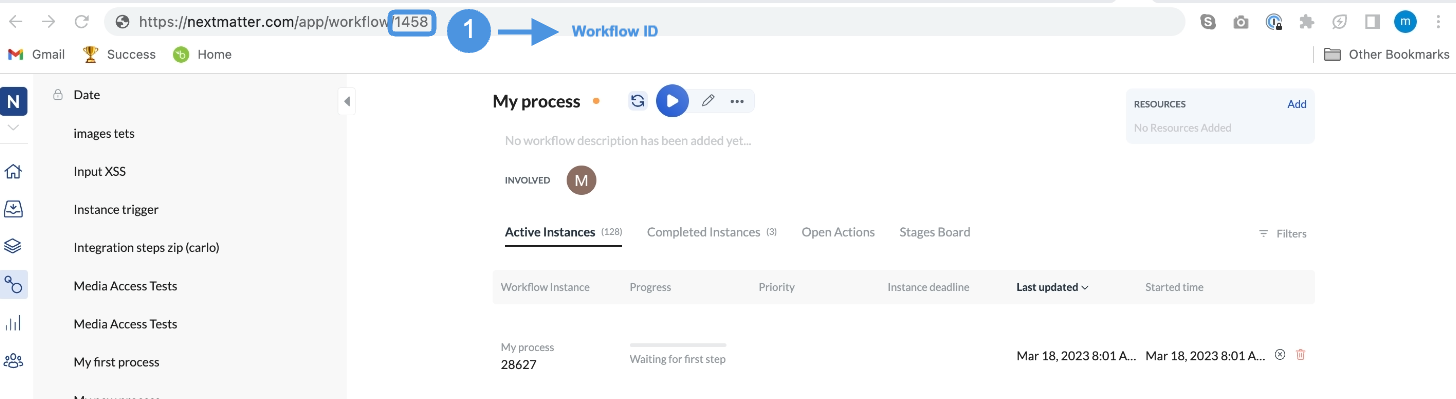
 You can get the ID by clicking the follow-up workflow and copying the number from the URL in your browser.
 * Make sure you know how to use data references. See [Data references](/docs/use-data-references).
**Good to know:** Check out our ready-made templates available when you add a step and select **Templates > 3rd party templates**. You can use the templates to create a set of pre-configured steps. Need a specific template? Click the **Contact us** button in the top right of the page and let us know.
## Activate Twilio Verify Service
1. Sign in to Twilio as an administrator.
2. Go to **Explore Products**.
3. In **All products**, scroll to the **Account security** section.
4. Click **Verify.**
5. Go to **Verify > Services**.
6. In the list of existing services, click the **+** icon. This will create a new service.
7. Give the service a name and copy the SID. You will need it in the Next Matter process.
## Configure the Next Matter integration
The OTP SMS Verification requires two workflows. One is the main process that you want to integrate with Twilio, and the other is a helper workflow that does the verification. The main process triggers the verification workflow.
The verification workflow can be used by more than one workflow. There is no need to create a separate verification workflow each time you create a new workflow.
To configure the integration, you'll need to do the following:
1. Create the verification workflow (if not previously created).
2. Set up the verification workflow.
3. Add the verification process trigger in the main workflow.
4. Set up the verification trigger steps.
### Create the verification sub-process
1. Open your workflow and add a new form step right with the data you want to collect. For example, click **+ Add Form field** and select **Short Text -Input** if you want to collect the user's surname.
2. To send the email to the user with the step to collect the data, you can create a custom integration step that will use Sendgrid integration. [See how to configure Sendgrid](/docs/integrate-with-sendgrid).
3. Configure the Sendgrid email step with the following data:
* **Method**: POST
* **URL**: `https://api.sendgrid.com/v3/mail/send`
* **Headers:** Content-Type: application/json
* **Headers:** Authorization: `Bearer SENDGRID_ENCODED_API_KEY`
* **Body** might look like the following:
```json JSON theme={null}
{
"from": {
"email": "service@[company-domain].com",
"name": "Next Matter Notifications"
},
"personalizations": [{
"to": [{
"email": "{81. Provide details - Customer email - Input (plain)} "
}],
"dynamic_template_data": {
"email-subject": "Your sandbox credentials are ready!",
"email-content": "Hi {81. Provide details - Customer name - Input (plain)},
* Make sure you know how to use data references. See [Data references](/docs/use-data-references).
**Good to know:** Check out our ready-made templates available when you add a step and select **Templates > 3rd party templates**. You can use the templates to create a set of pre-configured steps. Need a specific template? Click the **Contact us** button in the top right of the page and let us know.
## Activate Twilio Verify Service
1. Sign in to Twilio as an administrator.
2. Go to **Explore Products**.
3. In **All products**, scroll to the **Account security** section.
4. Click **Verify.**
5. Go to **Verify > Services**.
6. In the list of existing services, click the **+** icon. This will create a new service.
7. Give the service a name and copy the SID. You will need it in the Next Matter process.
## Configure the Next Matter integration
The OTP SMS Verification requires two workflows. One is the main process that you want to integrate with Twilio, and the other is a helper workflow that does the verification. The main process triggers the verification workflow.
The verification workflow can be used by more than one workflow. There is no need to create a separate verification workflow each time you create a new workflow.
To configure the integration, you'll need to do the following:
1. Create the verification workflow (if not previously created).
2. Set up the verification workflow.
3. Add the verification process trigger in the main workflow.
4. Set up the verification trigger steps.
### Create the verification sub-process
1. Open your workflow and add a new form step right with the data you want to collect. For example, click **+ Add Form field** and select **Short Text -Input** if you want to collect the user's surname.
2. To send the email to the user with the step to collect the data, you can create a custom integration step that will use Sendgrid integration. [See how to configure Sendgrid](/docs/integrate-with-sendgrid).
3. Configure the Sendgrid email step with the following data:
* **Method**: POST
* **URL**: `https://api.sendgrid.com/v3/mail/send`
* **Headers:** Content-Type: application/json
* **Headers:** Authorization: `Bearer SENDGRID_ENCODED_API_KEY`
* **Body** might look like the following:
```json JSON theme={null}
{
"from": {
"email": "service@[company-domain].com",
"name": "Next Matter Notifications"
},
"personalizations": [{
"to": [{
"email": "{81. Provide details - Customer email - Input (plain)} "
}],
"dynamic_template_data": {
"email-subject": "Your sandbox credentials are ready!",
"email-content": "Hi {81. Provide details - Customer name - Input (plain)},
Setup for your sandbox has been completed and your credentials are ready.
Please provide your input here
with this secure form
of where you want to get the following notifications and the SMS two-factor authentication."
}
}],
"template_id": "d-1aa0b4cd59214c18924a28c96ed78f7f"
}
```
4. Create a step that's an **instruction** assigned to the external user. The user will see these instructions when they click the public link that's provided in the email. Click **Settings** and enter the following in the Instruction field:
```
Click the Complete button, once you are ready to do the 2-Factor Authentification.
Go to this page immediately and
enter the code that you have received on your phone
(will only work once you Click Complete): {89. Verify yourself - Public URL}
```
5. Create a new step that's **Integration > Custom integration**. This step will send a request to Twilio to send a code to the user's phone. Enter the following in the step's **Settings**:
* **Method**: POST
* **URL**: `https://verify.twilio.com/v2/Services/TWILIO_VERIFY_SERVICE_SID/Verifications`
* **Headers:** Content-Type: application/x-www-form-urlencoded
* **Headers:** Authorization: `Basic TWILIO_ENCODED_API_KEY`
* **Body** might look like the following:
```
To=%2B{81. Provide details - Phone number. (Note: please include 1 before the area code.) - Input (plain)}&Channel=sms
```
* Select to skip this step on failure.
* Click **+ Add variable** and create an `error_message` variable with the value of `$.message` and a `status` variable with the value of `$.status`.
6. Save your changes.
7. Click **+ Add step** and select the step to be **Integration > Custom integration**. This step will automatically complete the verification process and send data to the main workflow. Enter the following in the step's **Settings**:
* **Method**: POST
* **URL**: `https://core.nextmatter.com/api/instances/{InstanceID}/complete_step/`
* **Headers:** Content-Type: application/json
* **Headers:** Authorization: `Api-Key NEXT_MATTER_API_KEY`
* **Body** might look like the following:
```json theme={null}
{
"step_id": "STEP_ID",
"actions": [
{
"action_id": "ACTION_ID1",
"input_object": {
"radioItemSelected": "{84. Send Text - Integration step - status (plain)}"
}
},
{
"action_id": "ACTION_ID2",
"input_object": {
"radioItemSelected": "{84. Send Text - Integration step - error_message (plain)}"
}
},
{
"action_id": "ACTION_ID3",
"input_object": {}
}
]
}
```
**Note:** Make sure to make the step non-blocking (**... > Make non-blocking**)
8. Save your changes.
9. Create a form step allowing internal users to verify if Twilio reported any error messages.
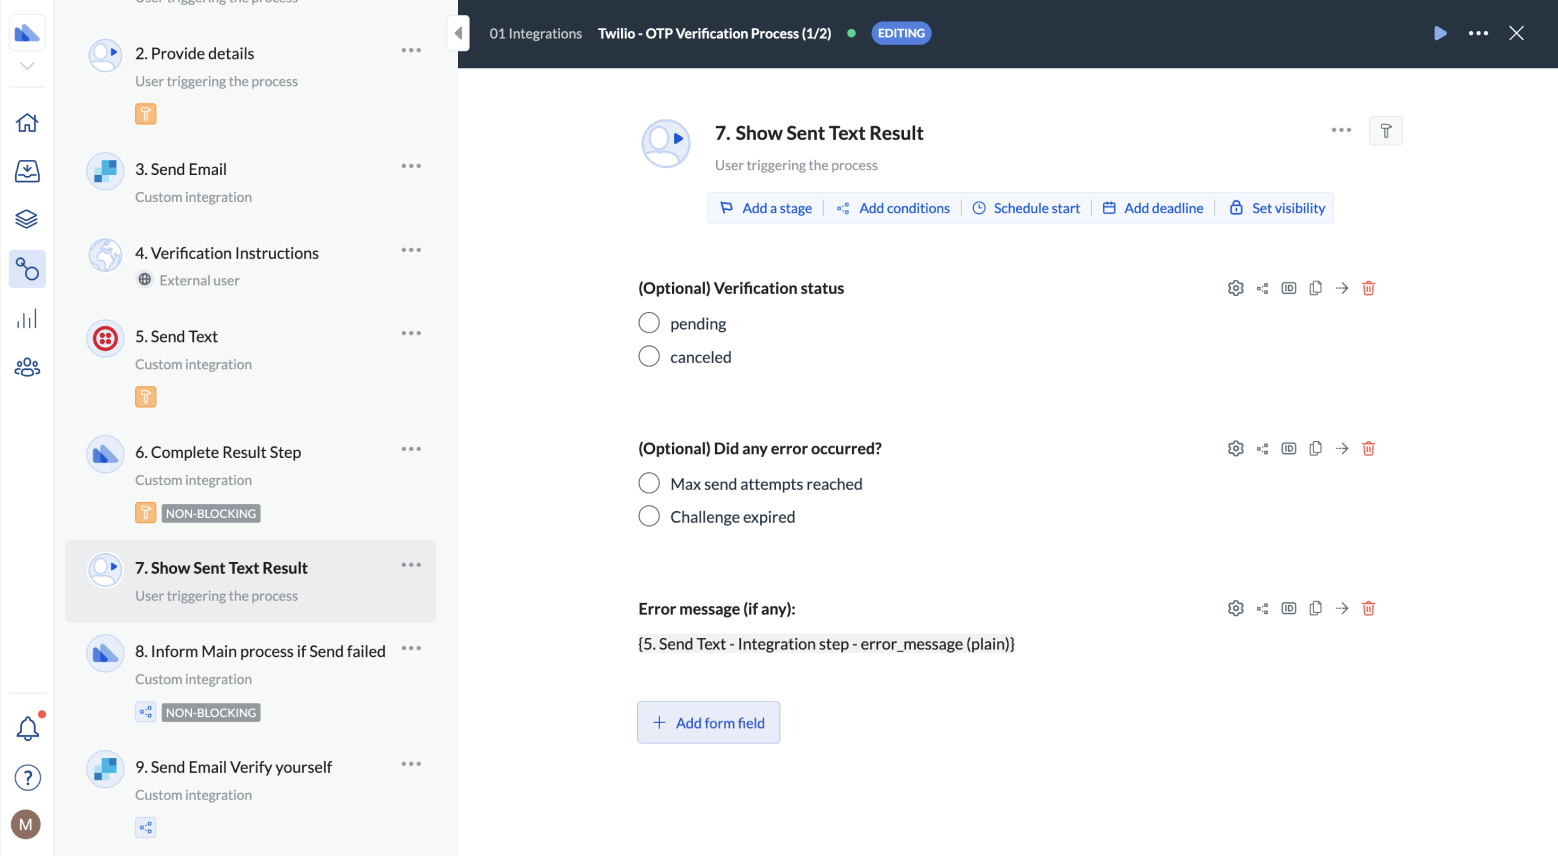 **The next 4 steps below verify if the code entered by the user is correct.**
10. Create an integration step to inform the main process that the verification failed. Enter the following in the step's **Settings**:
* **Method**: POST
* **URL**: `https://core.nextmatter.com/api/instances/{2. Provide details - Output instance id - Input}/complete_step/`
* **Headers:** Content-Type: application/json
* **Headers:** Authorization: `API Key NEXT_MATTER_API_KEY`
* **Body** might look like the following:
```json theme={null}
{
"step_id": "{2. Provide details - Target outcome of check step - Input (plain)}",
"actions": [
{
"action_id": "{2. Provide details - Action ID of Radio Button - Input (plain)}",
"input_object": {
"radioItemSelected": "{5. Send Text - Integration step - error_message (plain)}"
}
}
]
}
```
11. Save your changes.
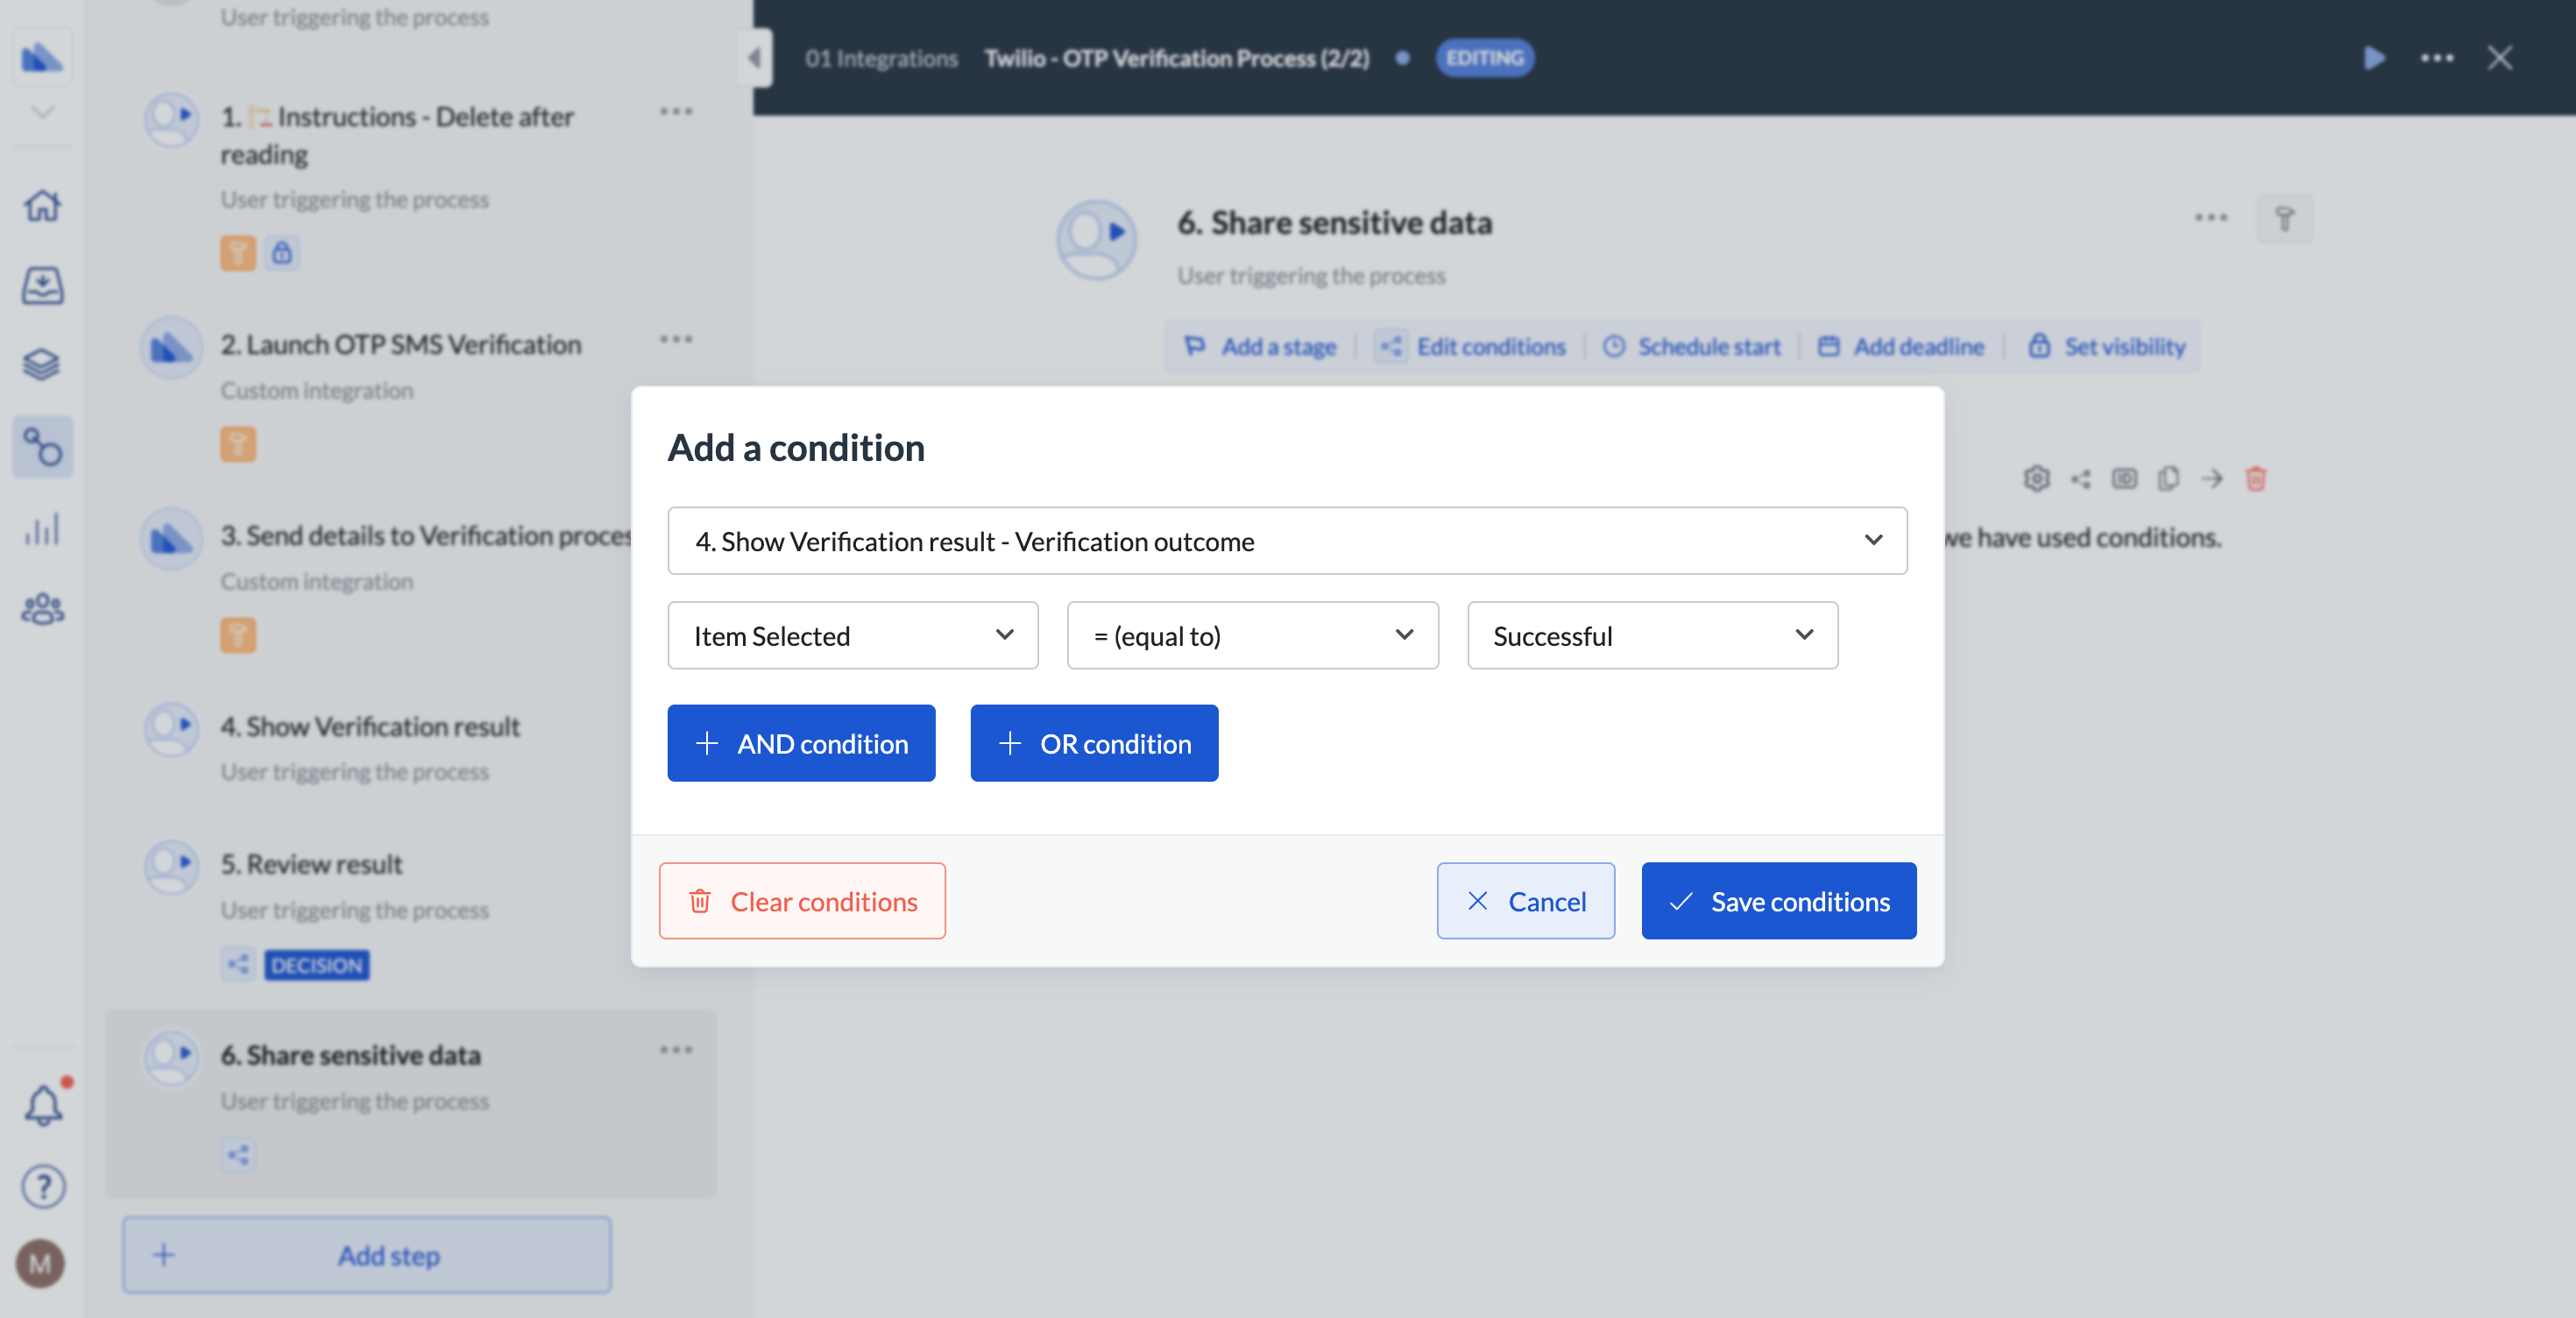
12. This step is conditional and is only triggered if the verification status is canceled. Click **Add condition**, and specify that the step should only be triggered if the previous step didn't contain the pending status.
**The next 4 steps below verify if the code entered by the user is correct.**
10. Create an integration step to inform the main process that the verification failed. Enter the following in the step's **Settings**:
* **Method**: POST
* **URL**: `https://core.nextmatter.com/api/instances/{2. Provide details - Output instance id - Input}/complete_step/`
* **Headers:** Content-Type: application/json
* **Headers:** Authorization: `API Key NEXT_MATTER_API_KEY`
* **Body** might look like the following:
```json theme={null}
{
"step_id": "{2. Provide details - Target outcome of check step - Input (plain)}",
"actions": [
{
"action_id": "{2. Provide details - Action ID of Radio Button - Input (plain)}",
"input_object": {
"radioItemSelected": "{5. Send Text - Integration step - error_message (plain)}"
}
}
]
}
```
11. Save your changes.
12. This step is conditional and is only triggered if the verification status is canceled. Click **Add condition**, and specify that the step should only be triggered if the previous step didn't contain the pending status. 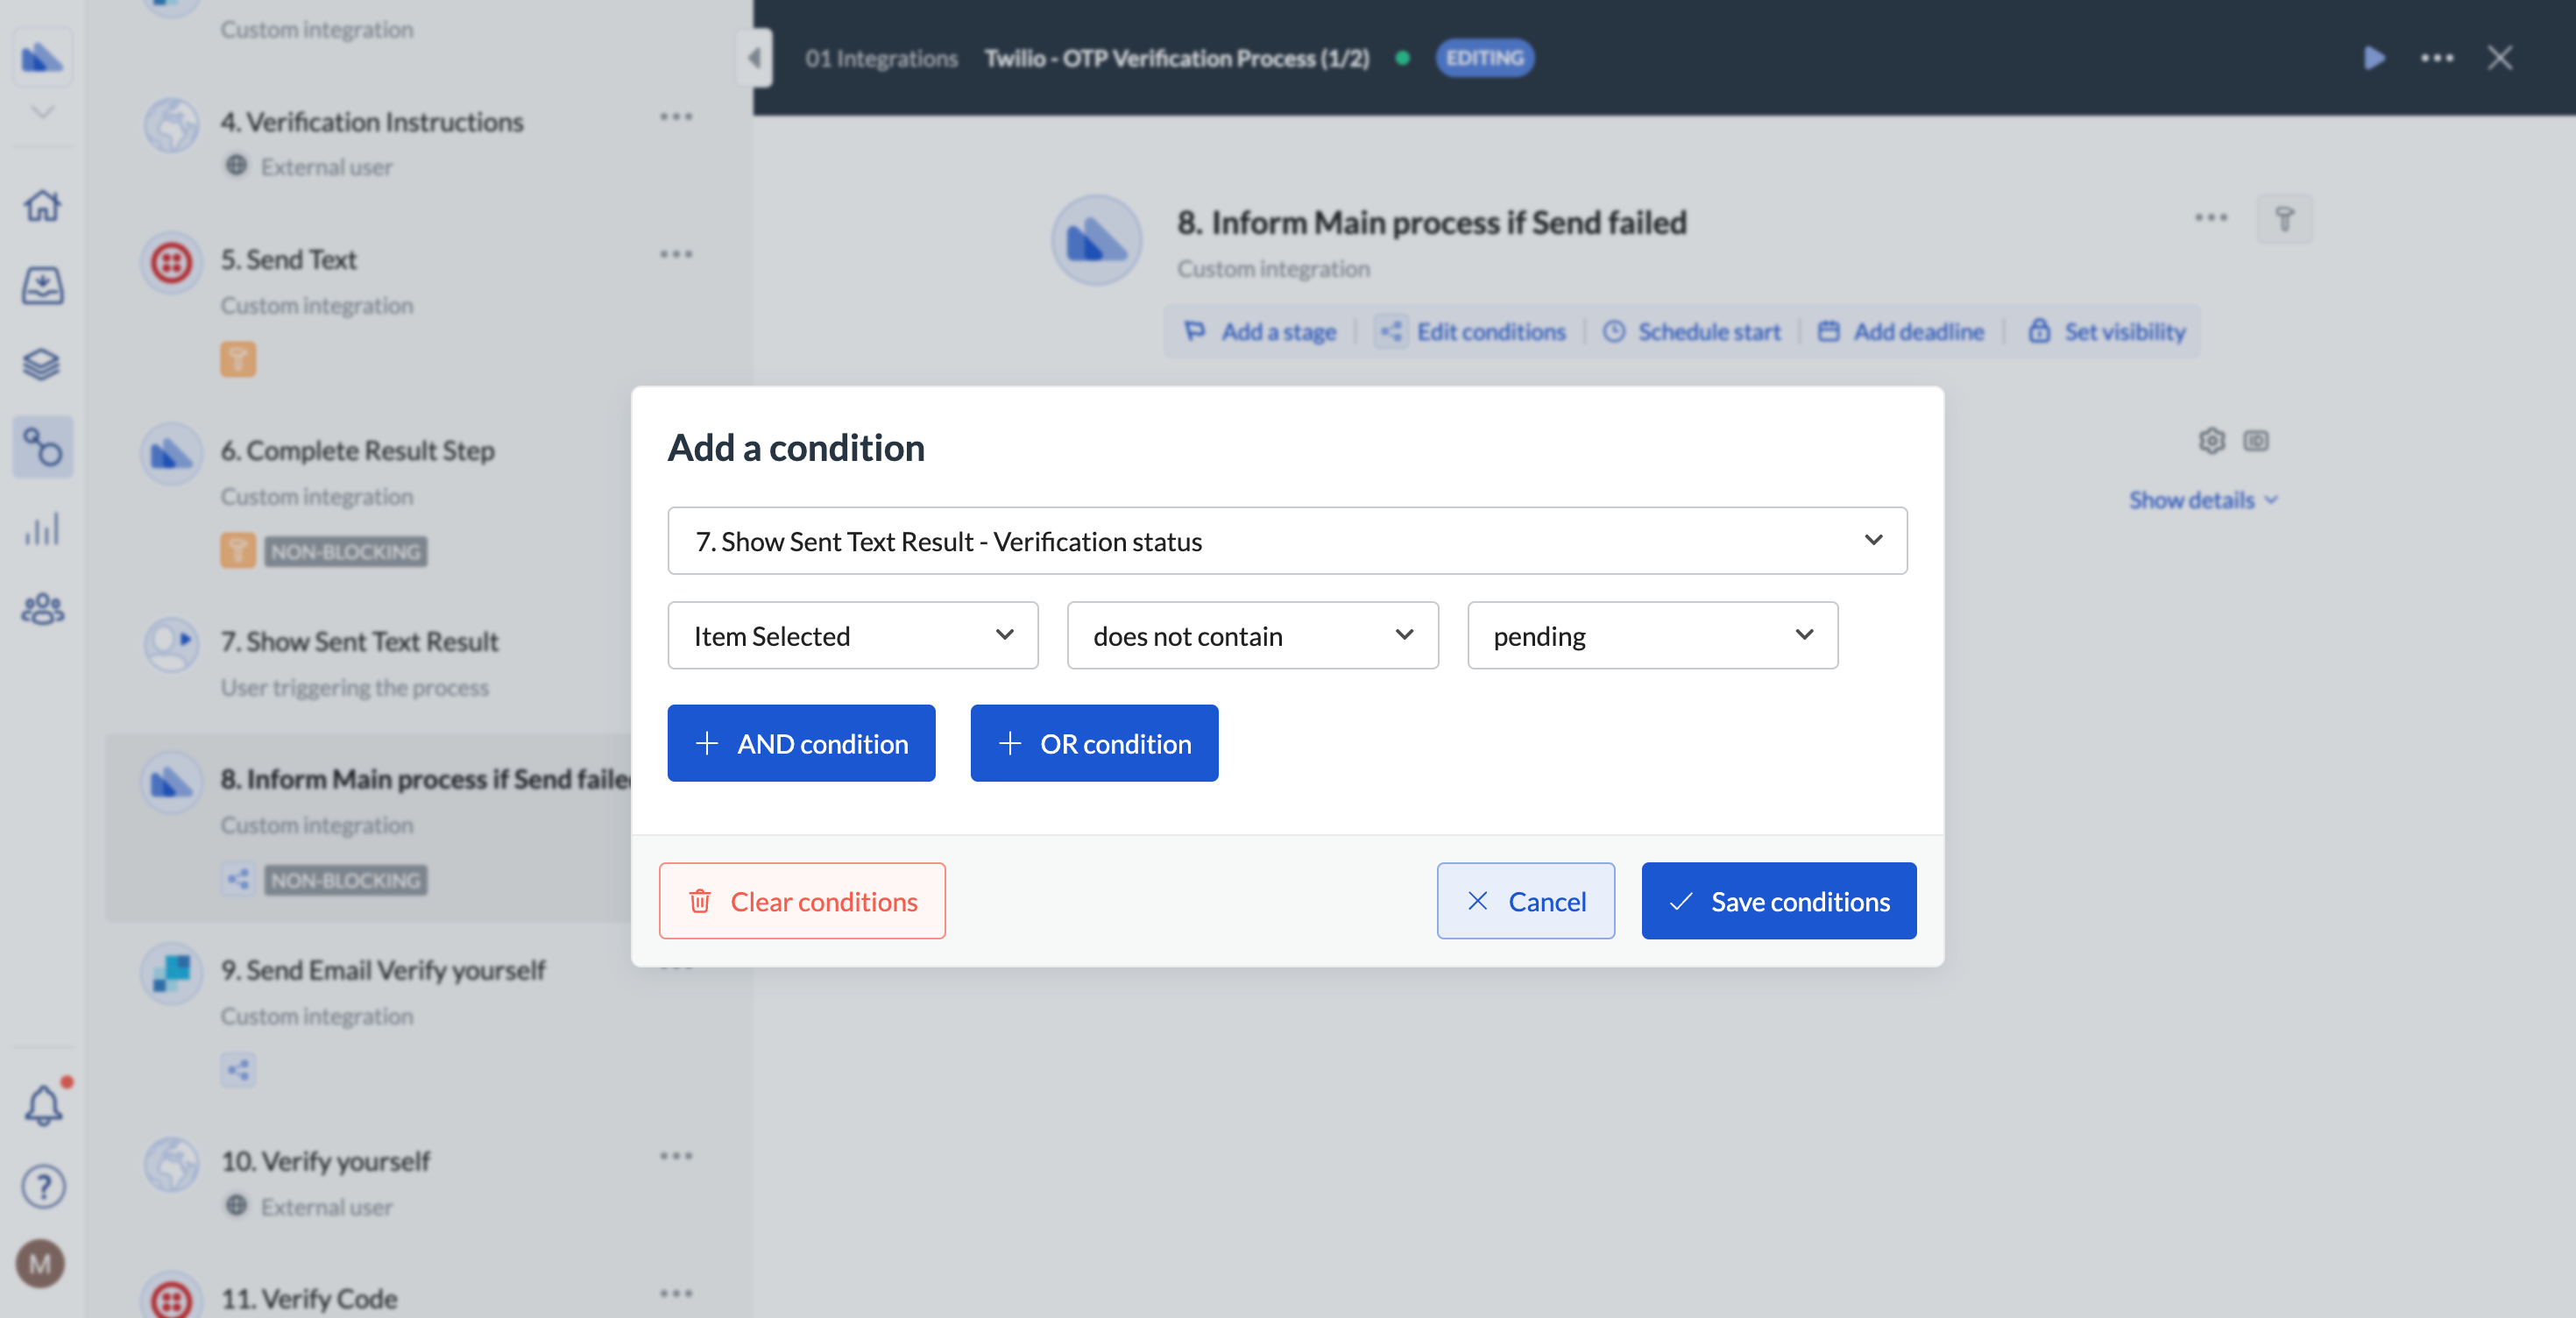 13. Save your condition.
14. Create another Sendgrid integration step **with a condition** for when the status is pending. In this case, you want another email to be sent out to the user to complete the verification. Use the setting details from step 3, however, consider changing the **Body** to the following:
```json theme={null}
{
"from": {
"email": "service@[company-domain].com",
"name": "Verify by Next Matter"
},
"personalizations": [{
"to": [{
"email": "{2. Provide details - Customer email - Input (plain)}"
}],
"dynamic_template_data": {
"email-subject": "2 Factor Verification",
"email-content": "Please provide your access token with this secure link. Never share your token with anyone."
}
}],
"template_id": "d-1aa0b4cd59214c18924a28c96ed78f7f"
}
```
15. Click **Add conditions** to create your condition for step 12.
16. Create a form step with a field for the user to enter the verification code. Assign this step to the external user.
13. Save your condition.
14. Create another Sendgrid integration step **with a condition** for when the status is pending. In this case, you want another email to be sent out to the user to complete the verification. Use the setting details from step 3, however, consider changing the **Body** to the following:
```json theme={null}
{
"from": {
"email": "service@[company-domain].com",
"name": "Verify by Next Matter"
},
"personalizations": [{
"to": [{
"email": "{2. Provide details - Customer email - Input (plain)}"
}],
"dynamic_template_data": {
"email-subject": "2 Factor Verification",
"email-content": "Please provide your access token with this secure link. Never share your token with anyone."
}
}],
"template_id": "d-1aa0b4cd59214c18924a28c96ed78f7f"
}
```
15. Click **Add conditions** to create your condition for step 12.
16. Create a form step with a field for the user to enter the verification code. Assign this step to the external user.
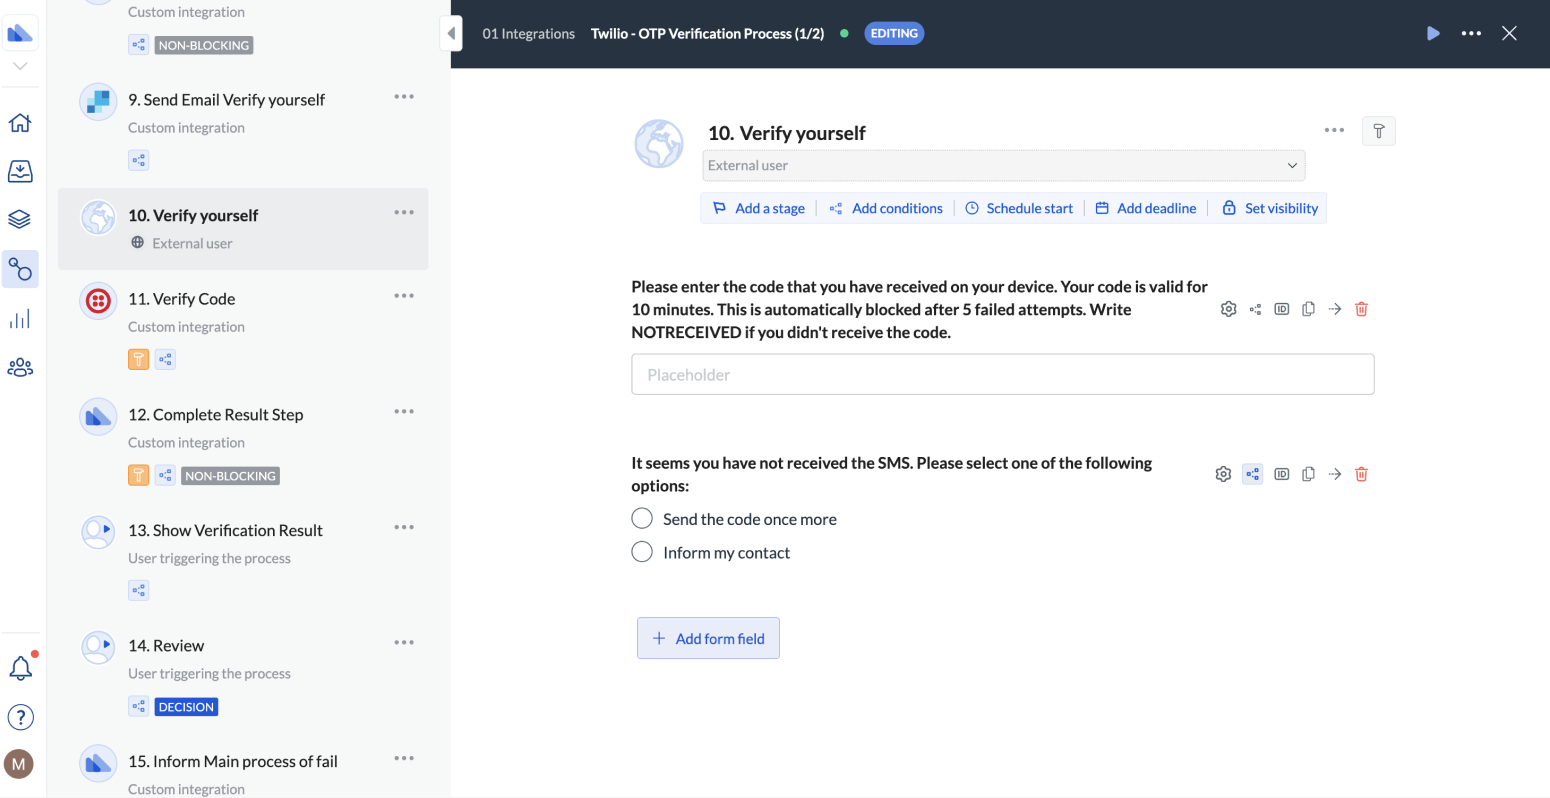 17. Create an integration step for Twilio to verify the provided code. Click the **Settings** gear icon to configure the step:
* **Method**: POST
* **URL**: `https://verify.twilio.com/v2/Services/TWILIO_VERIFY_SERVICE_SID/VerificationCheck`
* **Headers:** Content-Type: application/x-www-form-urlencoded
* **Headers:** Authorization: `Basic TWILIO_ENCODED_API_KEY`
* **Body** might look like the following:
```
To=%2B{2. Provide details - Phone number. (Note: please include 1 before the area code.) - Input (plain)}&Code={10. Verify yourself - Please enter the code that you have received on your device. Your code is valid for 10 minutes. This is automatically blocked after 5 failed attempts. Write NOTRECEIVED if you didn't receive the code. - Input (plain)}
```
* Select to skip this step on failure.
* Click **+ Add variable** and create an `error_message` variable with the value of `$.message` and an `isOTPvalid` variable with the value of `$.status`.
18. Save your changes.
19. Click **Add conditions**, and create a condition for step 15 to run when step 14 didn't contain the NOTRECEIVED input.
20. Create a form step with the field to show the verification result (and any errors Twilio might have sent). Add a condition to this step to run if the verification step (step 10 was successfully completed).
17. Create an integration step for Twilio to verify the provided code. Click the **Settings** gear icon to configure the step:
* **Method**: POST
* **URL**: `https://verify.twilio.com/v2/Services/TWILIO_VERIFY_SERVICE_SID/VerificationCheck`
* **Headers:** Content-Type: application/x-www-form-urlencoded
* **Headers:** Authorization: `Basic TWILIO_ENCODED_API_KEY`
* **Body** might look like the following:
```
To=%2B{2. Provide details - Phone number. (Note: please include 1 before the area code.) - Input (plain)}&Code={10. Verify yourself - Please enter the code that you have received on your device. Your code is valid for 10 minutes. This is automatically blocked after 5 failed attempts. Write NOTRECEIVED if you didn't receive the code. - Input (plain)}
```
* Select to skip this step on failure.
* Click **+ Add variable** and create an `error_message` variable with the value of `$.message` and an `isOTPvalid` variable with the value of `$.status`.
18. Save your changes.
19. Click **Add conditions**, and create a condition for step 15 to run when step 14 didn't contain the NOTRECEIVED input.
20. Create a form step with the field to show the verification result (and any errors Twilio might have sent). Add a condition to this step to run if the verification step (step 10 was successfully completed).
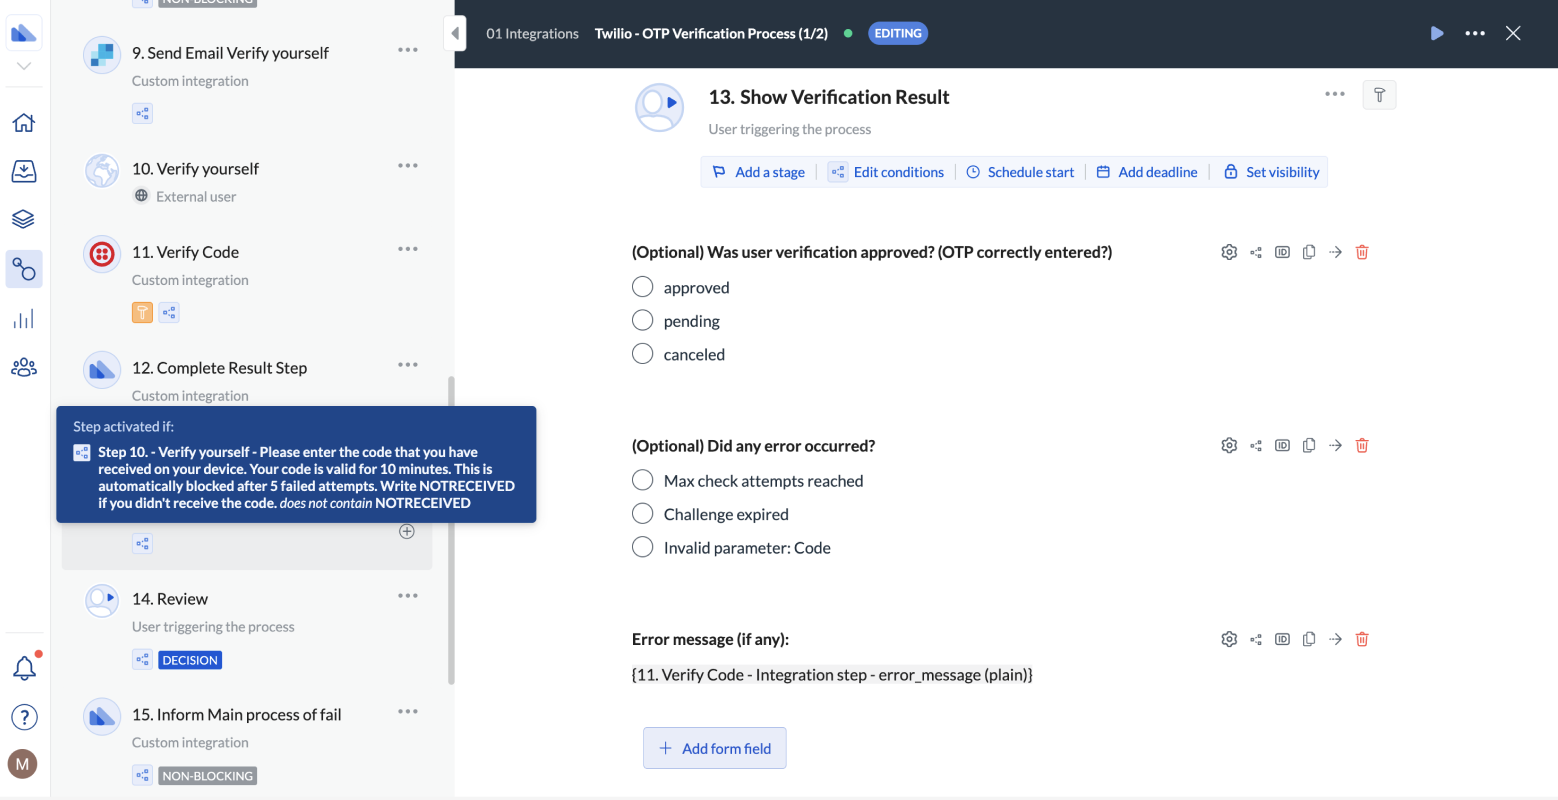 21. Create a step with a routing form field to verify how to proceed in case of verification errors. The step can go back to the step to re-send the code, but in the case of a wrong number can be modified.
You can add the following description for the user:
OTP code entered was not valid. Please select how to proceed. Consider that 'Return to 2. Send OTP' option will send the same code again to allow another attempt. After 5 attempts, the system gets blocked.
The step should have the following options:
* Confirm and continue
* Return to the Provide details step
* Decline and stop workflow
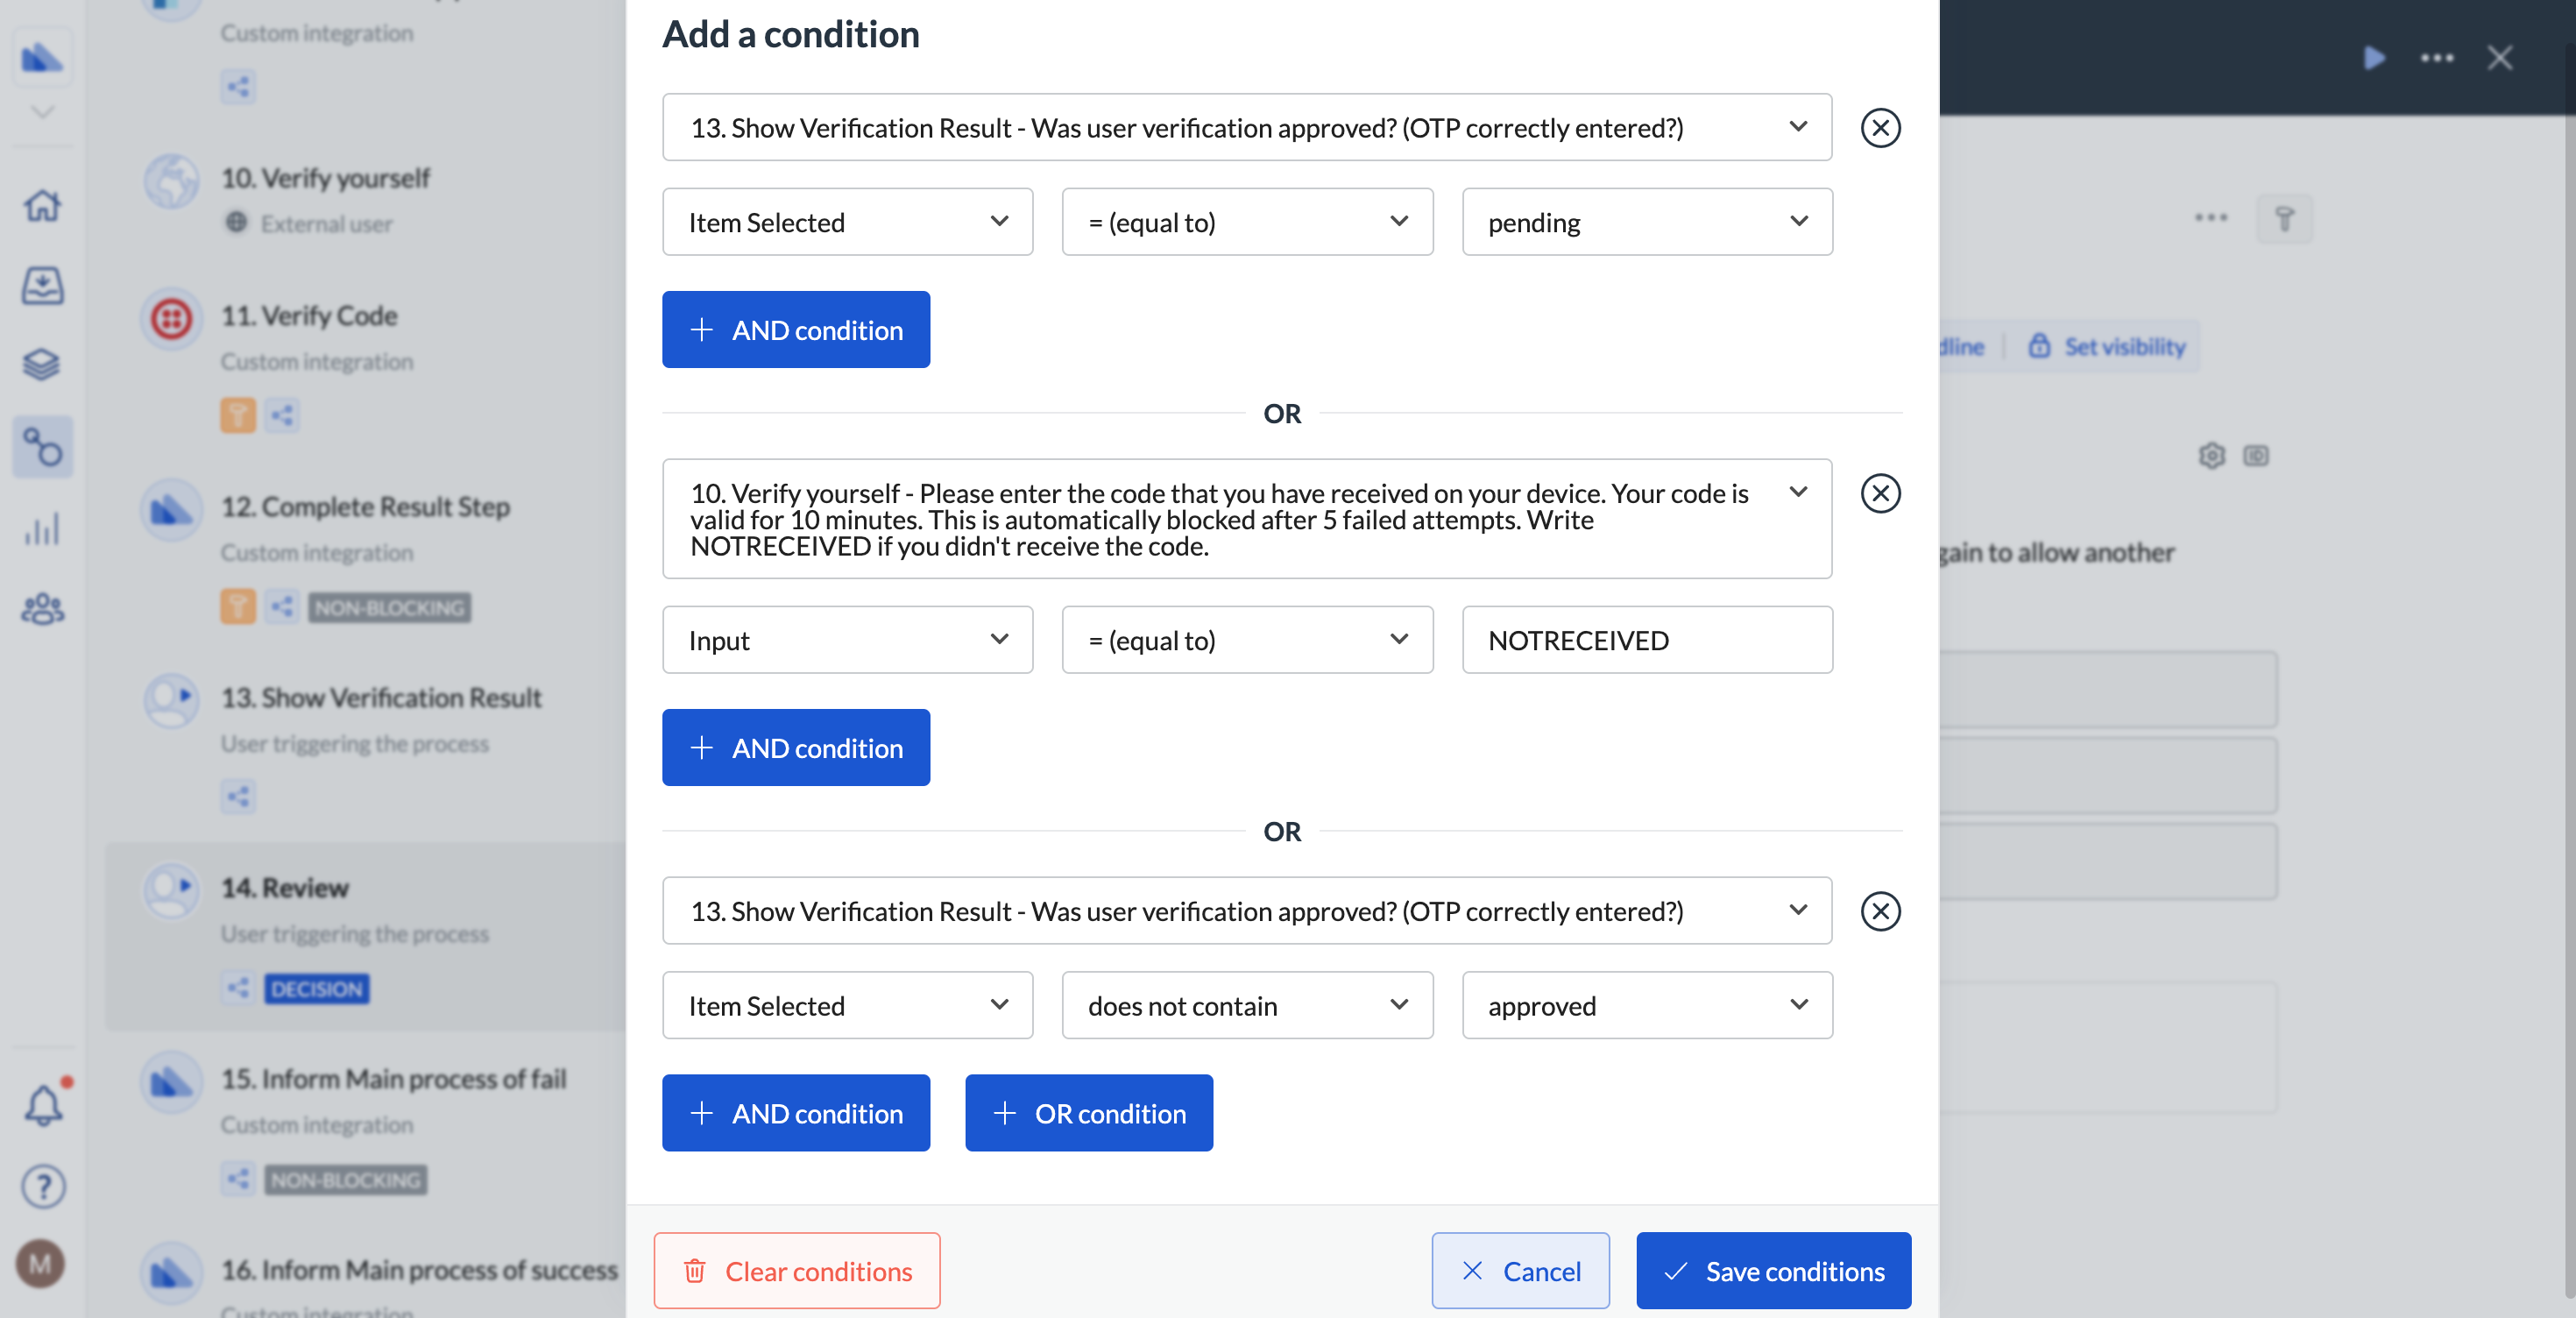
22. Click **Add conditions** to create the conditions for the step to run in the case the verification was not successful (code was not received, got stuck on send, or was not approved)
21. Create a step with a routing form field to verify how to proceed in case of verification errors. The step can go back to the step to re-send the code, but in the case of a wrong number can be modified.
You can add the following description for the user:
OTP code entered was not valid. Please select how to proceed. Consider that 'Return to 2. Send OTP' option will send the same code again to allow another attempt. After 5 attempts, the system gets blocked.
The step should have the following options:
* Confirm and continue
* Return to the Provide details step
* Decline and stop workflow
22. Click **Add conditions** to create the conditions for the step to run in the case the verification was not successful (code was not received, got stuck on send, or was not approved)
 The next 2 steps are conditional steps informing the main workflow of a verification failure or success.
23. Create an integration step to inform the main workflow of verification failure. Click the **Settings** gear icon to configure the step:
* **Method**: POST
* **URL**: `https://core.nextmatter.com/api/instances/{2. Provide details - Output instance id - Input}/complete_step/`
* **Headers:** Content-Type: application/json
* **Headers:** Authorization: `API-Key NEXTMATTER_API_KEY`
* **Body** might look like the following:
```json theme={null}
{
"step_id": "{2. Provide details - Target outcome of check step - Input (plain)}",
"actions": [
{
"action_id": "{2. Provide details - Action ID of Radio Button - Input (plain)}",
"input_object": {
"radioItemSelected": "{11. Verify Code - Integration step - error_message (plain)}"
}
}
]
}
```
24. Click **Add conditions** to add the conditions to the step to run when verification was not successful:
The next 2 steps are conditional steps informing the main workflow of a verification failure or success.
23. Create an integration step to inform the main workflow of verification failure. Click the **Settings** gear icon to configure the step:
* **Method**: POST
* **URL**: `https://core.nextmatter.com/api/instances/{2. Provide details - Output instance id - Input}/complete_step/`
* **Headers:** Content-Type: application/json
* **Headers:** Authorization: `API-Key NEXTMATTER_API_KEY`
* **Body** might look like the following:
```json theme={null}
{
"step_id": "{2. Provide details - Target outcome of check step - Input (plain)}",
"actions": [
{
"action_id": "{2. Provide details - Action ID of Radio Button - Input (plain)}",
"input_object": {
"radioItemSelected": "{11. Verify Code - Integration step - error_message (plain)}"
}
}
]
}
```
24. Click **Add conditions** to add the conditions to the step to run when verification was not successful: 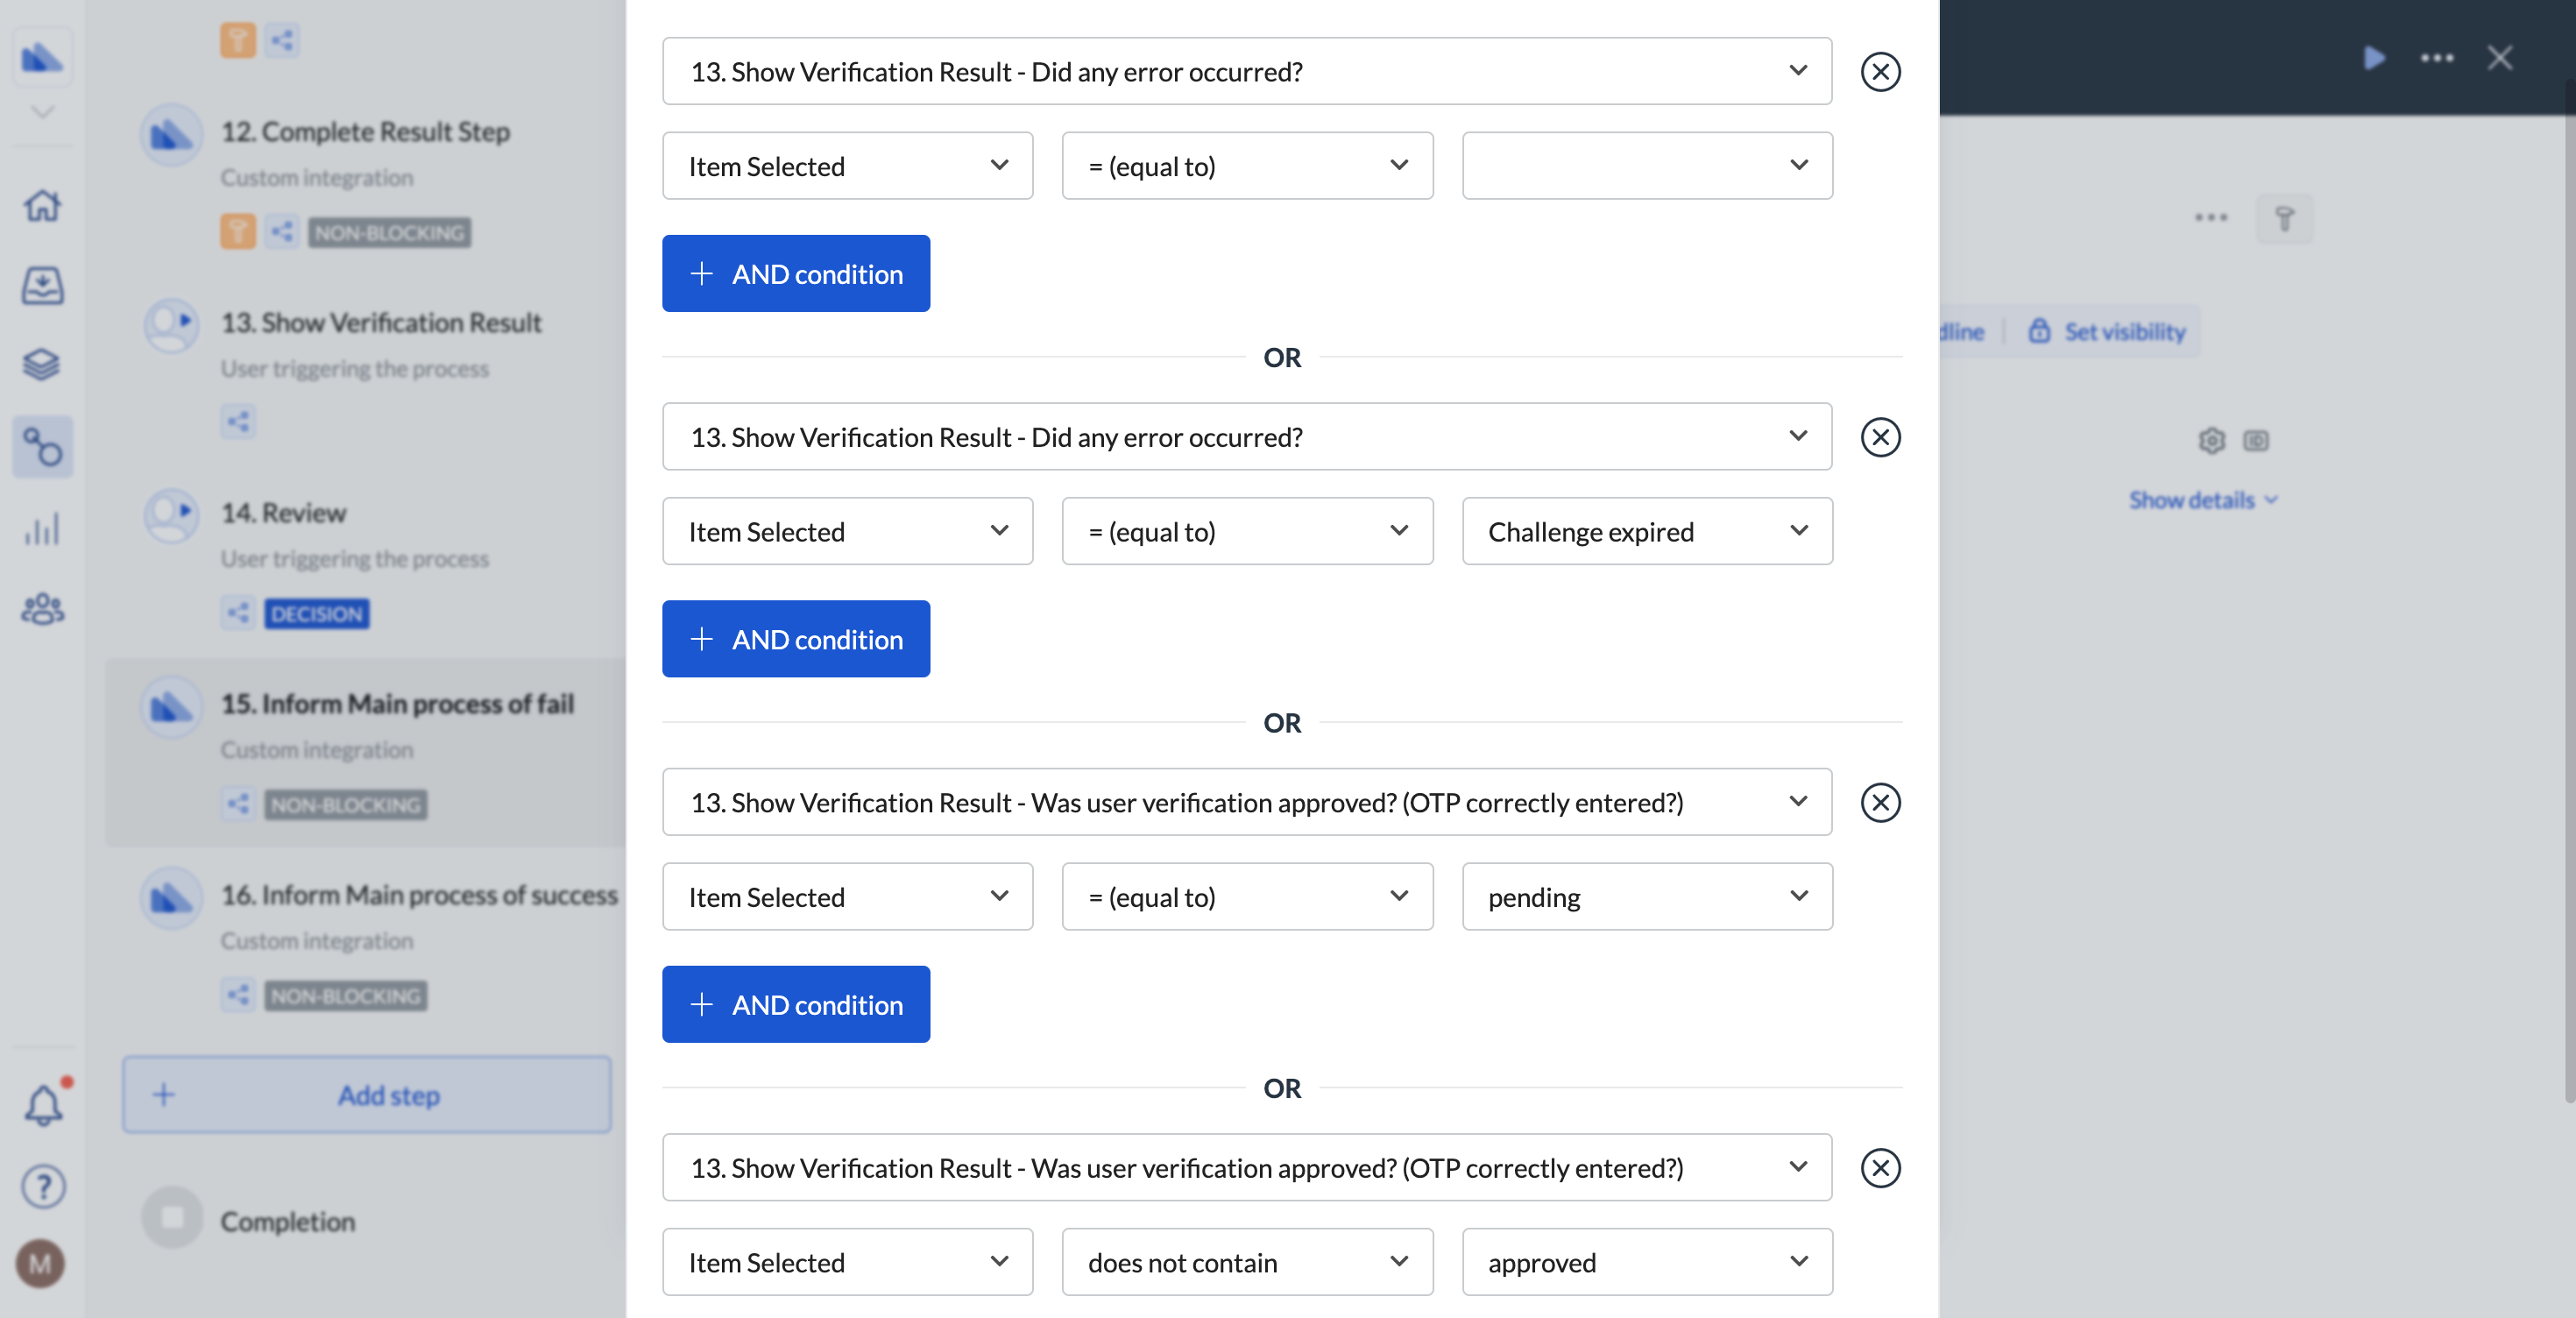 25. Click **...** in the left-hand process panel and select **Make non-blocking**.
26. Create an integration step to inform the main workflow of verification failure. Click the **Settings** gear icon to configure the step:
* **Method**: POST
* **URL**: `https://core.nextmatter.com/api/instances/{2. Provide details - Output instance id - Input}/complete_step/`
* **Headers:** Content-Type: application/json
* **Headers:** Authorization: `API-Key NEXTMATTER_API_KEY`
* **Body** might look like the following:
```json theme={null}
{
"step_id": "{2. Provide details - Target outcome of check step - Input (plain)}",
"actions": [
{
"action_id": "{2. Provide details - Action ID of Radio Button - Input (plain)}",
"input_object": {
"radioItemSelected": "Successful"
}
}
]
}
```
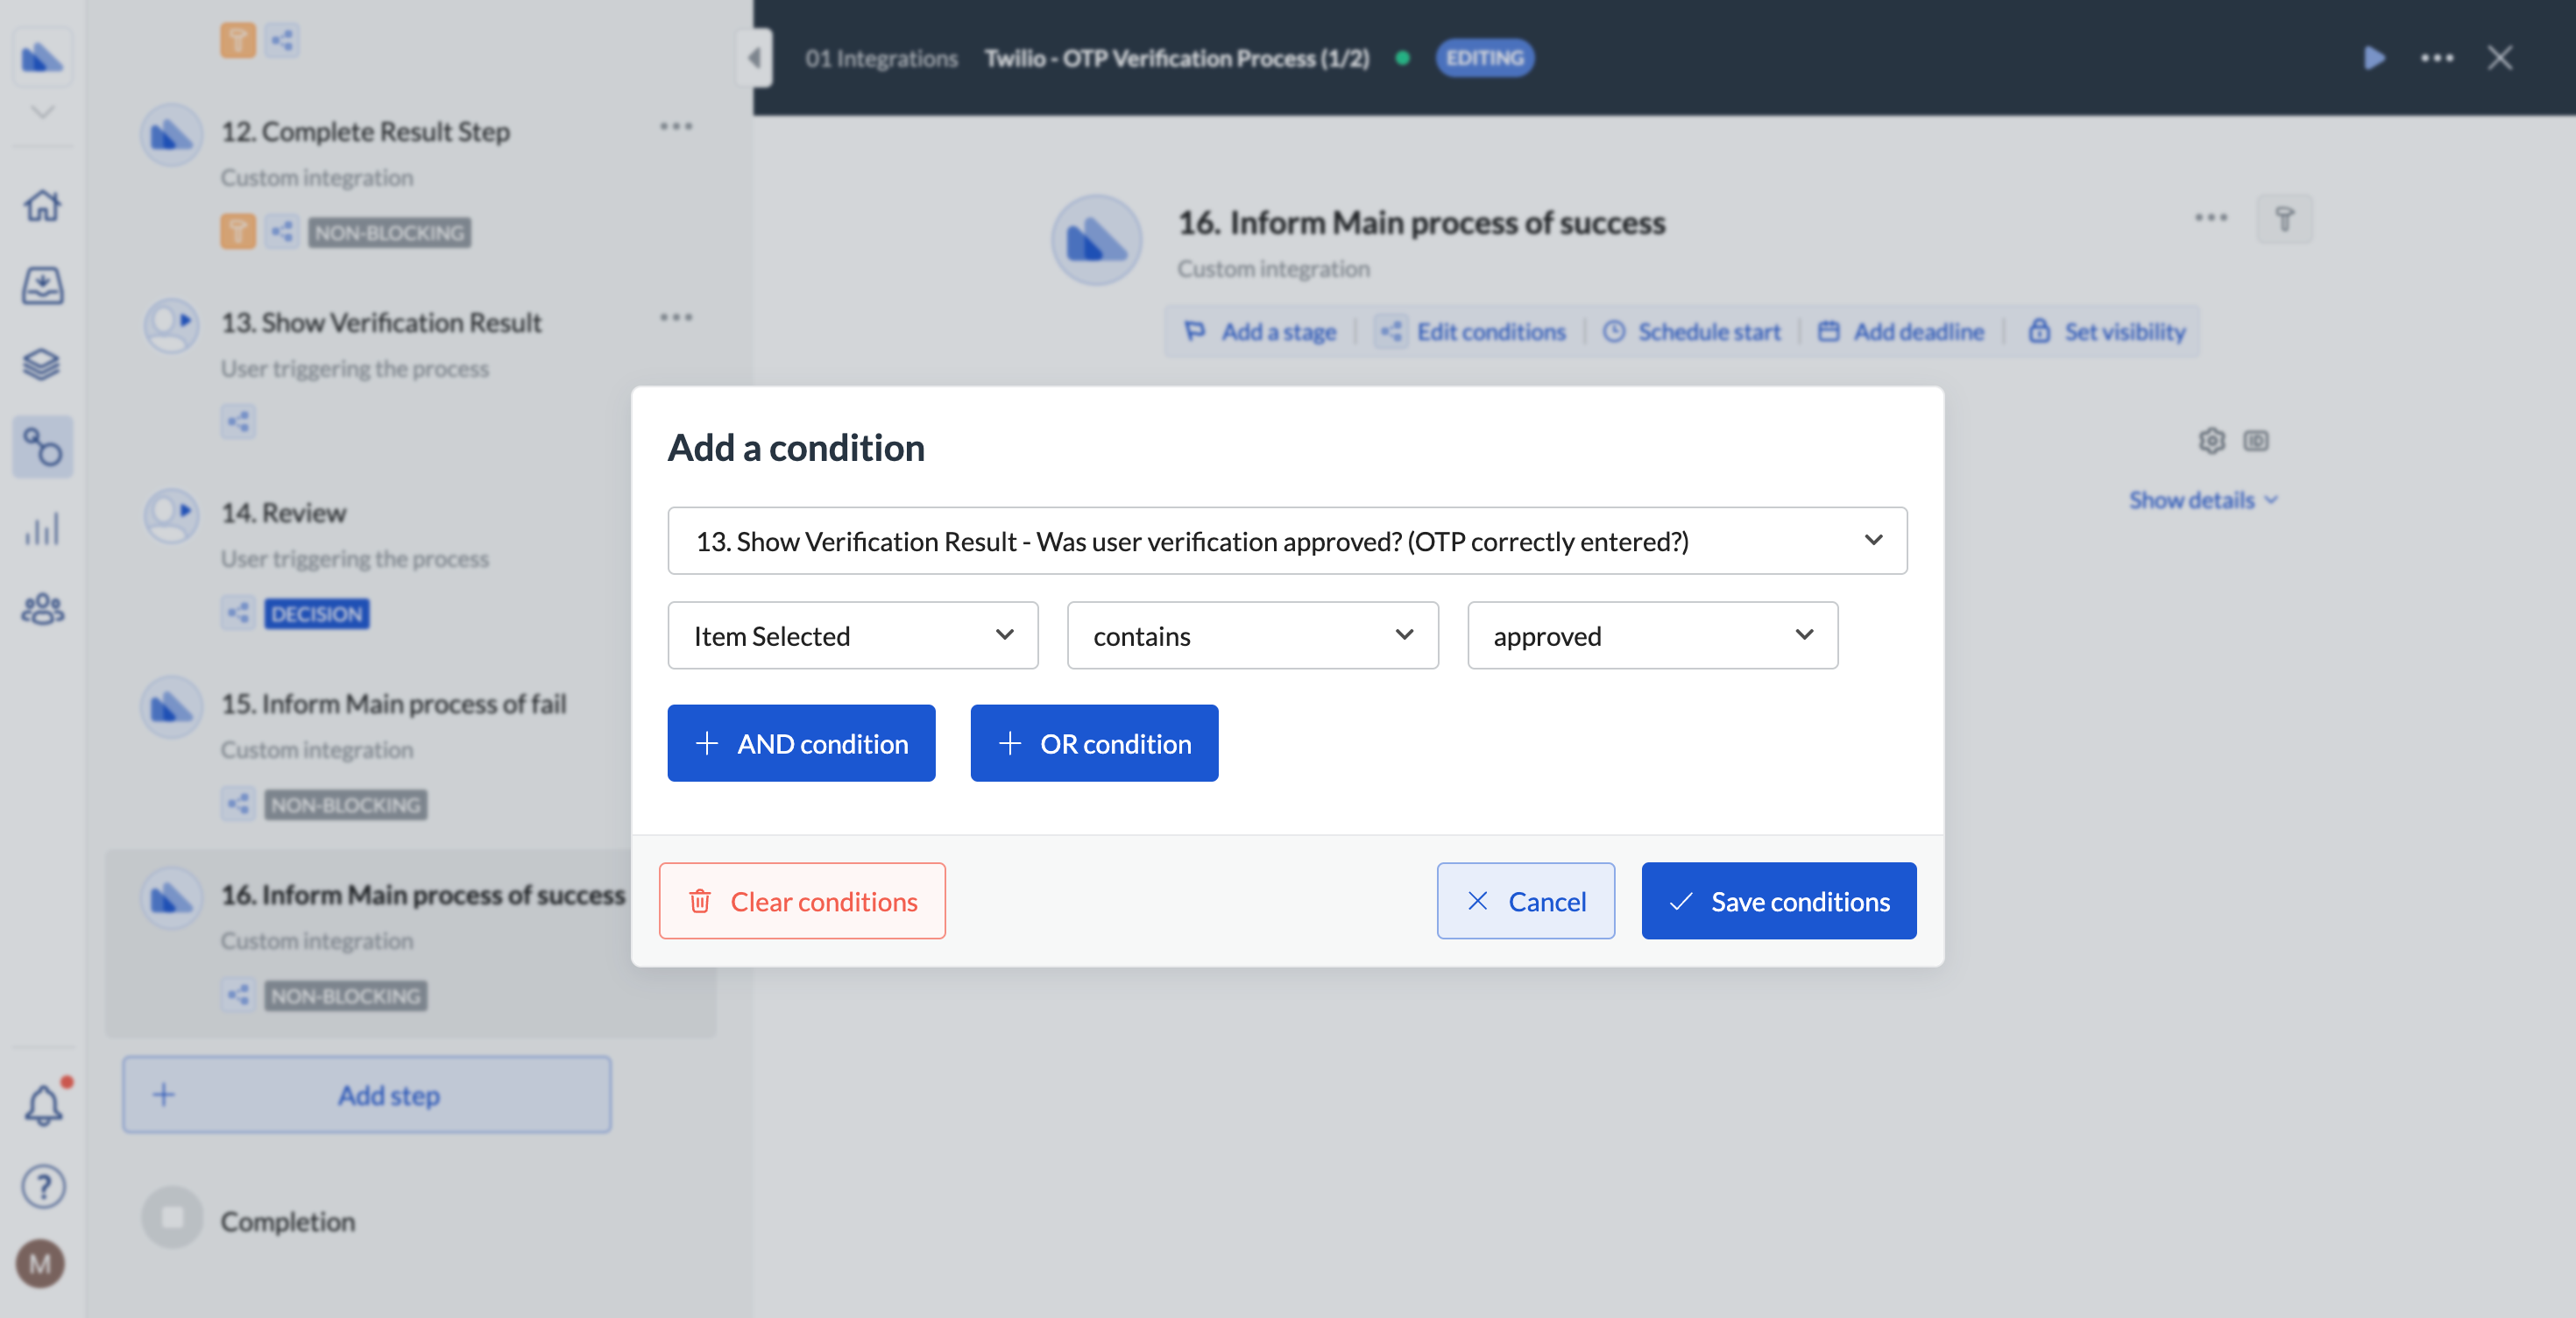
27. Click **Add conditions** to add the conditions to the step to run when the verification was successful.
25. Click **...** in the left-hand process panel and select **Make non-blocking**.
26. Create an integration step to inform the main workflow of verification failure. Click the **Settings** gear icon to configure the step:
* **Method**: POST
* **URL**: `https://core.nextmatter.com/api/instances/{2. Provide details - Output instance id - Input}/complete_step/`
* **Headers:** Content-Type: application/json
* **Headers:** Authorization: `API-Key NEXTMATTER_API_KEY`
* **Body** might look like the following:
```json theme={null}
{
"step_id": "{2. Provide details - Target outcome of check step - Input (plain)}",
"actions": [
{
"action_id": "{2. Provide details - Action ID of Radio Button - Input (plain)}",
"input_object": {
"radioItemSelected": "Successful"
}
}
]
}
```
27. Click **Add conditions** to add the conditions to the step to run when the verification was successful.
 28. Click **...** in the left-hand workflow panel and select **Make non-blocking**.
### Create the main workflow
1. Create an integration step to launch verification.
In this step, you'll be calling the Next Matter API to launch the subworkflow. Click the **Settings** gear icon to configure the step:
* **Method**: POST
* **URL**: `https://core.nextmatter.com/api/instances/`
* **Headers:** Content-Type: application/json
* **Headers:**: Authorization: `API-Key NEXTMATTER_API_KEY`
* **Body** might look like the following:
```json JSON theme={null}
{
"process": "https://core.nextmatter.com/api/processes/VERIFICATION_WORKFLOW_ID/",//this is the ID of the sub-workflow described above
"name": "{Instance name}-Verification"
}
```
2. Create the following variables:
| Name | Value |
| ------------- | --------------------------------------------- |
| id | \$.id |
| url | \$.url |
| step\_id | \$.process\_snapshot.steps\[0].id |
| name\_aid | \$.process\_snapshot.steps\[0].actions\[0].id |
| email\_aid | \$.process\_snapshot.steps\[0].actions\[1].id |
| phone\_aid | \$.process\_snapshot.steps\[0].actions\[2].id |
| instance\_aid | \$.process\_snapshot.steps\[0].actions\[3].id |
| step\_aid | \$.process\_snapshot.steps\[0].actions\[4].id |
| action\_aid | \$.process\_snapshot.steps\[0].actions\[5].id |
3. Save your changes.
4. Create a step to send the details to the verification sub-workflow. Again, you'll be calling Next Matter API. Click the Settings gear icon to configure the details:
* **Method**: POST
* **URL**: `https://core.nextmatter.com/api/instances/{2. Launch OTP SMS Verification - Launch workflow automatically - id (plain)}/complete_step/`
* **Headers:** Content-Type: application/json
* **Headers:**: Authorization: `API-Key NEXTMATTER_API_KEY`
* **Body** might look like the following: Note that the data in {} are data references.
```json JSON theme={null}
{"step_id":{2. Launch OTP SMS Verification - Launch process automatically - step_id (plain)}
,"actions":[
{
"action_id":{2. Launch OTP SMS Verification - Launch process automatically - name_aid (plain)},
"input_object":{
"inputValue":"{2. Launch OTP SMS Verification - Launch process automatically - name_aid (plain)}"}},
{
"action_id":{2. Launch OTP SMS Verification - Launch process automatically - email_aid (plain)},
"input_object":{
"inputValue":"{2. Launch OTP SMS Verification - Launch process automatically - email_aid (plain)}"}},
{
"action_id":{2. Launch OTP SMS Verification - Launch process automatically - phone_aid (plain)},
"input_object":{
"inputValue":"{2. Launch OTP SMS Verification - Launch process automatically - phone_aid (plain)}"
}},
{
"action_id":{2. Launch OTP SMS Verification - Launch process automatically - instance_aid (plain)},
"input_object":{
"inputValue":"{Instance ID}"
}},
{
"action_id":{2. Launch OTP SMS Verification - Launch process automatically - step_aid (plain)},
"input_object":{
"inputValue":"RESULT_STEP_ID"// this is a placeholder for the step ID of the next step
}},
{
"action_id":{2. Launch OTP SMS Verification - Launch process automatically - action_aid (plain)},
"input_object":{
"inputValue":"RESULT_ACTION_ID"// this is a placeholder for the action ID from the next step
}
}
]}
```
5. Save your changes.
6. Create a radio form field step with the following details as radio items:
* Successful
* Max send attempts reached
* Challenge expired
28. Click **...** in the left-hand workflow panel and select **Make non-blocking**.
### Create the main workflow
1. Create an integration step to launch verification.
In this step, you'll be calling the Next Matter API to launch the subworkflow. Click the **Settings** gear icon to configure the step:
* **Method**: POST
* **URL**: `https://core.nextmatter.com/api/instances/`
* **Headers:** Content-Type: application/json
* **Headers:**: Authorization: `API-Key NEXTMATTER_API_KEY`
* **Body** might look like the following:
```json JSON theme={null}
{
"process": "https://core.nextmatter.com/api/processes/VERIFICATION_WORKFLOW_ID/",//this is the ID of the sub-workflow described above
"name": "{Instance name}-Verification"
}
```
2. Create the following variables:
| Name | Value |
| ------------- | --------------------------------------------- |
| id | \$.id |
| url | \$.url |
| step\_id | \$.process\_snapshot.steps\[0].id |
| name\_aid | \$.process\_snapshot.steps\[0].actions\[0].id |
| email\_aid | \$.process\_snapshot.steps\[0].actions\[1].id |
| phone\_aid | \$.process\_snapshot.steps\[0].actions\[2].id |
| instance\_aid | \$.process\_snapshot.steps\[0].actions\[3].id |
| step\_aid | \$.process\_snapshot.steps\[0].actions\[4].id |
| action\_aid | \$.process\_snapshot.steps\[0].actions\[5].id |
3. Save your changes.
4. Create a step to send the details to the verification sub-workflow. Again, you'll be calling Next Matter API. Click the Settings gear icon to configure the details:
* **Method**: POST
* **URL**: `https://core.nextmatter.com/api/instances/{2. Launch OTP SMS Verification - Launch workflow automatically - id (plain)}/complete_step/`
* **Headers:** Content-Type: application/json
* **Headers:**: Authorization: `API-Key NEXTMATTER_API_KEY`
* **Body** might look like the following: Note that the data in {} are data references.
```json JSON theme={null}
{"step_id":{2. Launch OTP SMS Verification - Launch process automatically - step_id (plain)}
,"actions":[
{
"action_id":{2. Launch OTP SMS Verification - Launch process automatically - name_aid (plain)},
"input_object":{
"inputValue":"{2. Launch OTP SMS Verification - Launch process automatically - name_aid (plain)}"}},
{
"action_id":{2. Launch OTP SMS Verification - Launch process automatically - email_aid (plain)},
"input_object":{
"inputValue":"{2. Launch OTP SMS Verification - Launch process automatically - email_aid (plain)}"}},
{
"action_id":{2. Launch OTP SMS Verification - Launch process automatically - phone_aid (plain)},
"input_object":{
"inputValue":"{2. Launch OTP SMS Verification - Launch process automatically - phone_aid (plain)}"
}},
{
"action_id":{2. Launch OTP SMS Verification - Launch process automatically - instance_aid (plain)},
"input_object":{
"inputValue":"{Instance ID}"
}},
{
"action_id":{2. Launch OTP SMS Verification - Launch process automatically - step_aid (plain)},
"input_object":{
"inputValue":"RESULT_STEP_ID"// this is a placeholder for the step ID of the next step
}},
{
"action_id":{2. Launch OTP SMS Verification - Launch process automatically - action_aid (plain)},
"input_object":{
"inputValue":"RESULT_ACTION_ID"// this is a placeholder for the action ID from the next step
}
}
]}
```
5. Save your changes.
6. Create a radio form field step with the following details as radio items:
* Successful
* Max send attempts reached
* Challenge expired
 7. Create a routing step with the following condition to run when verification has reached the send attempts limit.
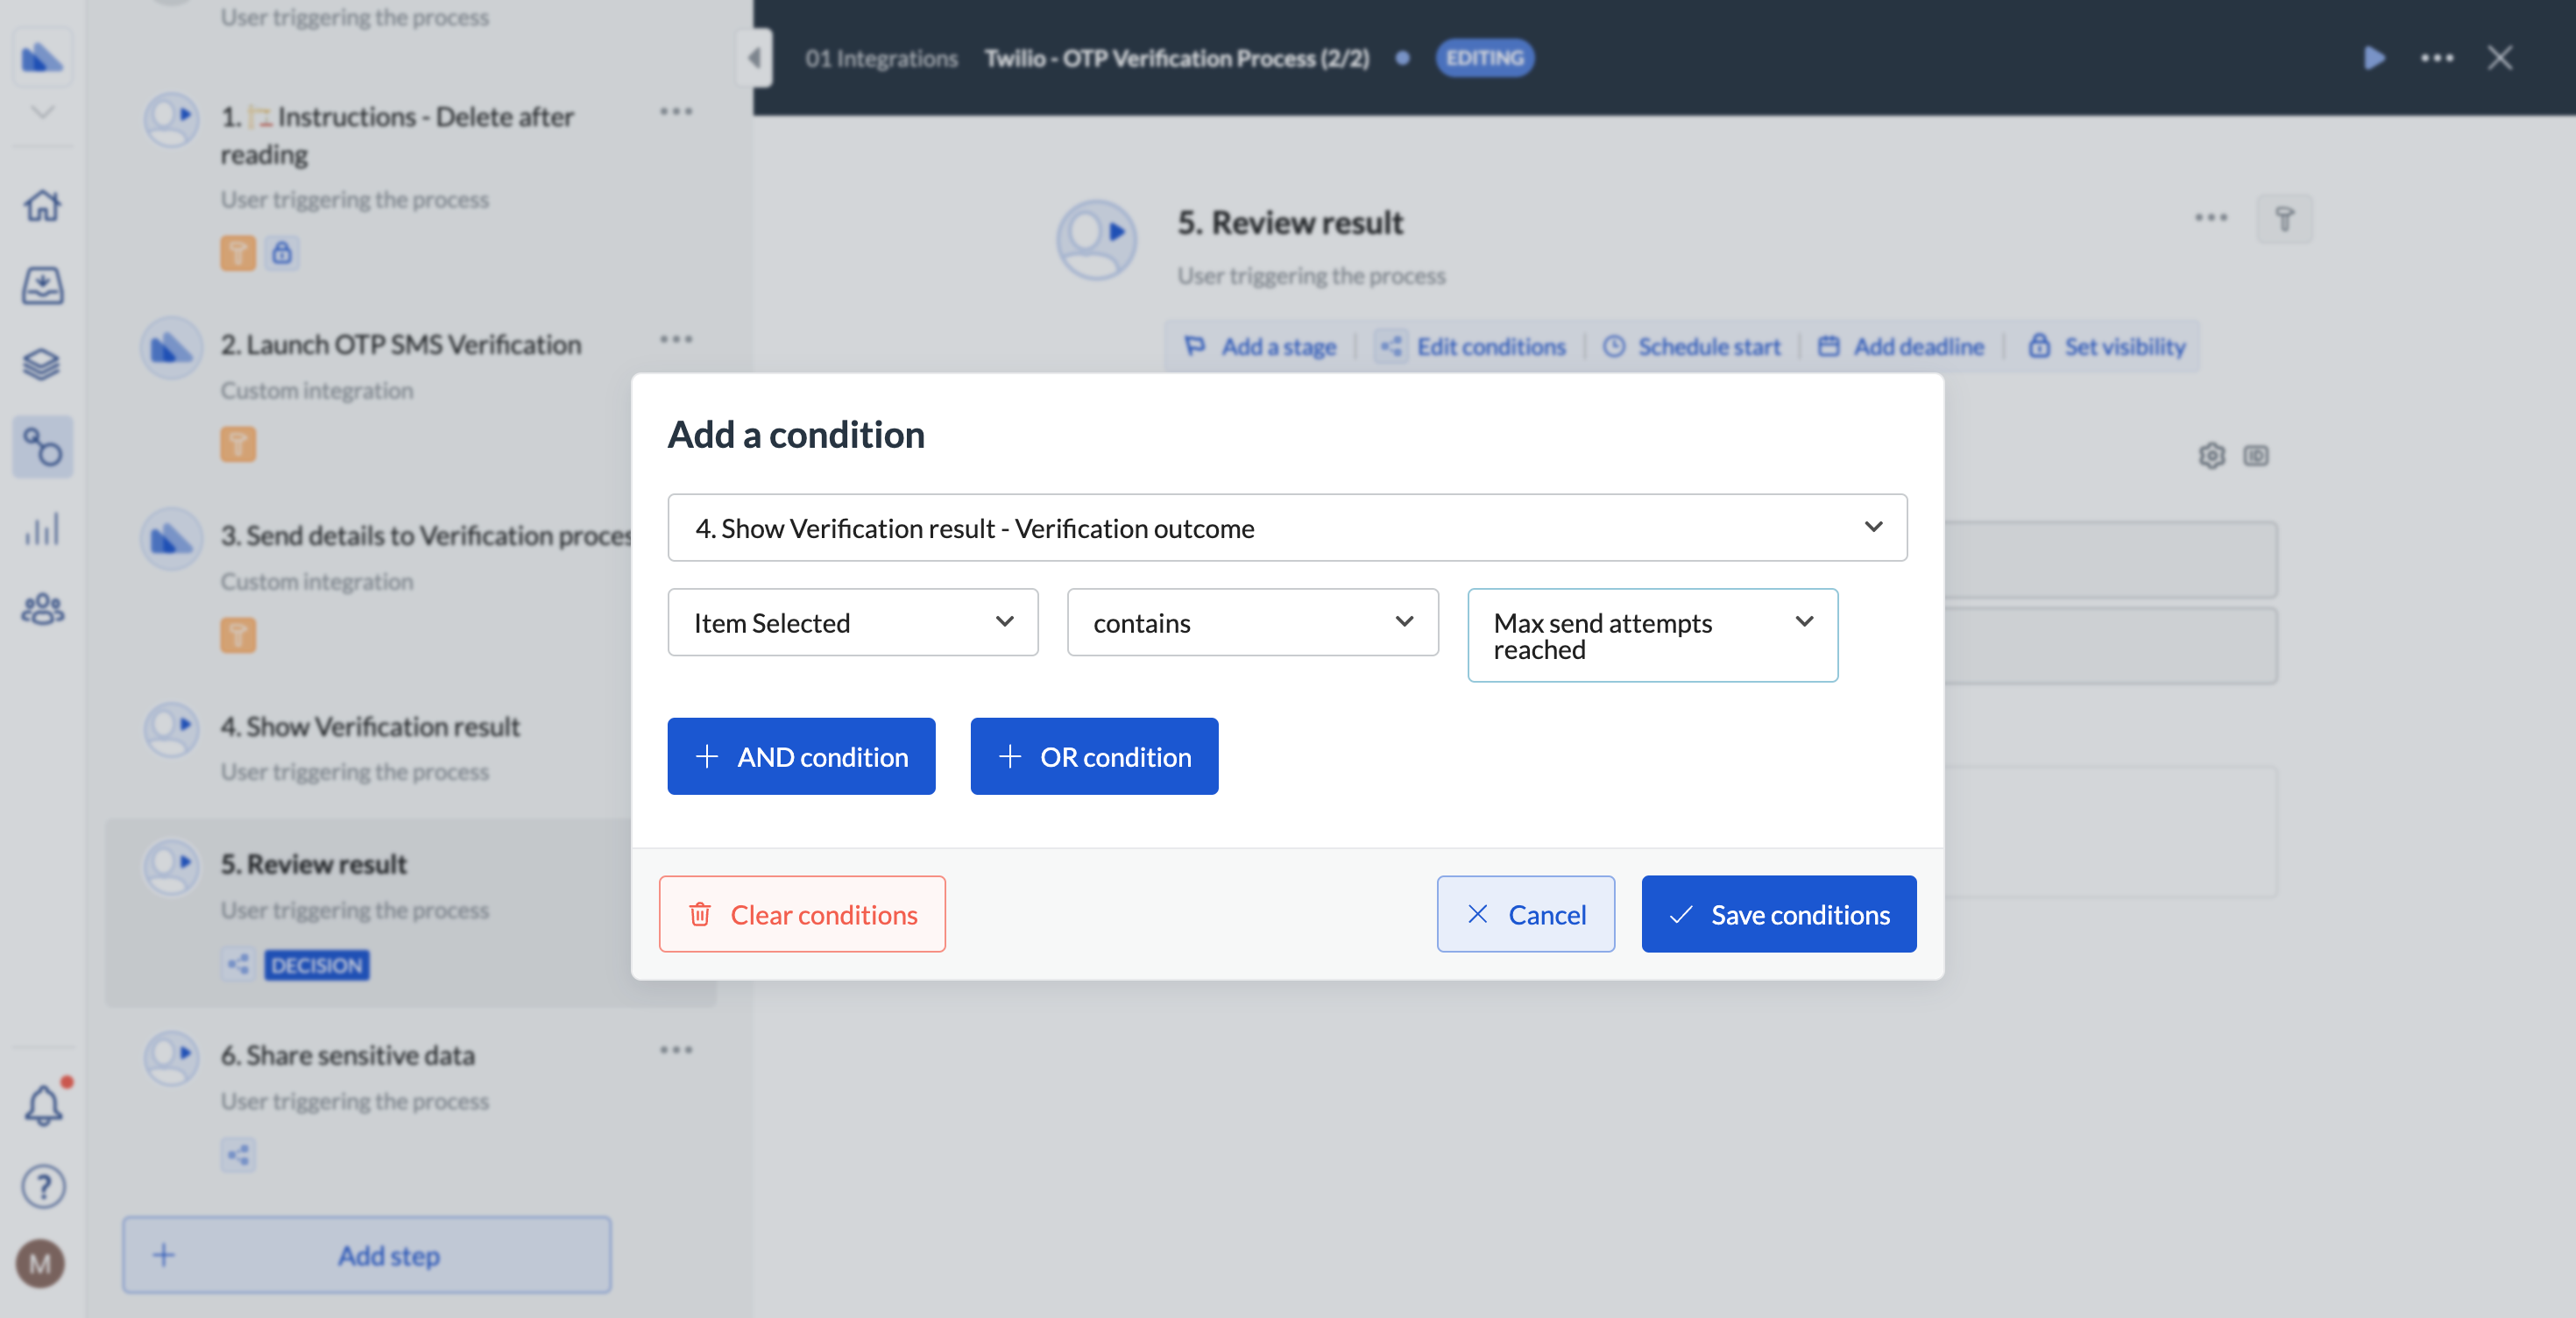 The step should have the option to confirm and continue or return to step 2.
8. Create a form step with the field to share data with the verified user. Make sure you create the condition for this step to run when user verification has been successful.
The step should have the option to confirm and continue or return to step 2.
8. Create a form step with the field to share data with the verified user. Make sure you create the condition for this step to run when user verification has been successful.