> ## Documentation Index
> Fetch the complete documentation index at: https://help.nextmatter.com/llms.txt
> Use this file to discover all available pages before exploring further.
# Next Matter actions
> Use any of the no-code templates available to perform an action on the Next Matter instance.
## Stop instances
Use this no-code step as a result of [a condition](/docs/set-conditions-to-a-step) or as the last step in the workflow.
1. Click **Workflows > + Create new\... > Create a new workflow** and give your workflow a name. If you have a workflow ready, click **... > Edit workflow**.
2. Click **+ Add step** and select **Integrations > Next Matter action**.
3. In the operation dropdown, select **Stop instance**.
 4. Provide the Instance ID.
The instance ID is an item of metadata created when an instance is created. You can find it when you open the data reference braces or by calling Next Matter API ([List instances](/reference/processes_instances_list)).
4. Provide the Instance ID.
The instance ID is an item of metadata created when an instance is created. You can find it when you open the data reference braces or by calling Next Matter API ([List instances](/reference/processes_instances_list)).
 5. Add any variables you need to reuse later.
User variables are not displayed in the output. However, they are visible in the data reference dropdown if you want to use them in further steps.
6. Save your changes.
You can find no-code data calculations or formatting actions you can perform on Next Matter data in **Integrations > Quick Actions**.
## Add or overwrite instance tags
You can add tags to instances to categorize them and improve their searchability. See [how you can create tags](/docs/use-tags-for-better-filtering#create-tags)
With this action, you can add new tags to your instance or overwrite existing ones.
You can use this action step in combination with conditions. For example, if the customer email doesn't come from a list of approved domains, you can automatically run this step to add a warning tag.
You can use this action step in combination with conditions. For example, if the customer email doesn't come from a list of approved domains, you can automatically run this step to add a warning tag.
1. Click **Workflows > + Create new\... > Create a new workflow** and give your workflow a name. If you have a workflow ready, click **... > Edit workflow**.
2. Click **+ Add step** and select **Integrations > Next Matter action**.
3. In the operation dropdown, select **Tags: create, add, overwrite**.
4. Add the tags you want to create. They should be a maximum of 100 characters. You can also use a data reference to create a tag from data already in the workflow instance.
5. If you want to replace existing tags with new ones, toggle on **Overwrite all existing tags**
If you want to replace only specific tags and leave some of the old ones in place, add the ones you keep to the **Add tags** list.
6. Tags have a limit of 100 characters to maintain readability. If you use a data reference as a tag, you might not know how long the final tag will be. In that case, it's a good idea to toggle on the **Fail step if a tag exceeds 100 characters**. Otherwise, the instance overview might be cluttered with unreadable tags.
7. Save your changes.
## Export step as PDF
The step works on the running instance.
1. Click **Workflows > + Create new\... > Create a new workflow** and give your workflow a name. If you have a workflow ready, click **... > Edit workflow**.
2. Click **+ Add step** and select **Integrations > Next Matter action**.
3. In the operation dropdown, select **Export step from Next Matter**.
4. Enter or reference the step ID (for multiple steps, click **+ Add**).
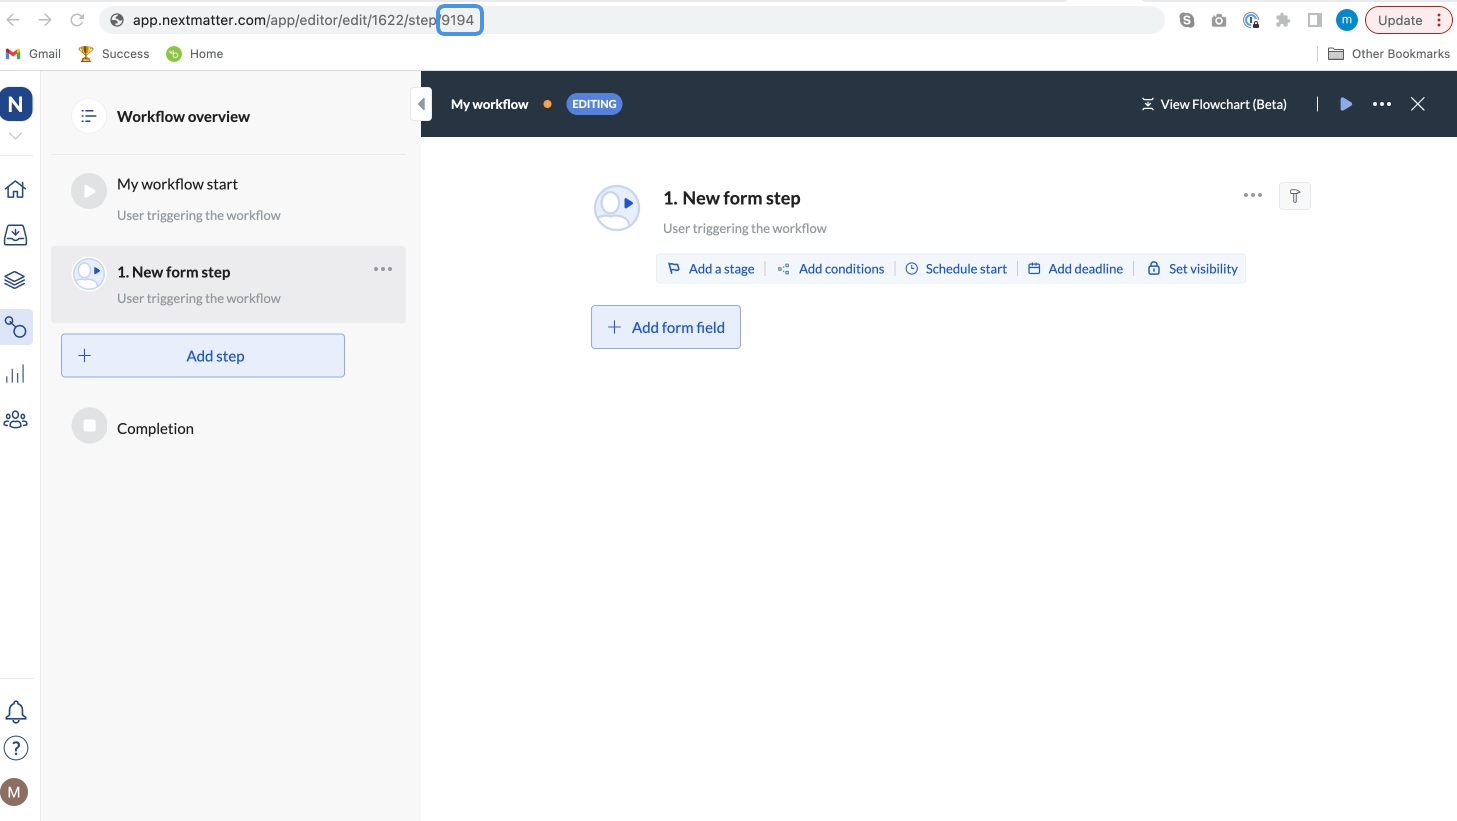
1. In your left-hand navigation, click the **Workflows** icon.
2. Hover over the follow-up workflow and click on the menu icon.
3. Click **Edit workflow**.
4. Click the step to which you'd like to send data.
5. Copy the step ID. It's the last number in the URL you see in your browser.
5. Add any variables you need to reuse later.
User variables are not displayed in the output. However, they are visible in the data reference dropdown if you want to use them in further steps.
6. Save your changes.
You can find no-code data calculations or formatting actions you can perform on Next Matter data in **Integrations > Quick Actions**.
## Add or overwrite instance tags
You can add tags to instances to categorize them and improve their searchability. See [how you can create tags](/docs/use-tags-for-better-filtering#create-tags)
With this action, you can add new tags to your instance or overwrite existing ones.
You can use this action step in combination with conditions. For example, if the customer email doesn't come from a list of approved domains, you can automatically run this step to add a warning tag.
You can use this action step in combination with conditions. For example, if the customer email doesn't come from a list of approved domains, you can automatically run this step to add a warning tag.
1. Click **Workflows > + Create new\... > Create a new workflow** and give your workflow a name. If you have a workflow ready, click **... > Edit workflow**.
2. Click **+ Add step** and select **Integrations > Next Matter action**.
3. In the operation dropdown, select **Tags: create, add, overwrite**.
4. Add the tags you want to create. They should be a maximum of 100 characters. You can also use a data reference to create a tag from data already in the workflow instance.
5. If you want to replace existing tags with new ones, toggle on **Overwrite all existing tags**
If you want to replace only specific tags and leave some of the old ones in place, add the ones you keep to the **Add tags** list.
6. Tags have a limit of 100 characters to maintain readability. If you use a data reference as a tag, you might not know how long the final tag will be. In that case, it's a good idea to toggle on the **Fail step if a tag exceeds 100 characters**. Otherwise, the instance overview might be cluttered with unreadable tags.
7. Save your changes.
## Export step as PDF
The step works on the running instance.
1. Click **Workflows > + Create new\... > Create a new workflow** and give your workflow a name. If you have a workflow ready, click **... > Edit workflow**.
2. Click **+ Add step** and select **Integrations > Next Matter action**.
3. In the operation dropdown, select **Export step from Next Matter**.
4. Enter or reference the step ID (for multiple steps, click **+ Add**).
1. In your left-hand navigation, click the **Workflows** icon.
2. Hover over the follow-up workflow and click on the menu icon.
3. Click **Edit workflow**.
4. Click the step to which you'd like to send data.
5. Copy the step ID. It's the last number in the URL you see in your browser.
 5. Expand **Advanced configuration** to select the template for the PDF export, define margins, or narrow down the form fields to export by entering the list of form field IDs. You can also toggle to enable options. **Tip**: Enter the number to define margins - the number should be a value in inches.
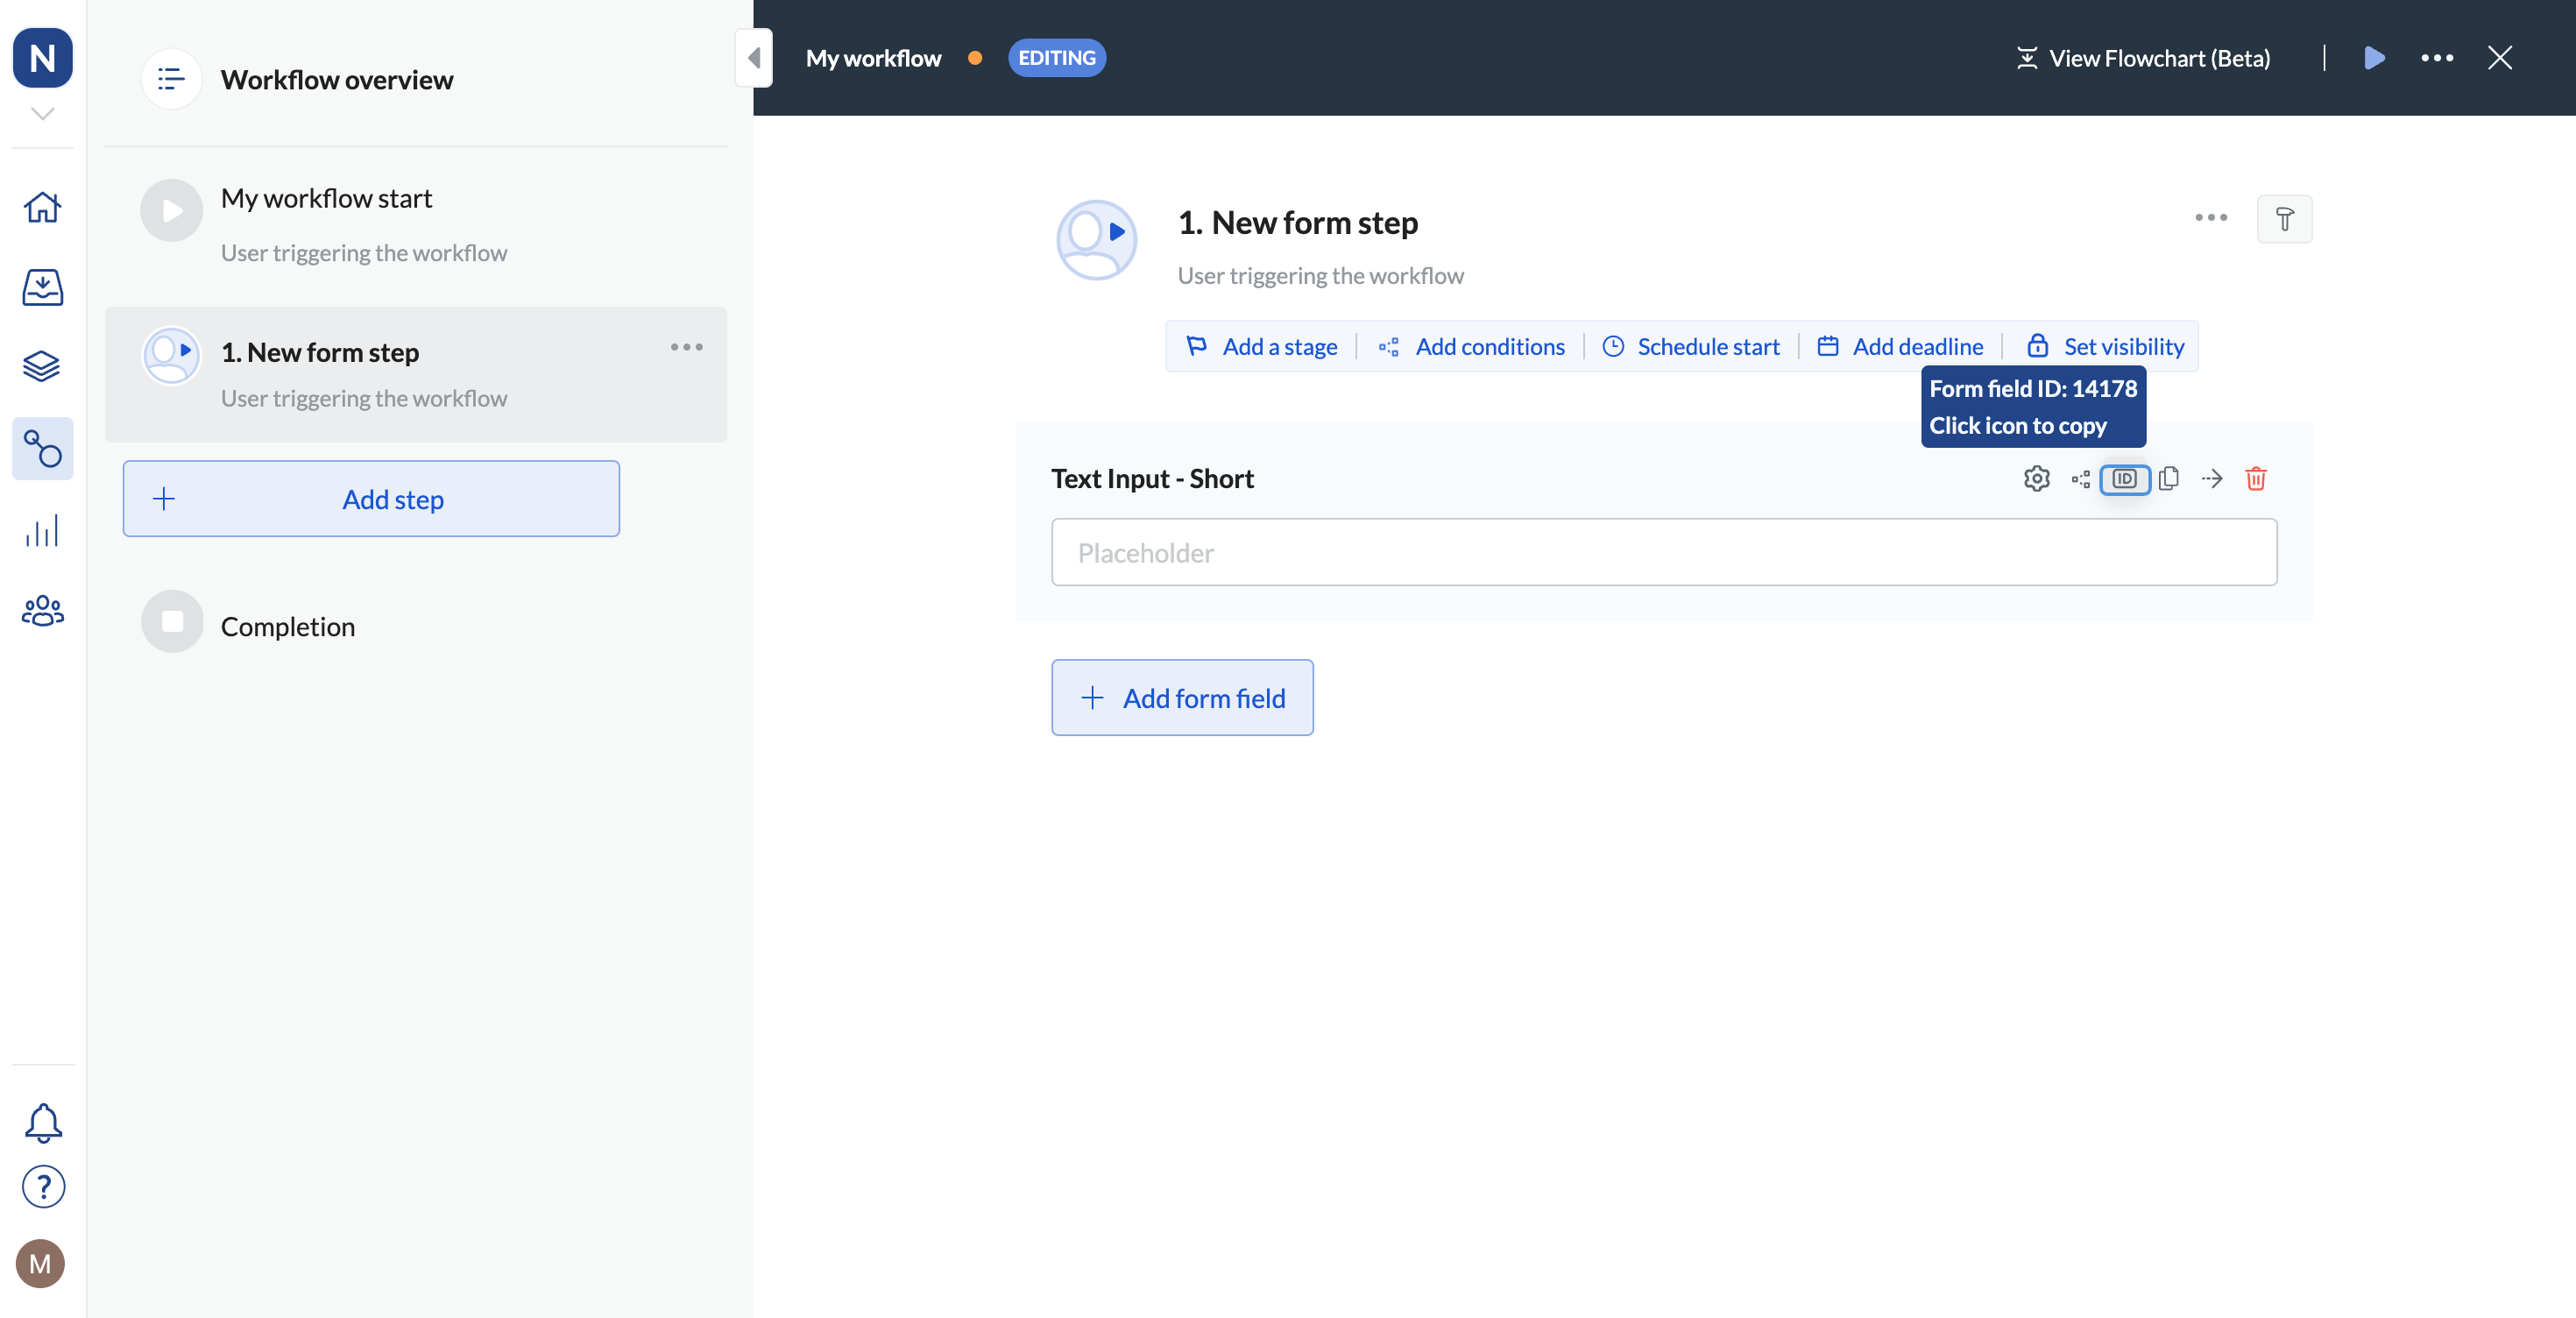
1. In your left-hand navigation, click the **Workflows** icon.
2. Hover over the follow-up process and click on the menu icon.
3. Click **Edit workflow**.
4. Click the step to which you'd like to send data.
5. Click the ID icon for the field to which you want to copy data.
6. Copy **Form field ID**.
5. Expand **Advanced configuration** to select the template for the PDF export, define margins, or narrow down the form fields to export by entering the list of form field IDs. You can also toggle to enable options. **Tip**: Enter the number to define margins - the number should be a value in inches.
1. In your left-hand navigation, click the **Workflows** icon.
2. Hover over the follow-up process and click on the menu icon.
3. Click **Edit workflow**.
4. Click the step to which you'd like to send data.
5. Click the ID icon for the field to which you want to copy data.
6. Copy **Form field ID**.
 6. Save your changes.
## Export instance as PDF
The step works on the running instance.
1. Click **Workflows > + Create new\... > Create a new workflow** and give your workflow a name. If you have a workflow ready, click **... > Edit workflow**.
2. Click **+ Add step** and select **Integrations > Next Matter action**.
3. In the operation dropdown, select **Export instance from Next Matter**.
4. Enter or reference the step ID (for multiple steps, click **+ Add**).
1. In your left-hand navigation, click the **Workflows** icon.
2. Hover over the follow-up workflow and click on the menu icon.
3. Click **Edit workflow**.
4. Click the step to which you'd like to send data.
5. Copy the step ID. It's the last number in the URL you see in your browser.
5. Expand **Advanced configuration** to select the template for the PDF export, define margins, or narrow down the form fields to export by entering the list of form field IDs. You can also toggle to enable options. **Tip**: Enter the number to define margins - the number should be a value in inches.
1. In your left-hand navigation, click the **Workflows** icon.
2. Hover over the follow-up process and click on the menu icon.
3. Click **Edit workflow**.
4. Click the step to which you'd like to send data.
5. Click the ID icon for the field to which you want to copy data.
6. Copy **Form field ID**.
6. Save your changes.
6. Save your changes.
## Export instance as PDF
The step works on the running instance.
1. Click **Workflows > + Create new\... > Create a new workflow** and give your workflow a name. If you have a workflow ready, click **... > Edit workflow**.
2. Click **+ Add step** and select **Integrations > Next Matter action**.
3. In the operation dropdown, select **Export instance from Next Matter**.
4. Enter or reference the step ID (for multiple steps, click **+ Add**).
1. In your left-hand navigation, click the **Workflows** icon.
2. Hover over the follow-up workflow and click on the menu icon.
3. Click **Edit workflow**.
4. Click the step to which you'd like to send data.
5. Copy the step ID. It's the last number in the URL you see in your browser.
5. Expand **Advanced configuration** to select the template for the PDF export, define margins, or narrow down the form fields to export by entering the list of form field IDs. You can also toggle to enable options. **Tip**: Enter the number to define margins - the number should be a value in inches.
1. In your left-hand navigation, click the **Workflows** icon.
2. Hover over the follow-up process and click on the menu icon.
3. Click **Edit workflow**.
4. Click the step to which you'd like to send data.
5. Click the ID icon for the field to which you want to copy data.
6. Copy **Form field ID**.
6. Save your changes.