> ## Documentation Index
> Fetch the complete documentation index at: https://help.nextmatter.com/llms.txt
> Use this file to discover all available pages before exploring further.
# Integrate with Zendesk
> Exchange information between workflows and Zendesk
You can use Next Matter as a [Zendesk sidebar widget](https://www.zendesk.com/marketplace/apps/support/992085/next-matter/)! That's a quick way to start workflows, link chats and tickets, and get your tasks done.
## Before you begin
* You need your Zendesk API Key. For details on how to generate it, see [Zendesk documentation](https://support.zendesk.com/hc/en-us/articles/4408889192858-Generating-a-new-API-token).
* In your Next Matter portal, go to **Company > Integrations**, and click **Connect** next to **Zendesk**. Enter the subdomain to connect to Zendesk using OAuth. For example, if your domain is: [`https://d3v-nextmatter.zendesk.com/agent/dashboard`](https://d3v-nextmatter.zendesk.com/agent/dashboard), then `d3v-nextmatter` is the subdomain to enter.
* For some tasks, you might need a Zendesk ticket ID. The ticket ID is the number at the end of the URL that shows when you click the ticket.
 * Check the [required scopes](/docs/security-matrix) to learn more about which data is shared between the apps.
### Prepare your Next Matter workflow
* Make sure that the first step in the workflow contains a form field to receive the Zendesk ticket ID.
* Make sure that you have auto-naming enabled for the workflow. The name of the instance should be a data reference to the Zendesk ticket ID. You can enable auto-naming in the **Trigger step configuration**.
* Select **Webhook trigger** in the **Trigger step configuration**. Enable the webhook and copy the webhook URL. You'll need it later on.
### Set up a custom field for categorizing the ticket and the Next Matter instance ID
The purpose of the custom field is to provide an ID of the Next Matter instance so that Zendesk can update the workflow instance automatically.
1. In Zendesk go to **Admin Center > Objects and rules > Fields**.
2. Click **Add Field** and select **Dropdown** as the text type.
* Check the [required scopes](/docs/security-matrix) to learn more about which data is shared between the apps.
### Prepare your Next Matter workflow
* Make sure that the first step in the workflow contains a form field to receive the Zendesk ticket ID.
* Make sure that you have auto-naming enabled for the workflow. The name of the instance should be a data reference to the Zendesk ticket ID. You can enable auto-naming in the **Trigger step configuration**.
* Select **Webhook trigger** in the **Trigger step configuration**. Enable the webhook and copy the webhook URL. You'll need it later on.
### Set up a custom field for categorizing the ticket and the Next Matter instance ID
The purpose of the custom field is to provide an ID of the Next Matter instance so that Zendesk can update the workflow instance automatically.
1. In Zendesk go to **Admin Center > Objects and rules > Fields**.
2. Click **Add Field** and select **Dropdown** as the text type.
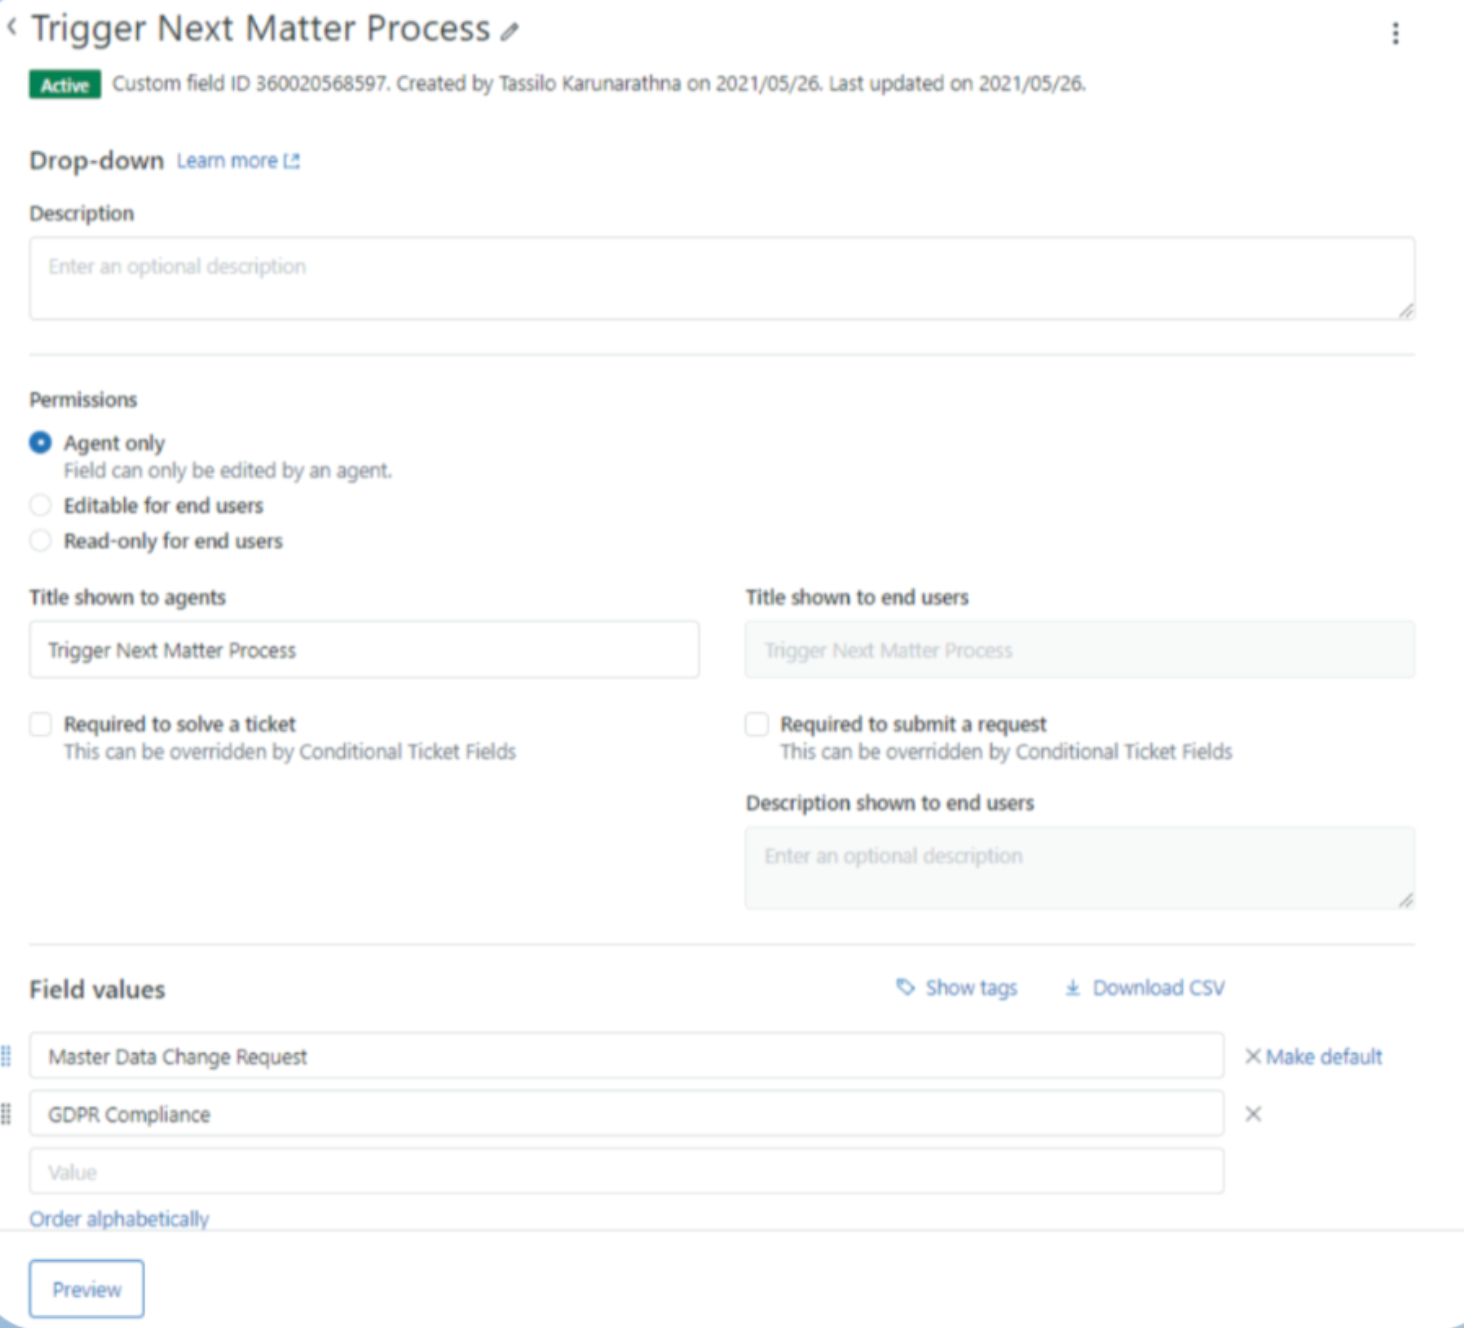 3. Create one or more fields for agents to choose from.
You can use fields/categories that you already have. Additionally, you can make the fields end-user editable if you want to allow users to select categories that then trigger Next Matter workflows.
4. Save your changes.
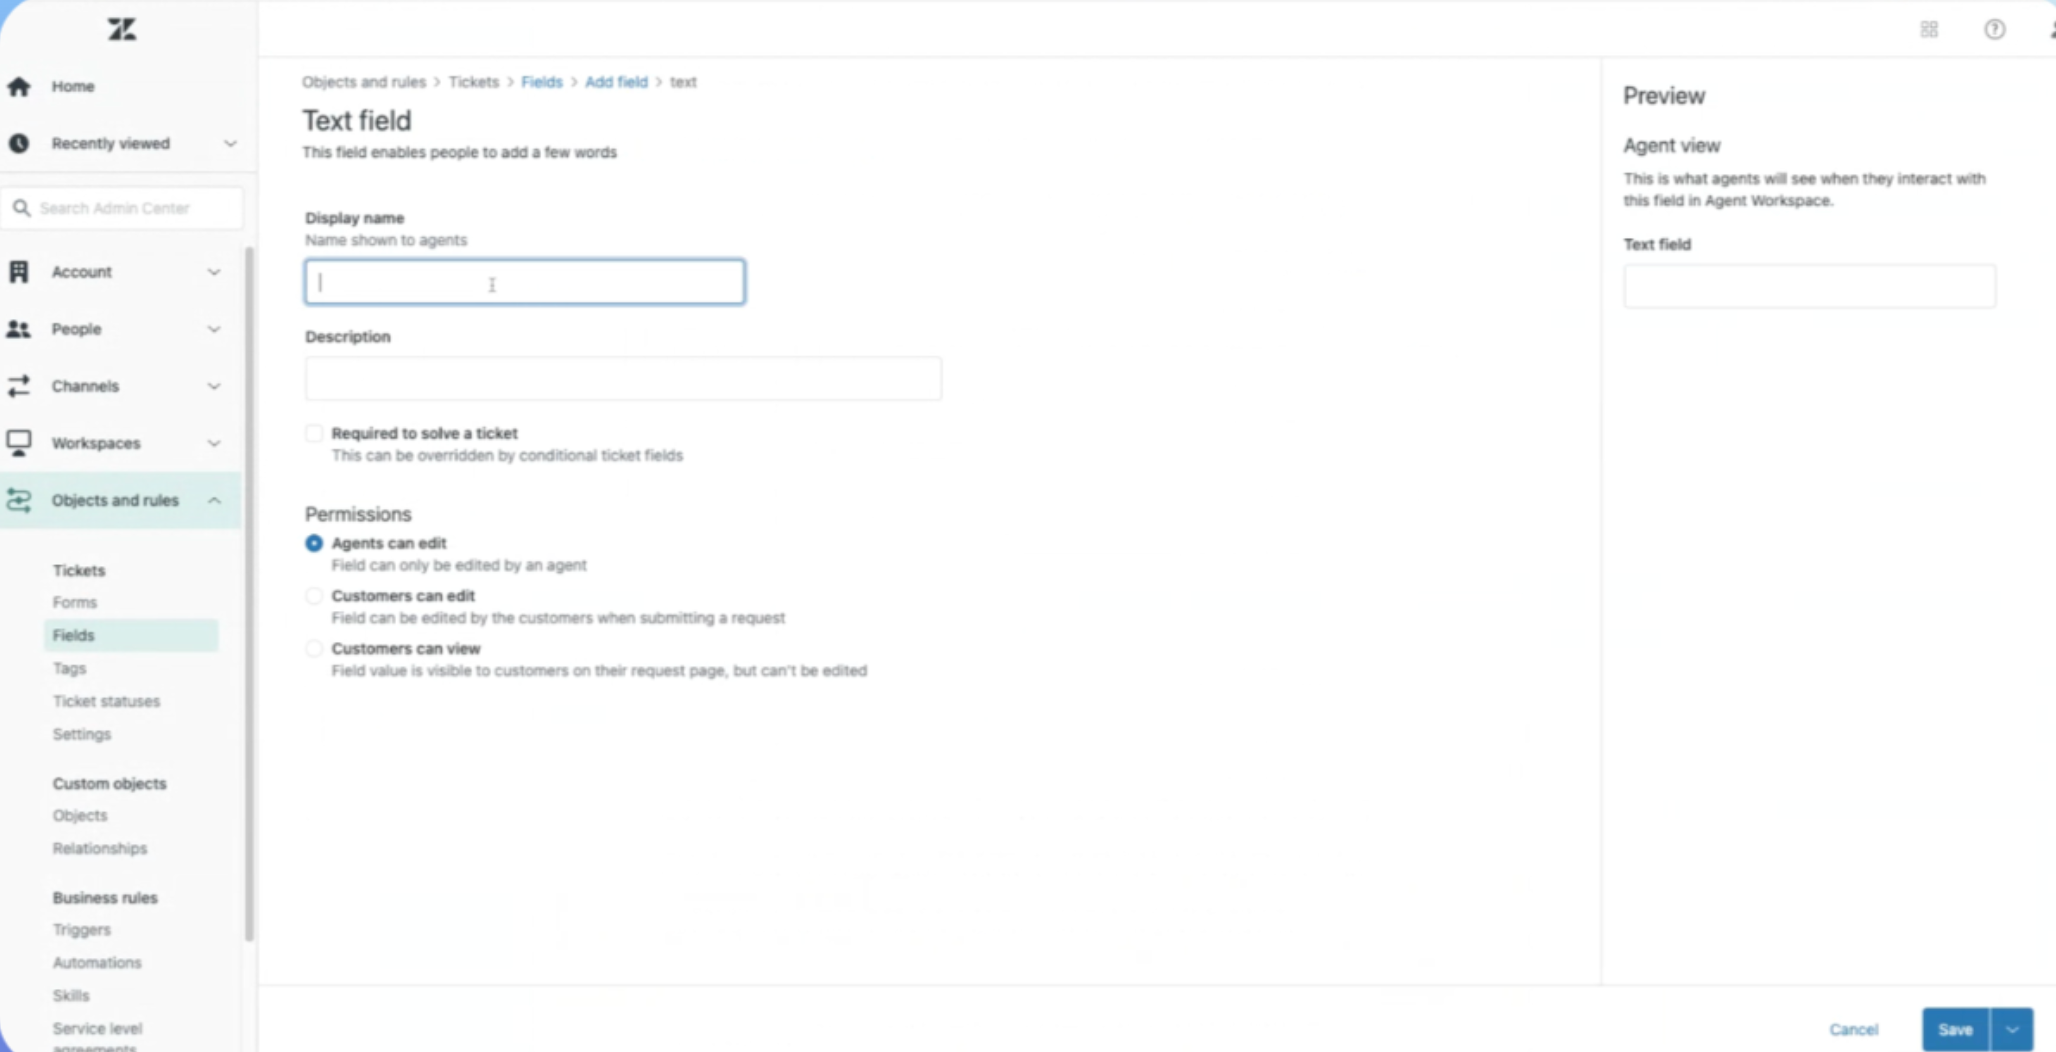
5. Click **Add Field** again and select **Text** as the text type.
6. Give the field a meaningful name.
3. Create one or more fields for agents to choose from.
You can use fields/categories that you already have. Additionally, you can make the fields end-user editable if you want to allow users to select categories that then trigger Next Matter workflows.
4. Save your changes.
5. Click **Add Field** again and select **Text** as the text type.
6. Give the field a meaningful name.
 Your agents can either manually fill the workflow ID in each ticket but it's easier if you send the **instance ID** from the Next Matter workflow to Zendesk with an integration step.
This is how to send instance details to Zendesk
1. In your Next Matter workflow, create an integration step.
2. Click **Settings** and enter the following details:
* **URL**: `https://YOUR_ZENDESK_DOMAIN.zendesk.com/api/v2/tickets/{Instance Name}` with Instance Name being the data reference
* **Method**: PATCH
* **Headers**: Content-Type: `application/json`
* **Headers**: Authorization: `ZENDESK_API_KEY`
* In **Body**, enter the following:
```json JSON theme={null}
{
"ticket": {
"custom_fields": [
{ "id": ZENDESK_CUSTOM_FIELD_ID, "value": "{Instance URL}" }
]
}
}
```
### Add the field to the ticket form
1. Go to **Admin Center > Objects and rules > Forms**.
2. Click on the form you'll use to start the workflow.
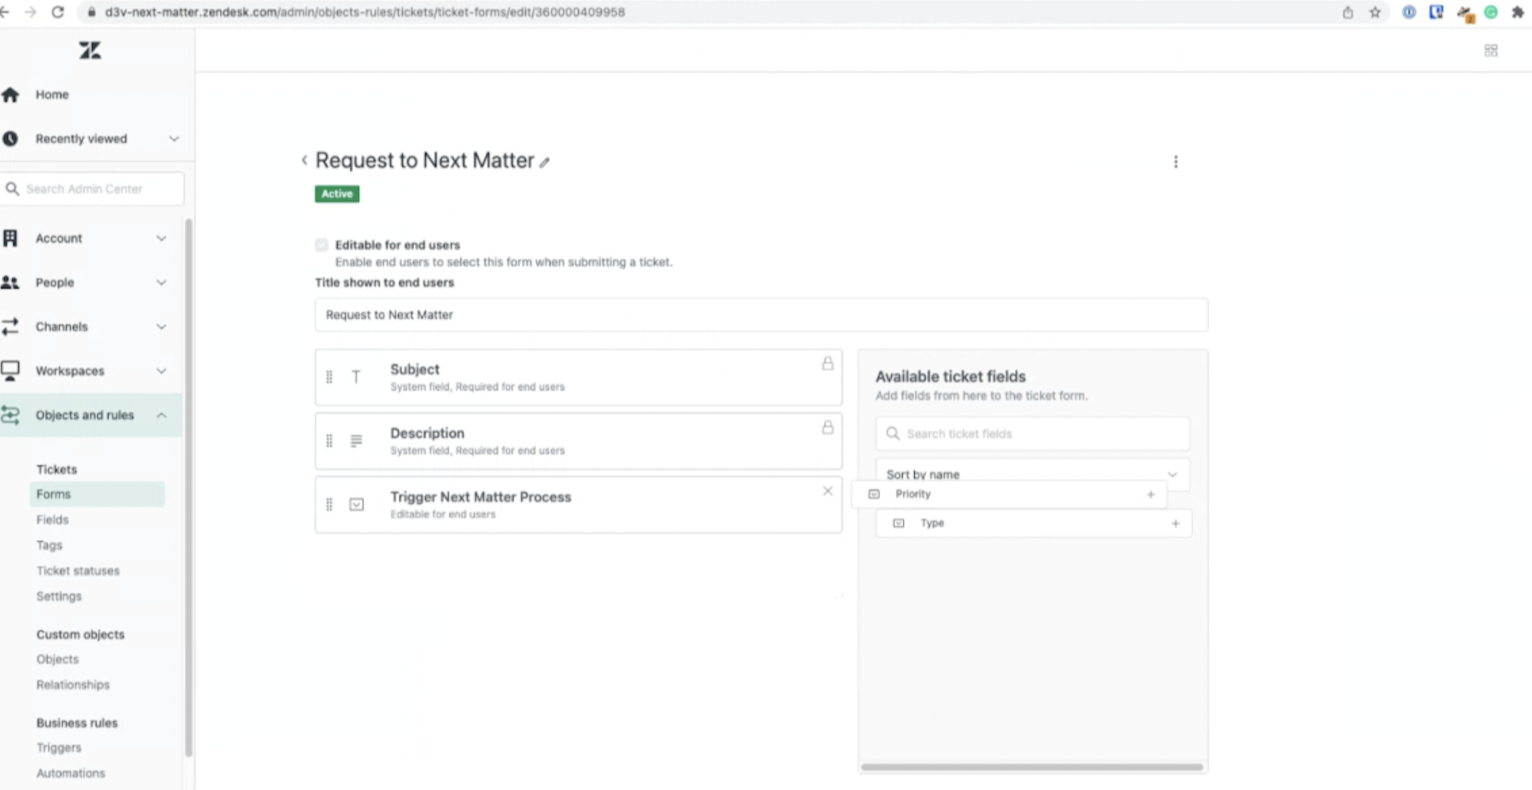
3. Drag and drop the newly created custom field from the right-hand side section to the form.
Your agents can either manually fill the workflow ID in each ticket but it's easier if you send the **instance ID** from the Next Matter workflow to Zendesk with an integration step.
This is how to send instance details to Zendesk
1. In your Next Matter workflow, create an integration step.
2. Click **Settings** and enter the following details:
* **URL**: `https://YOUR_ZENDESK_DOMAIN.zendesk.com/api/v2/tickets/{Instance Name}` with Instance Name being the data reference
* **Method**: PATCH
* **Headers**: Content-Type: `application/json`
* **Headers**: Authorization: `ZENDESK_API_KEY`
* In **Body**, enter the following:
```json JSON theme={null}
{
"ticket": {
"custom_fields": [
{ "id": ZENDESK_CUSTOM_FIELD_ID, "value": "{Instance URL}" }
]
}
}
```
### Add the field to the ticket form
1. Go to **Admin Center > Objects and rules > Forms**.
2. Click on the form you'll use to start the workflow.
3. Drag and drop the newly created custom field from the right-hand side section to the form.
 ### Set up a webhook
The webhook will activate the integration with Next Matter.
1. In Zendesk, navigate to **Admin Center > Apps and Integrations > Webhooks**.
2. Click **Actions > Create Webhook**.
3. Give the webhook a meaningful name.
4. In the **Endpoint URL**, enter the endpoint created for the [Webhook trigger](/docs/webhook-triggers).
5. Select **POST** as the call method and **JSON** as the response format.
### Set up a trigger
Zendesk needs to be configured to send the right data at the right time to Next Matter. For that, you need to configure a trigger within Zendesk. **For each workflow you want to communicate with, you will need a separate trigger**.
1. In Zendesk, navigate to **Admin Center > Objects and rules > Triggers**.
2. Enter a recognizable name for the trigger. We recommend basing the name on the type of update that you want to do in Next Matter.
3. Choose a Zendesk category for your trigger. We recommend creating a "Next Matter" category for all your Next Matter-related triggers.
4. Set up the conditions for your trigger. This defines when Zendesk contacts Next Matter. The trigger can be based on different events happening in your tickets. Note that there must be one condition to check if the Next Matter Instance ID field that you created before is not empty.
### Set up a webhook
The webhook will activate the integration with Next Matter.
1. In Zendesk, navigate to **Admin Center > Apps and Integrations > Webhooks**.
2. Click **Actions > Create Webhook**.
3. Give the webhook a meaningful name.
4. In the **Endpoint URL**, enter the endpoint created for the [Webhook trigger](/docs/webhook-triggers).
5. Select **POST** as the call method and **JSON** as the response format.
### Set up a trigger
Zendesk needs to be configured to send the right data at the right time to Next Matter. For that, you need to configure a trigger within Zendesk. **For each workflow you want to communicate with, you will need a separate trigger**.
1. In Zendesk, navigate to **Admin Center > Objects and rules > Triggers**.
2. Enter a recognizable name for the trigger. We recommend basing the name on the type of update that you want to do in Next Matter.
3. Choose a Zendesk category for your trigger. We recommend creating a "Next Matter" category for all your Next Matter-related triggers.
4. Set up the conditions for your trigger. This defines when Zendesk contacts Next Matter. The trigger can be based on different events happening in your tickets. Note that there must be one condition to check if the Next Matter Instance ID field that you created before is not empty.
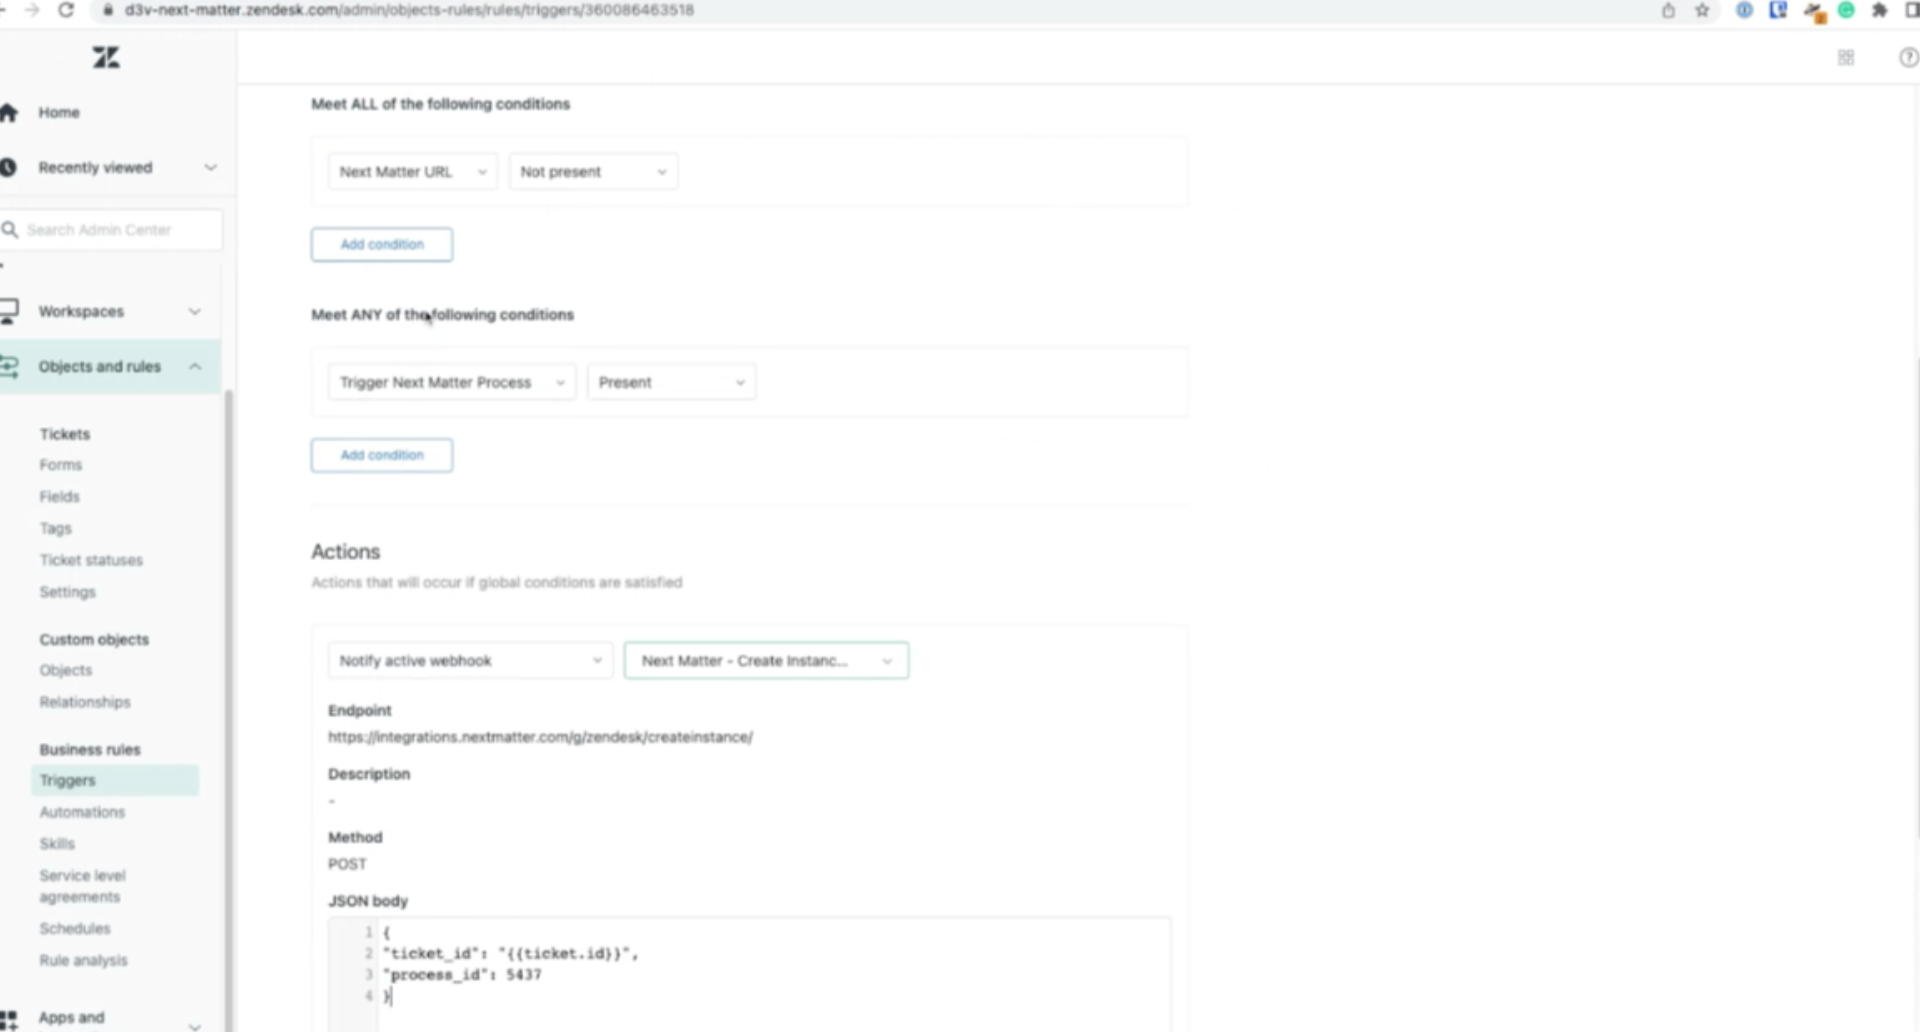 5. Add action and choose **Notify webhook** in the dropdown. Select the previously configured Next Matter webhook in the second dropdown.
6. The contents of the **JSON body** can contain whatever information you need to transfer from Zendesk. For example, the section might look like the following:
```json JSON theme={null}
{
"id":"{{ticket.id}}",
"description":"{{ticket.description}}",
"subject":"{{ticket.subject}}",
"type":"{{ticket.type}}",
"comment": "{{ticket.latest_comment_html}}"
}
```
When configured correctly, a Next Matter workflow will be launched with the ticket ID as the name of the workflow whenever you set the related category in the custom field and save it.
## Send data from Zendesk and complete a step
### Set up an instance field in the Next Matter form
1. In the workflow, you're building in the form to receive Zendesk input, create a form field (short input) that will be filled in with the Next Matter instance ID.
2. Copy the form field ID and store it for later.
### Set up a webhook to complete step
1. Navigate to **Admin Center > Apps and Integrations > Webhooks**.
2. Click **Actions > Create Webhook**.
3. Call the webhook: Next Matter Complete Step.
4. In the **Endpoint URL**, enter [`https://integrations.nextmatter.com/g/zendesk/completestep`](https://integrations.nextmatter.com/g/zendesk/completestep)
5. Select **POST** as the call method and **JSON** as the format.
6. Select the API key and enter the following details: **Header name**: Authorization **Value**: Api-key YOUR\_NEXTMATTER\_API\_KEY
### Set up a trigger
1. In Zendesk, go to **Admin Center > Objects and rules > Triggers**.
2. Choose a Zendesk category for your trigger. We recommend creating a "Next Matter" category for all your Next Matter-related triggers.
3. Set the conditions for **Ticket** & **Current user**. You can set other conditions that are relevant for the event you need. In the example provided, we're getting customer answers to Next Matter.
5. Add action and choose **Notify webhook** in the dropdown. Select the previously configured Next Matter webhook in the second dropdown.
6. The contents of the **JSON body** can contain whatever information you need to transfer from Zendesk. For example, the section might look like the following:
```json JSON theme={null}
{
"id":"{{ticket.id}}",
"description":"{{ticket.description}}",
"subject":"{{ticket.subject}}",
"type":"{{ticket.type}}",
"comment": "{{ticket.latest_comment_html}}"
}
```
When configured correctly, a Next Matter workflow will be launched with the ticket ID as the name of the workflow whenever you set the related category in the custom field and save it.
## Send data from Zendesk and complete a step
### Set up an instance field in the Next Matter form
1. In the workflow, you're building in the form to receive Zendesk input, create a form field (short input) that will be filled in with the Next Matter instance ID.
2. Copy the form field ID and store it for later.
### Set up a webhook to complete step
1. Navigate to **Admin Center > Apps and Integrations > Webhooks**.
2. Click **Actions > Create Webhook**.
3. Call the webhook: Next Matter Complete Step.
4. In the **Endpoint URL**, enter [`https://integrations.nextmatter.com/g/zendesk/completestep`](https://integrations.nextmatter.com/g/zendesk/completestep)
5. Select **POST** as the call method and **JSON** as the format.
6. Select the API key and enter the following details: **Header name**: Authorization **Value**: Api-key YOUR\_NEXTMATTER\_API\_KEY
### Set up a trigger
1. In Zendesk, go to **Admin Center > Objects and rules > Triggers**.
2. Choose a Zendesk category for your trigger. We recommend creating a "Next Matter" category for all your Next Matter-related triggers.
3. Set the conditions for **Ticket** & **Current user**. You can set other conditions that are relevant for the event you need. In the example provided, we're getting customer answers to Next Matter.
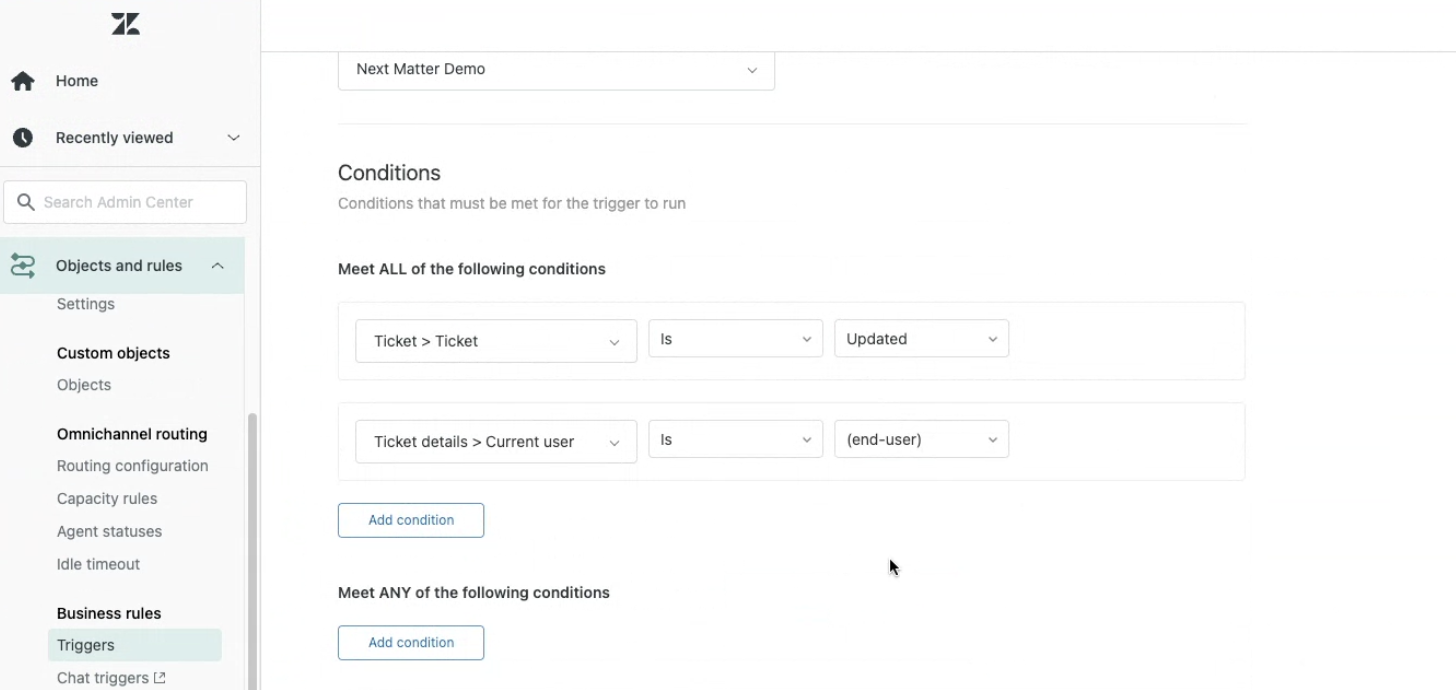 4. Select the following in **Actions**: **Notify by > Active Webhook** (left-hand field) and **Next Matter Complete Step** (right-hand field).
5. Get the following the step ID and the form field ID and enter the JSON body
1. In your left-hand navigation, click the **Workflows** icon.
2. Hover over the follow-up workflow and click on the menu icon.
3. Click **Edit workflow**.
4. Click the step to which you'd like to send data.
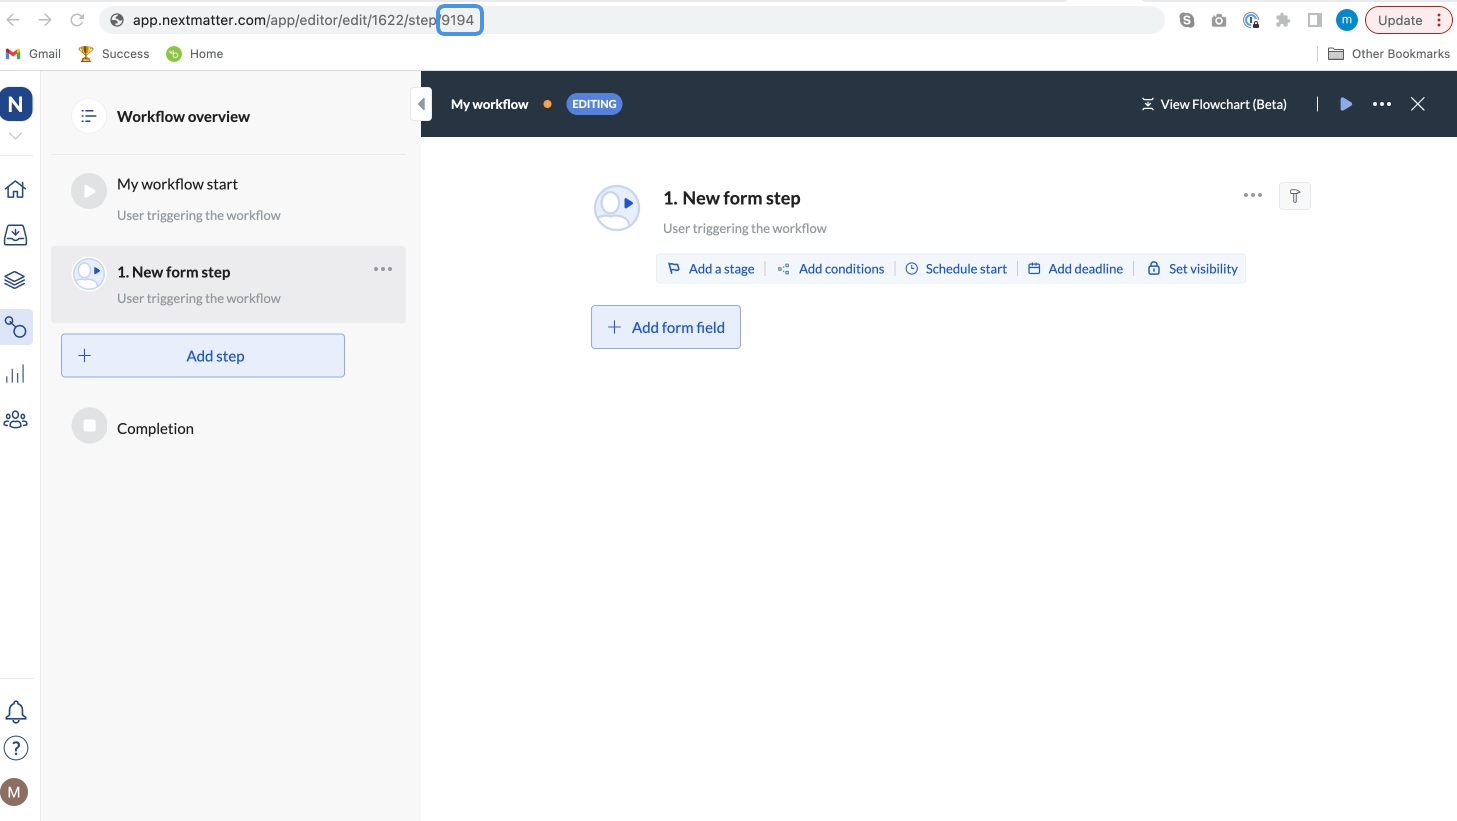
5. Copy the step ID. It's the last number in the URL you see in your browser.
4. Select the following in **Actions**: **Notify by > Active Webhook** (left-hand field) and **Next Matter Complete Step** (right-hand field).
5. Get the following the step ID and the form field ID and enter the JSON body
1. In your left-hand navigation, click the **Workflows** icon.
2. Hover over the follow-up workflow and click on the menu icon.
3. Click **Edit workflow**.
4. Click the step to which you'd like to send data.
5. Copy the step ID. It's the last number in the URL you see in your browser.
 1. In your left-hand navigation, click the **Workflows** icon.
2. Hover over the follow-up process and click on the menu icon.
3. Click **Edit workflow**.
4. Click the step to which you'd like to send data.
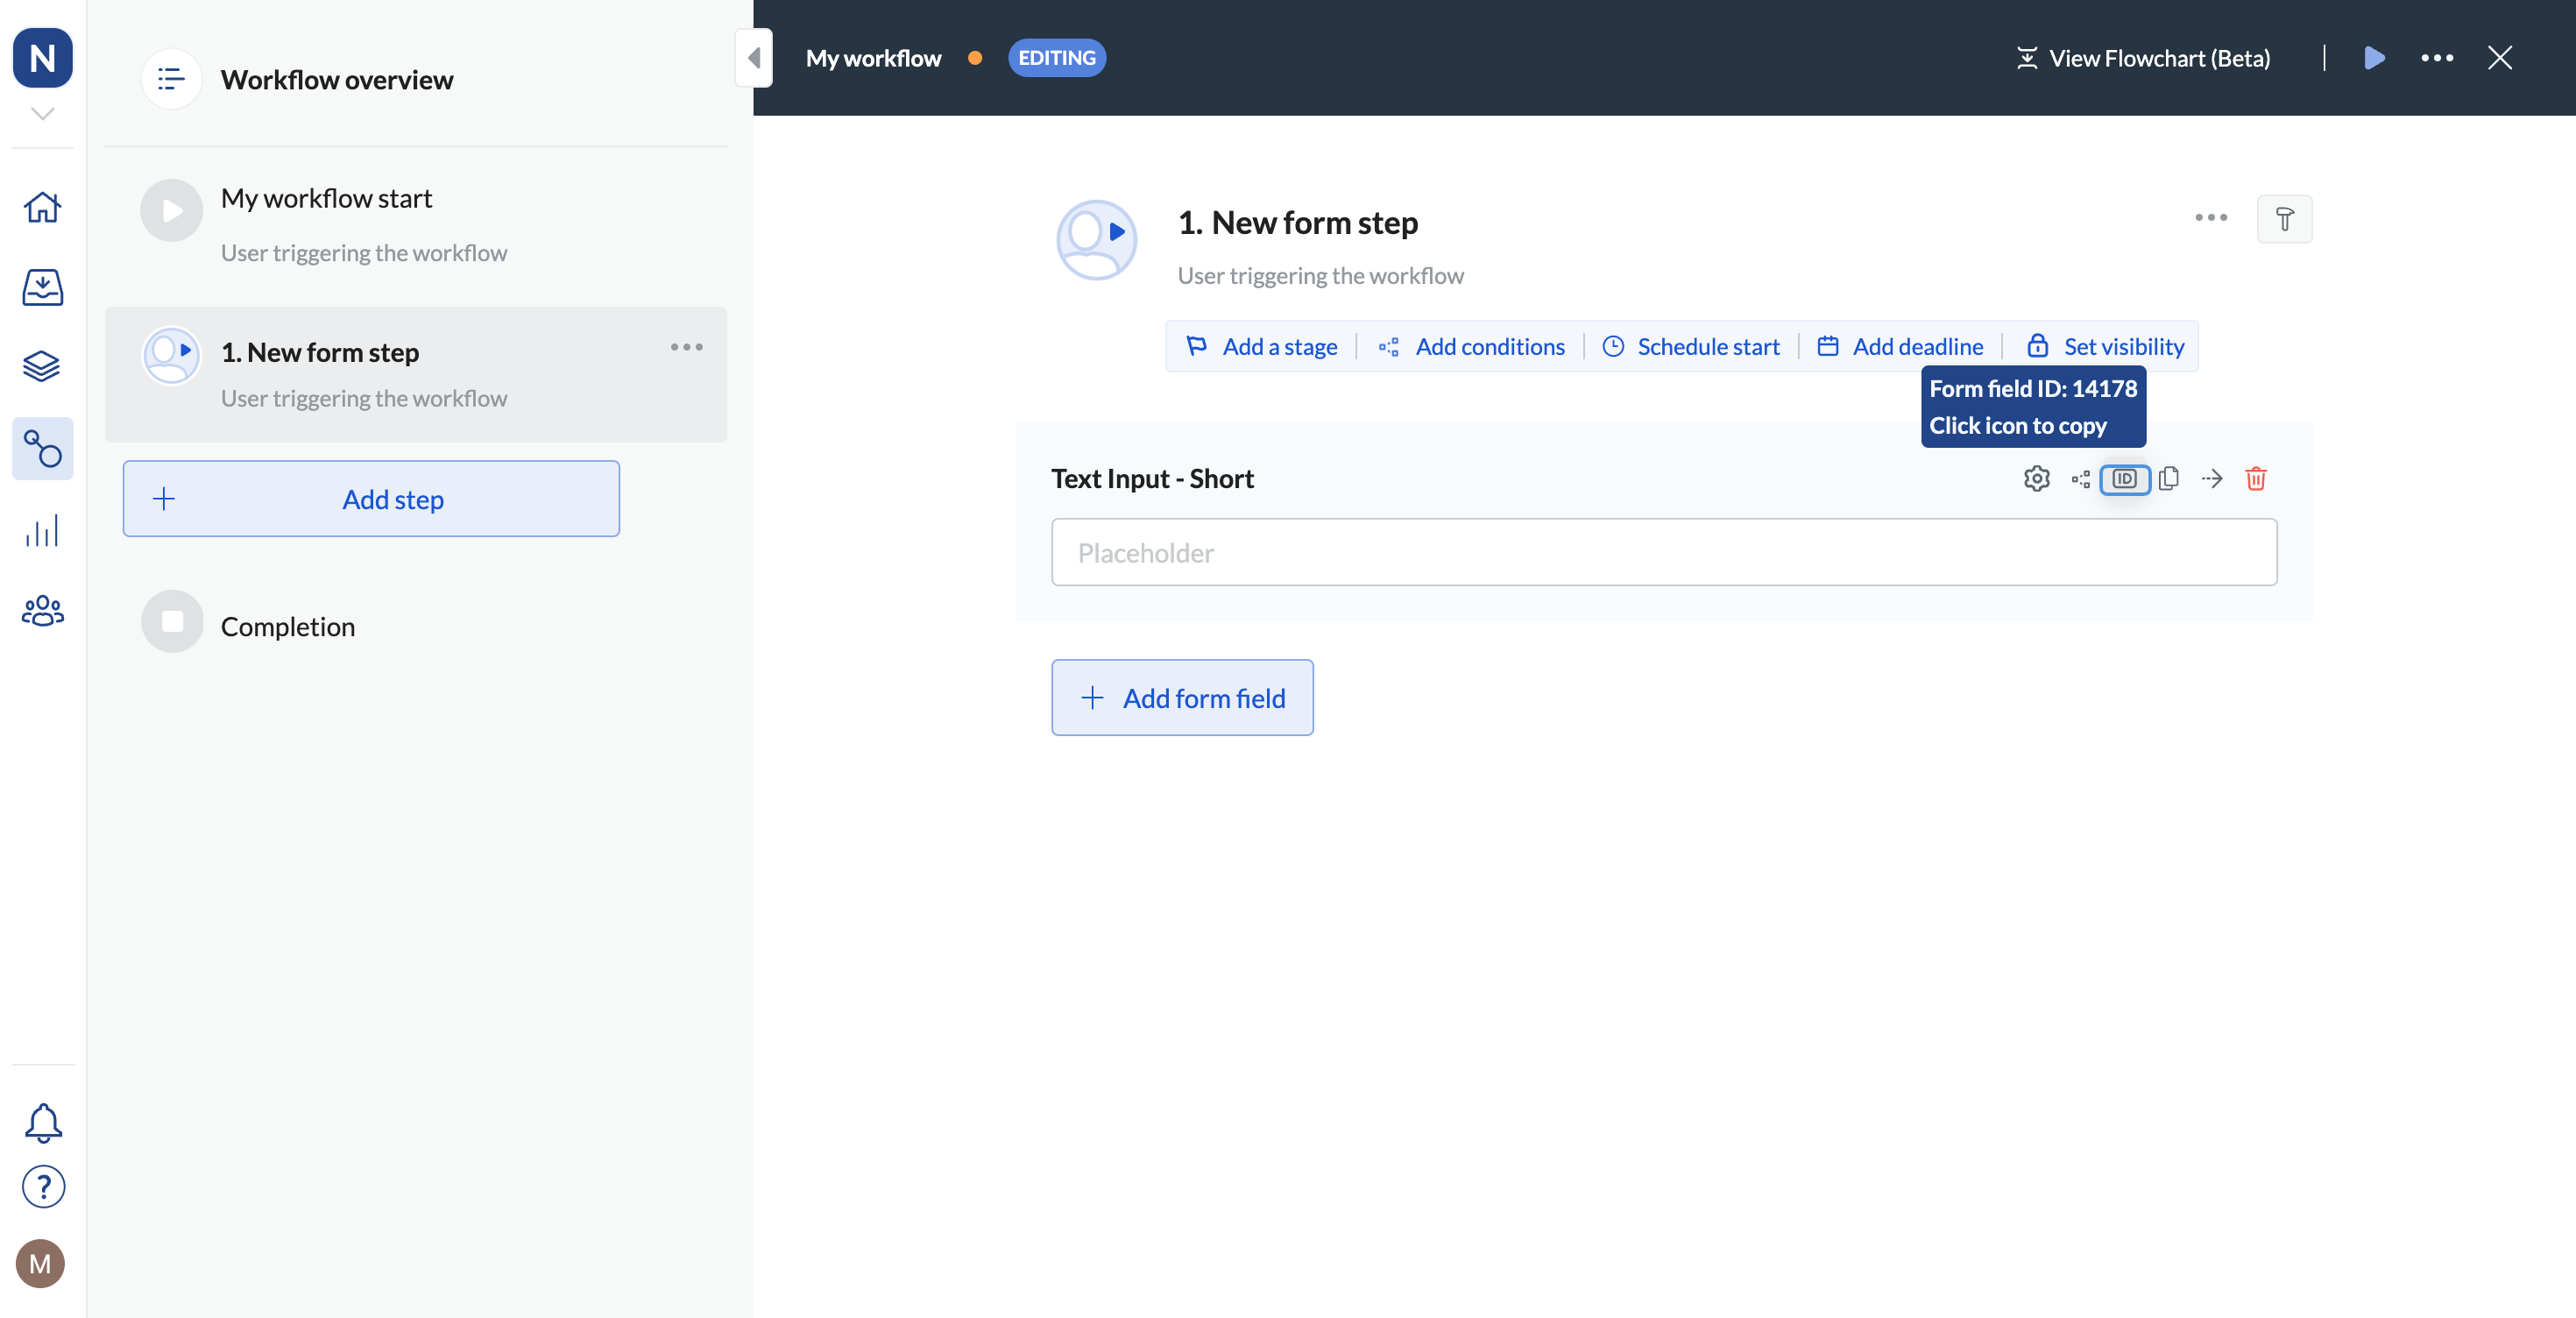
5. Click the ID icon for the field to which you want to copy data.
6. Copy **Form field ID**.
1. In your left-hand navigation, click the **Workflows** icon.
2. Hover over the follow-up process and click on the menu icon.
3. Click **Edit workflow**.
4. Click the step to which you'd like to send data.
5. Click the ID icon for the field to which you want to copy data.
6. Copy **Form field ID**.
 ```json JSON theme={null}
{
"nm_instance_id": "{{ticket.ticket_field_FIELDID}}",
"complete_step_data": {
"step_id": STEP_ID,
"actions": [{
"action_id": FORM_FIELD_ID,
"input_object": {
"inputValue": "{{ticket.latest_public_comment_html}}"
}
}]
}
}
```
You can use one of Next Matter no-code steps for Zendesk available when you add an integration step. For details, see [Zendesk no-code](/docs/connect-to-zendesk-code-free)
## Get ticket details
1. You need to write the instance URL in the ticket to transfer the data to the instance automatically. To do so:
1. In your Next Matter workflow, create an integration step.
2. Click **Settings** and enter the following details:
* **URL**: `https://ZENDESK_DOMAIN.zendesk.com/api/v2/tickets/{Instance name}` with Instance ID being the data reference
* **Method**: PATCH
* **Headers**: Content-Type: `application/json`
* **Headers**: Authorization: `ZENDESK_API_KEY`
* **Body**:
```json theme={null}
{
"ticket": {
"custom_fields": [
{ "id": 360020270077, "value": "{Instance URL}" }
]}
}
```
Now you can create the next integration steps to pull data.
2. Get a set of ticket data
1. In your Next Matter workflow, create an integration step.
2. Click **Settings** and enter the following details:
* **URL**: `https://ZENDESK_DOMAIN.zendesk.com/api/v2/tickets/{Instance name}` with Instance ID being the data reference
* **Method**: GET
* **Headers**: Content-Type: `application/json`
* **Headers**: Authorization: `ZENDESK_API_KEY`
* Leave **Body** empty.
* Create the following variables and save your changes.
* `$.ticket.via.source.from.name` (for requester name)
* `$.ticket.via.source.from.address` (requester's address)
* `$.ticket.description`
* `$.ticket.id`
* `$.ticket.comments`
* `$.ticket.requester_id` (requester's id)
* `$.user.email` (requester's email)
You can use these variables to update the ticket with values that were stored in previous workflow steps.
## Get comments with images
To do this, you can place a GET call to `https://ZENDESK_DOMAIN.zendesk.com/api/v2/tickets/{Instance name}`
with the following body:
```json JSON theme={null}
{
"include_inline_images": true
}
```
and the following variable: `$.comments.html_body`
## Search for a ticket
1. Click the **Settings** gear icon to configure your integration step.
2. In your integration step, you need to authenticate with your Zendesk API key and configure the API Method and URL. Use the following data replacing the placeholder with your own data.
* **Method**: GET
* **URL**: [https://ZENDESK\_DOMAIN.zendesk.com/api/v2/search.json?query=type:ticket%20subject:"WORD\_TO\_SEARCH\_BY"](https://ZENDESK_DOMAIN.zendesk.com/api/v2/search.json?query=type:ticket%20subject:%22WORD_TO_SEARCH_BY%22)
3. Save your changes.
## Upload a file and attach it to ticket
To upload a file and attach it to a Zendesk ticket, upload the file first and then attach it to the ticket.
1. To upload the file, create a custom integration step with the following integration details:
* **Method**: POST
* **Headers**: Content-Type: `FILE_TYPE i.e text/plain`
* **Headers**: Authorization: `ZENDESK_API_KEY`
* URL: [`https://ZENDESK_DOMAIN.zendesk.com/api/v2/uploads/?filename=FILENAME`](https://ZENDESK_DOMAIN.zendesk.com/api/v2/uploads/?filename=FILENAME) Note that the FILENAME is a placeholder that needs to be replaced by the name of the file you want to upload. If you're uploading multiple files, this needs to be the name of the first file, you want to upload.
* Ensure the **Body type** is **Form data** and has the following details:
```
Key: data-binary
Type: file
Value: FILE_REFERENCE
```
* Create the following variables:
* an `upload` variable with the value of `$.upload`
* a token variable with the value of \$.upload.token
* a Zendesk file URL variable with the value of \$.upload.attachment.content\_url
2. Create another custom integration step to attach the file to the ticket. Use the following details:
* **Method**: PUT
* **Headers**: Content-Type: `application/json`
* **Headers**: Authorization: `ZENDESK_API_KEY`
* URL: [`https://ZENDESK_DOMAIN.zendesk.com/api/v2/tickets/TICKET_ID/`](https://ZENDESK_DOMAIN.zendesk.com/api/v2/tickets/TICKET_ID/) Note that the FILENAME is a placeholder that needs to be replaced by the name of the file you want to upload
* Ensure the **Body type** is **Raw** and has the following details:
```json JSON theme={null}
{
"ticket": {
"comment": {
"body": "MESSAGE_CONTENT",
"uploads": [
"{1. Upload File - Integration step - token (plain)}"
]
}
}
}
```
## Pull data from Zendesk into an instance
1. In your Next Matter workflow create a new integration step.
2. To update a ticket, use the following:
* **Method**: PUT
* **Headers**: Content-Type: `application/json`
* **Headers**: Authorization: `ZENDESK_API_KEY`
* URL: `https://ZENDESK_DOMAIN.zendesk.com/api/v2/tickets/{{instance_name}}`
```json JSON theme={null}
{
"nm_instance_id": "{{ticket.ticket_field_FIELDID}}",
"complete_step_data": {
"step_id": STEP_ID,
"actions": [{
"action_id": FORM_FIELD_ID,
"input_object": {
"inputValue": "{{ticket.latest_public_comment_html}}"
}
}]
}
}
```
You can use one of Next Matter no-code steps for Zendesk available when you add an integration step. For details, see [Zendesk no-code](/docs/connect-to-zendesk-code-free)
## Get ticket details
1. You need to write the instance URL in the ticket to transfer the data to the instance automatically. To do so:
1. In your Next Matter workflow, create an integration step.
2. Click **Settings** and enter the following details:
* **URL**: `https://ZENDESK_DOMAIN.zendesk.com/api/v2/tickets/{Instance name}` with Instance ID being the data reference
* **Method**: PATCH
* **Headers**: Content-Type: `application/json`
* **Headers**: Authorization: `ZENDESK_API_KEY`
* **Body**:
```json theme={null}
{
"ticket": {
"custom_fields": [
{ "id": 360020270077, "value": "{Instance URL}" }
]}
}
```
Now you can create the next integration steps to pull data.
2. Get a set of ticket data
1. In your Next Matter workflow, create an integration step.
2. Click **Settings** and enter the following details:
* **URL**: `https://ZENDESK_DOMAIN.zendesk.com/api/v2/tickets/{Instance name}` with Instance ID being the data reference
* **Method**: GET
* **Headers**: Content-Type: `application/json`
* **Headers**: Authorization: `ZENDESK_API_KEY`
* Leave **Body** empty.
* Create the following variables and save your changes.
* `$.ticket.via.source.from.name` (for requester name)
* `$.ticket.via.source.from.address` (requester's address)
* `$.ticket.description`
* `$.ticket.id`
* `$.ticket.comments`
* `$.ticket.requester_id` (requester's id)
* `$.user.email` (requester's email)
You can use these variables to update the ticket with values that were stored in previous workflow steps.
## Get comments with images
To do this, you can place a GET call to `https://ZENDESK_DOMAIN.zendesk.com/api/v2/tickets/{Instance name}`
with the following body:
```json JSON theme={null}
{
"include_inline_images": true
}
```
and the following variable: `$.comments.html_body`
## Search for a ticket
1. Click the **Settings** gear icon to configure your integration step.
2. In your integration step, you need to authenticate with your Zendesk API key and configure the API Method and URL. Use the following data replacing the placeholder with your own data.
* **Method**: GET
* **URL**: [https://ZENDESK\_DOMAIN.zendesk.com/api/v2/search.json?query=type:ticket%20subject:"WORD\_TO\_SEARCH\_BY"](https://ZENDESK_DOMAIN.zendesk.com/api/v2/search.json?query=type:ticket%20subject:%22WORD_TO_SEARCH_BY%22)
3. Save your changes.
## Upload a file and attach it to ticket
To upload a file and attach it to a Zendesk ticket, upload the file first and then attach it to the ticket.
1. To upload the file, create a custom integration step with the following integration details:
* **Method**: POST
* **Headers**: Content-Type: `FILE_TYPE i.e text/plain`
* **Headers**: Authorization: `ZENDESK_API_KEY`
* URL: [`https://ZENDESK_DOMAIN.zendesk.com/api/v2/uploads/?filename=FILENAME`](https://ZENDESK_DOMAIN.zendesk.com/api/v2/uploads/?filename=FILENAME) Note that the FILENAME is a placeholder that needs to be replaced by the name of the file you want to upload. If you're uploading multiple files, this needs to be the name of the first file, you want to upload.
* Ensure the **Body type** is **Form data** and has the following details:
```
Key: data-binary
Type: file
Value: FILE_REFERENCE
```
* Create the following variables:
* an `upload` variable with the value of `$.upload`
* a token variable with the value of \$.upload.token
* a Zendesk file URL variable with the value of \$.upload.attachment.content\_url
2. Create another custom integration step to attach the file to the ticket. Use the following details:
* **Method**: PUT
* **Headers**: Content-Type: `application/json`
* **Headers**: Authorization: `ZENDESK_API_KEY`
* URL: [`https://ZENDESK_DOMAIN.zendesk.com/api/v2/tickets/TICKET_ID/`](https://ZENDESK_DOMAIN.zendesk.com/api/v2/tickets/TICKET_ID/) Note that the FILENAME is a placeholder that needs to be replaced by the name of the file you want to upload
* Ensure the **Body type** is **Raw** and has the following details:
```json JSON theme={null}
{
"ticket": {
"comment": {
"body": "MESSAGE_CONTENT",
"uploads": [
"{1. Upload File - Integration step - token (plain)}"
]
}
}
}
```
## Pull data from Zendesk into an instance
1. In your Next Matter workflow create a new integration step.
2. To update a ticket, use the following:
* **Method**: PUT
* **Headers**: Content-Type: `application/json`
* **Headers**: Authorization: `ZENDESK_API_KEY`
* URL: `https://ZENDESK_DOMAIN.zendesk.com/api/v2/tickets/{{instance_name}}`