> ## Documentation Index
> Fetch the complete documentation index at: https://help.nextmatter.com/llms.txt
> Use this file to discover all available pages before exploring further.
# Integrate with Jira
> You can trigger a workflow from a Jira issue or create a Jira ticket in a Jira project as a step in a workflow.
Check out our ready-made templates available when you add a step and select **Templates > 3rd party templates**. You can use the templates to create a set of pre-configured steps. Need a specific template? Click the **Contact us** button in the top right of the page and let us know.
## Create a Jira issue from workflow
### Before you begin
* Make sure to have the key of your Jira project at hand. The project key is the prefix of the issue number. For example, if your issue number is `JRA-123`, the `JRA` portion of the issue number is the project key.
### Create an issue in Jira
1. In Jira go to **Settings > Atlassian Account Settings > Security > Create and Manage API tokens**.
2. Create your Jira token and copy it to the clipboard.
3. You need the token to be base64-encoded (in the format of `useremail:api_token`). Base64-encode the string by using a tool like [https://base64encode.org](https://base64encode.org). Before encoding your string will look like the following: `email@example.com:12345`
4. In Next Matter select the workflow that should integrate with Jira, and add a new integration step.
5. Click **Settings** and enter the following details:
```json JSON theme={null}
{
"fields":{
"project": {
"key": "JIRA_PROJECT_KEY"
},
"summary": "SUMMARY",
"description": "DESCRIPTION",
"issuetype": {
"name": "TASK"
}
}
}
```
* **Method**: POST
* **URL**: [`https://JIRA_SUBDOMAIN.atlassian.net/rest/api/latest/issue/`](https://JIRA_SUBDOMAIN.atlassian.net/rest/api/latest/issue/)
* **Headers**: Content-Type: application/json
* **Headers**: Authorization: `Basic JIRA_API_KEY`
* **Body** might look like the following:
## Start a workflow from Jira Service Desk ticket or Jira issue
### Before you begin
* Make sure Next Matter is allowlisted in Jira. See [Jira documentation](https://confluence.atlassian.com/adminjiraserver/configuring-the-allowlist-1014667309.html).
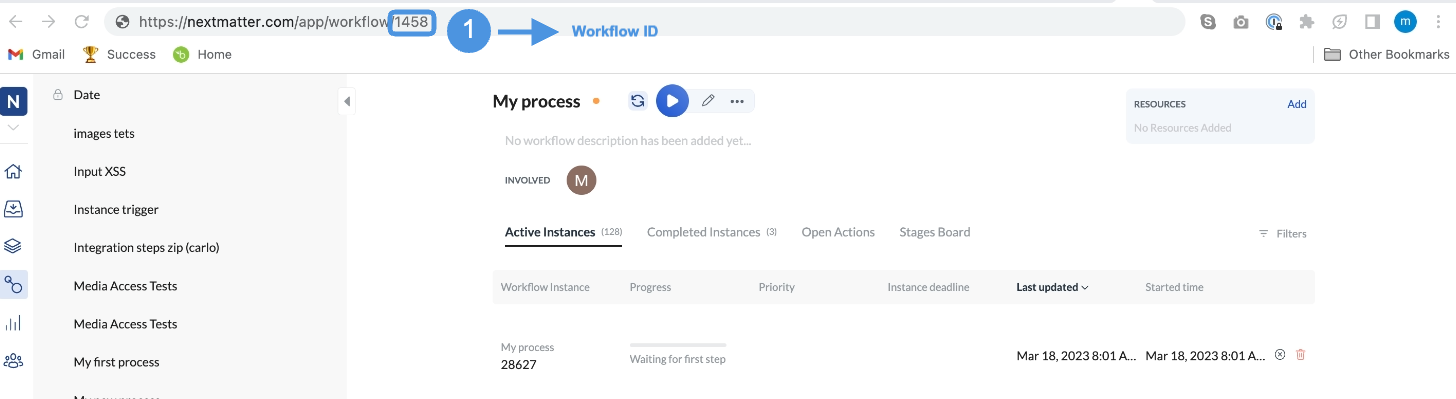
* Note down the ID of the workflow that will be triggered with the first workflow. You can get the ID by clicking the workflow and copying the number from the URL in your browser.
 ### Start a workflow from Jira Service Desk
1. In Jira Service Desk, go to Project **Settings > Automation**.
2. Click **Create rule**.
3. Define the **When** trigger as **Issue created**.
4. Add a **Then** action and define it as **Send web request**.
5. In the **Send web request** section, enter the following details:
```json JSON theme={null}
{"name": "{{issue.key}}",
"process": "https://core.nextmatter.com/api/processes/ID_OF_THE_PROCESS/" }
```
### Start a workflow from Jira Service Desk
1. In Jira Service Desk, go to Project **Settings > Automation**.
2. Click **Create rule**.
3. Define the **When** trigger as **Issue created**.
4. Add a **Then** action and define it as **Send web request**.
5. In the **Send web request** section, enter the following details:
```json JSON theme={null}
{"name": "{{issue.key}}",
"process": "https://core.nextmatter.com/api/processes/ID_OF_THE_PROCESS/" }
```
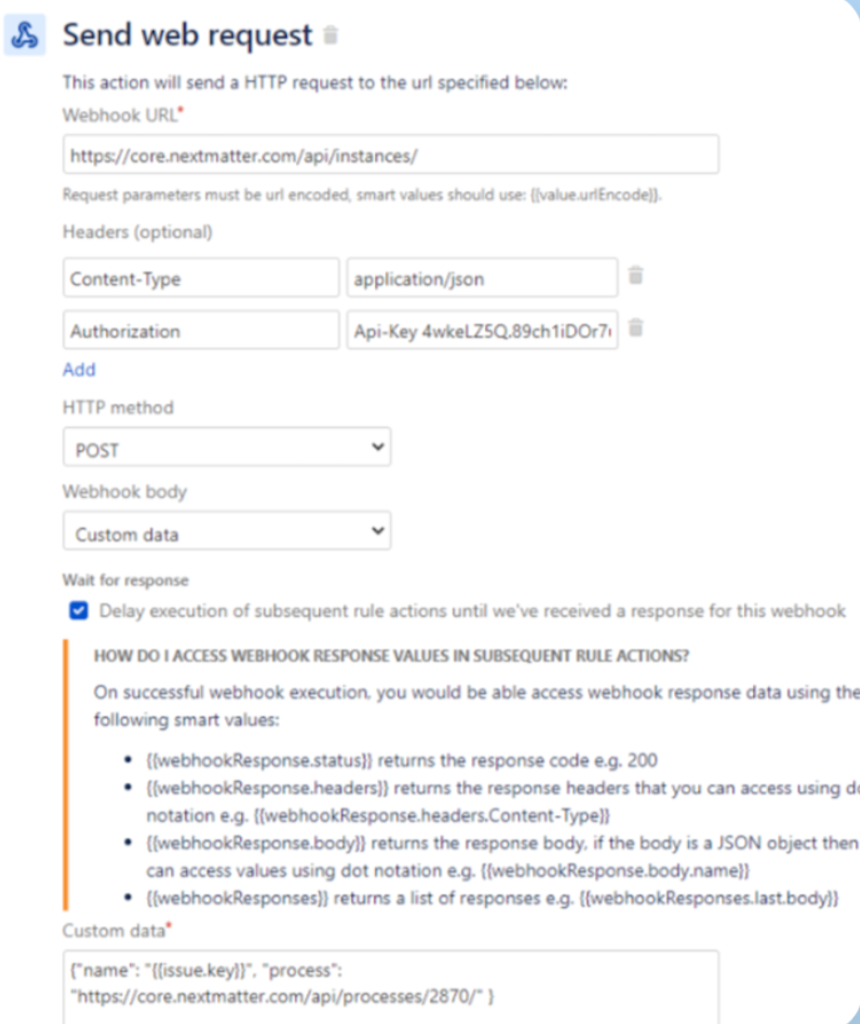 * **Webhook URL**: [`https://core.nextmatter.com/api/instances/`](https://core.nextmatter.com/api/instances/)
* **Headers**: Content-Type: application/json
* **Headers**: Authorizations `API-Key NEXT_MATTER_API_KEY`
* **Method**: POST
* **Webhook body**: Custom data
* **Custom data**:
Every time that a Jira issue for this project is created, it will launch the specified Next Matter workflow and use the issue-key as the name of the instance.
### (Optional) Push additional data from Jira to the first step in Next Matter workflow
If you want to create a workflow with some Jira data in it, go back to the automation rule you created in Jira, and change the following:
1. In Jira, automation settings add an **And** to your rule. Define the **And** as an action to complete a subsequent step.
2. Configure the following attributes for the **And**:
* **URL**: `https://core.nextmatter.com/api/instances/{{webhookResponse.body.id}}/complete_step/`
* **Headers**: Content-Type: application/json
* **Headers**: Authorizations `API-Key NEXT_MATTER_API_KEY`
* **Method**: POST
* **Webhook body**: Custom data
* **Custom data** - you can map Jira issue information onto corresponding Next Matter actions. Next Matter actions can be identified with the IDs displayed in the editor. The payload might look like the following
```json JSON theme={null}
{
"step_id": 33890,
"actions": [
{
"action_id": 112505,
"input_object": {
"inputValue": "{{issue.created.format('dd/MM/yyyy')}}"
}
},
{
"action_id": 112468,
"input_object": {
"inputValue": "{{issue.description}}"
}
},
{
"action_id": 112478,
"input_object": {
"inputValue": "attachment.filename"
}
},
{
"action_id": 112479,
"input_object": {
"inputValue": "{{issue.url}}"
}
},
{
"action_id": 112579,
"input_object": {
"inputValue": "{{attachment.author.displayName}}"
}
}
]
}
```
* **Webhook URL**: [`https://core.nextmatter.com/api/instances/`](https://core.nextmatter.com/api/instances/)
* **Headers**: Content-Type: application/json
* **Headers**: Authorizations `API-Key NEXT_MATTER_API_KEY`
* **Method**: POST
* **Webhook body**: Custom data
* **Custom data**:
Every time that a Jira issue for this project is created, it will launch the specified Next Matter workflow and use the issue-key as the name of the instance.
### (Optional) Push additional data from Jira to the first step in Next Matter workflow
If you want to create a workflow with some Jira data in it, go back to the automation rule you created in Jira, and change the following:
1. In Jira, automation settings add an **And** to your rule. Define the **And** as an action to complete a subsequent step.
2. Configure the following attributes for the **And**:
* **URL**: `https://core.nextmatter.com/api/instances/{{webhookResponse.body.id}}/complete_step/`
* **Headers**: Content-Type: application/json
* **Headers**: Authorizations `API-Key NEXT_MATTER_API_KEY`
* **Method**: POST
* **Webhook body**: Custom data
* **Custom data** - you can map Jira issue information onto corresponding Next Matter actions. Next Matter actions can be identified with the IDs displayed in the editor. The payload might look like the following
```json JSON theme={null}
{
"step_id": 33890,
"actions": [
{
"action_id": 112505,
"input_object": {
"inputValue": "{{issue.created.format('dd/MM/yyyy')}}"
}
},
{
"action_id": 112468,
"input_object": {
"inputValue": "{{issue.description}}"
}
},
{
"action_id": 112478,
"input_object": {
"inputValue": "attachment.filename"
}
},
{
"action_id": 112479,
"input_object": {
"inputValue": "{{issue.url}}"
}
},
{
"action_id": 112579,
"input_object": {
"inputValue": "{{attachment.author.displayName}}"
}
}
]
}
```
1. In your left-hand navigation, click the **Workflows** icon.
2. Hover over the follow-up workflow and click on the menu icon.
3. Click **Workflow**.
4. Click the step to which you'd like to send data.
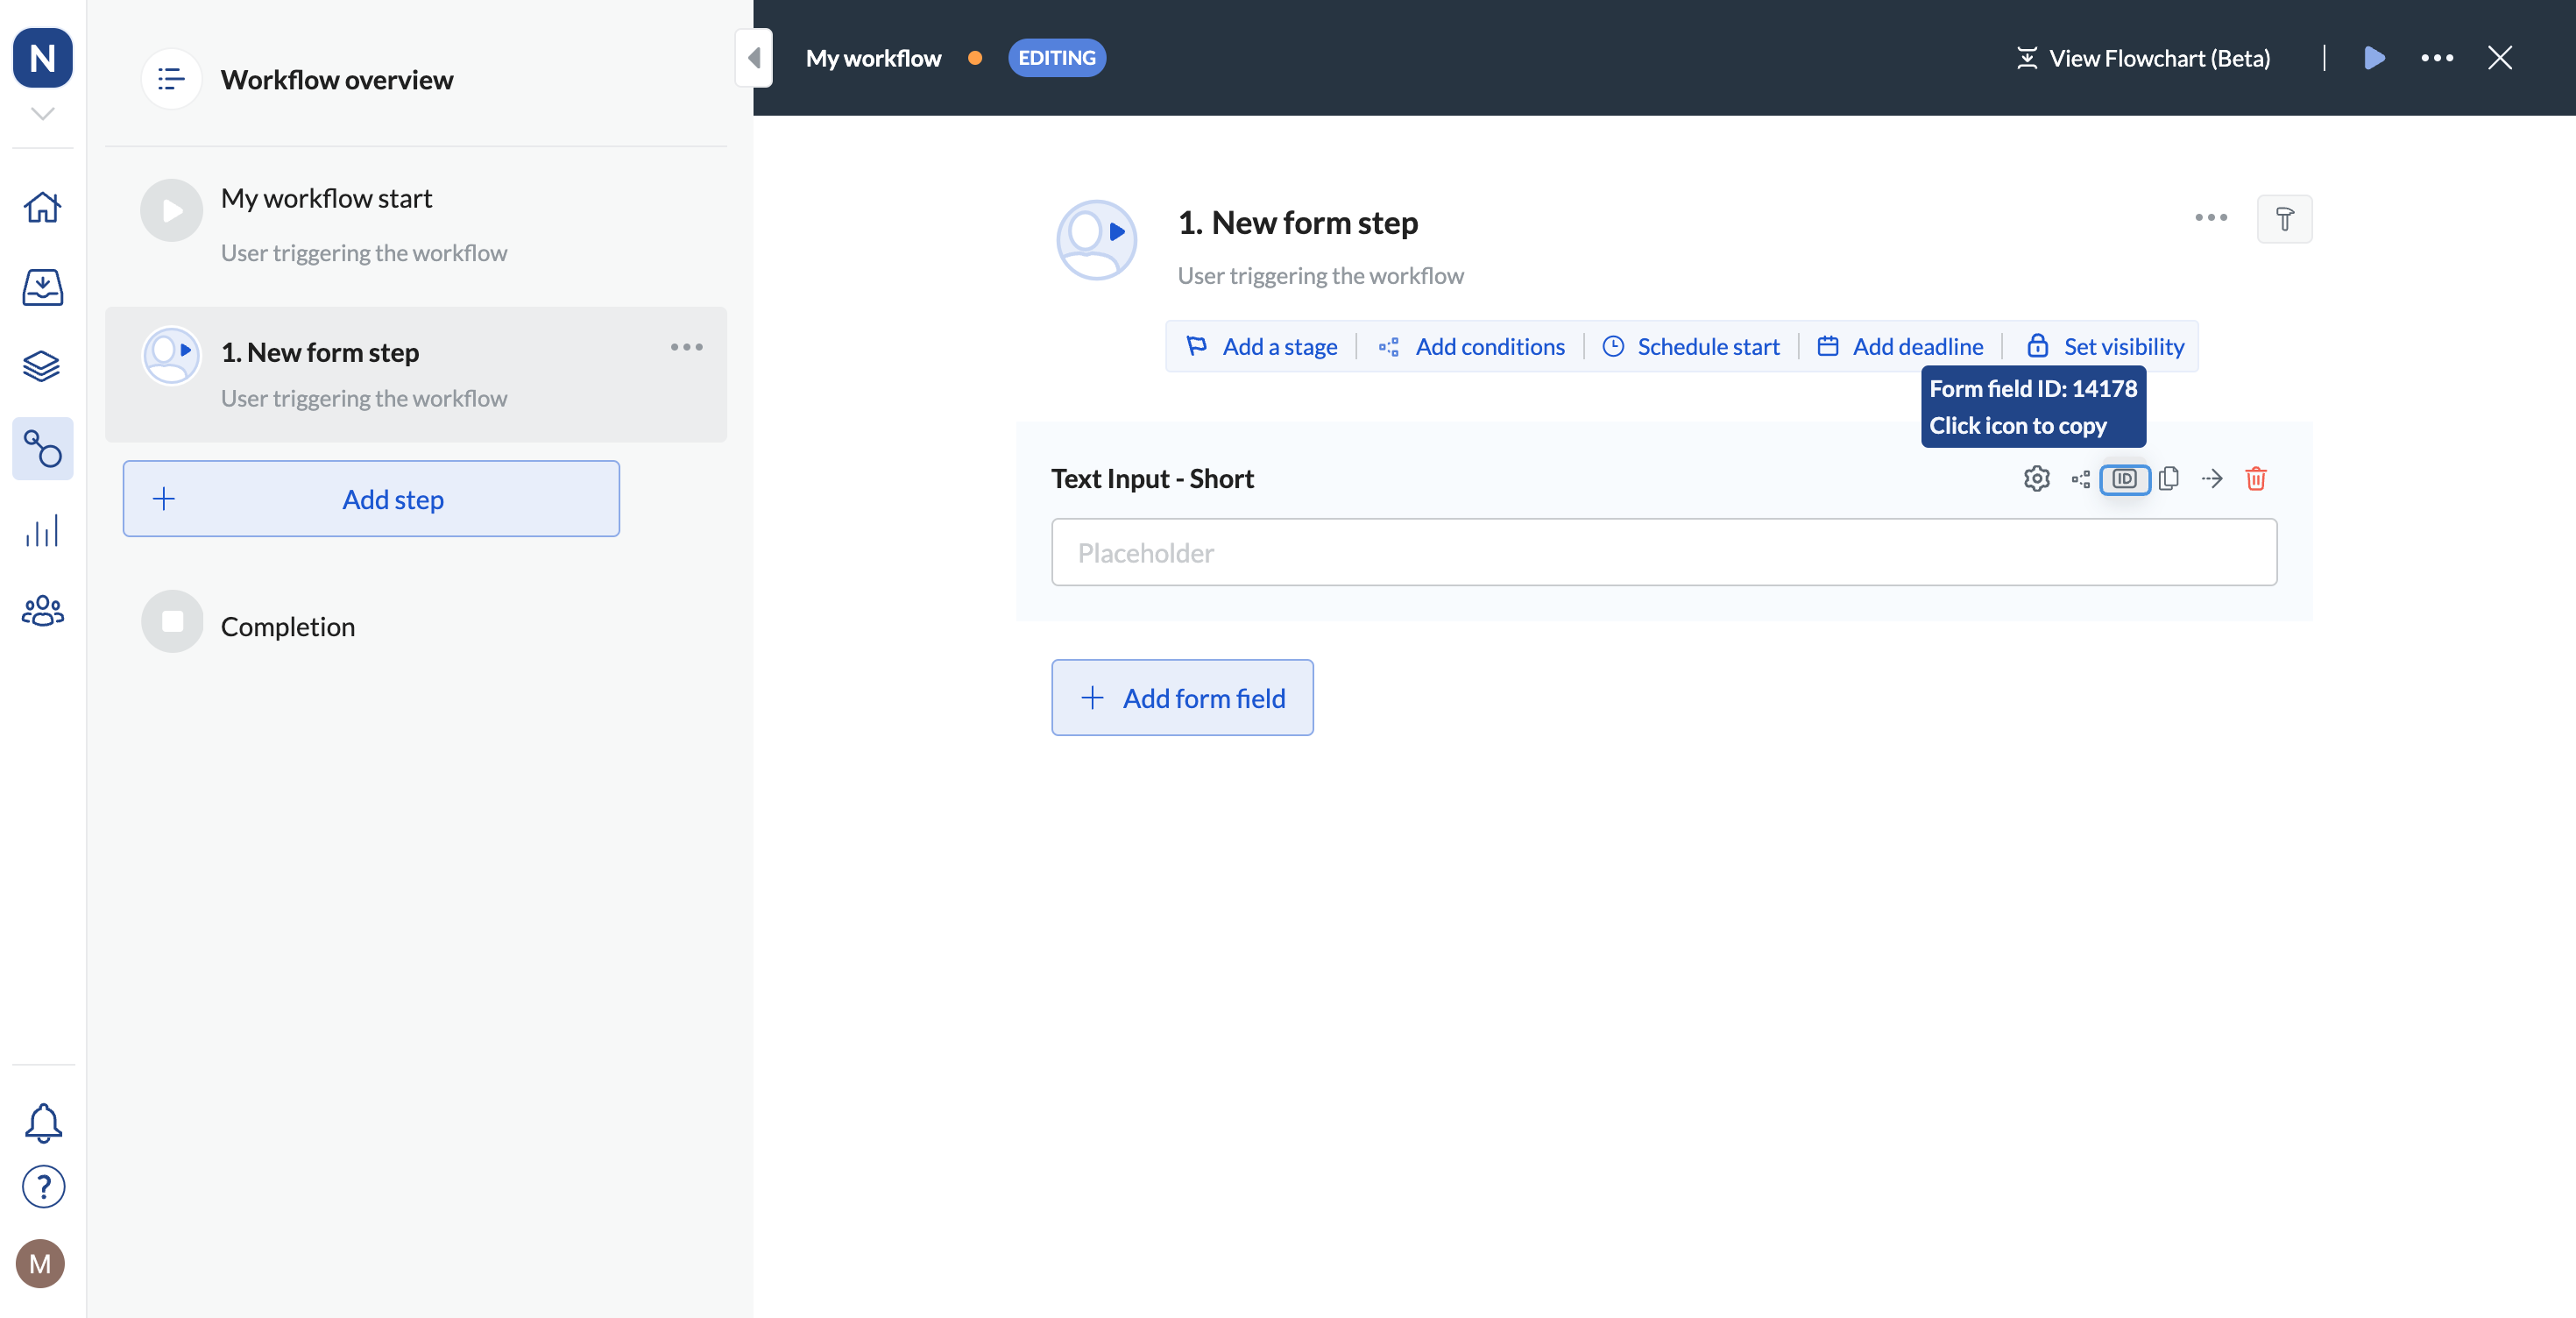
5. Click the ID icon for the field you want to copy data to.
6. Copy **Form field ID**.
 1. In your left-hand navigation, click the **Workflows** icon.
2. Hover over the follow-up workflow and click on the menu icon.
3. Click **Edit workflow**.
4. Click the step to which you'd like to send data.
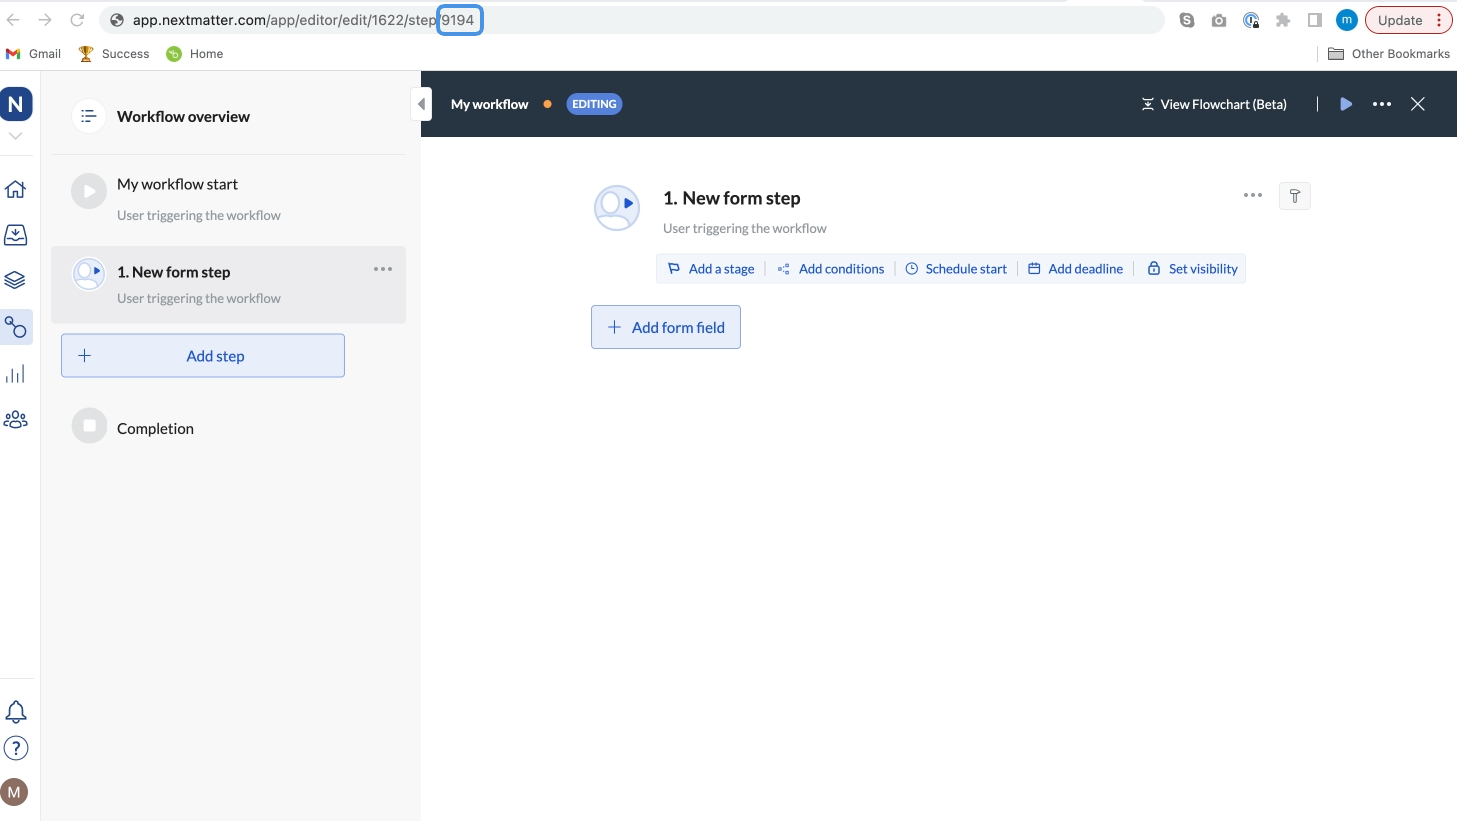
5. Copy the step ID. It's the last number in the URL you see in your browser.
1. In your left-hand navigation, click the **Workflows** icon.
2. Hover over the follow-up workflow and click on the menu icon.
3. Click **Edit workflow**.
4. Click the step to which you'd like to send data.
5. Copy the step ID. It's the last number in the URL you see in your browser.
 If you've configured everything, the result is a newly created instance and a filled-out first step.
As a follow-up, you can make updates to your Jira issue, for example, you can add a comment that is sent to the user who raised the issue originally with an integration step.
You can refer to [Jira documentation](https://confluence.atlassian.com/automation/smart-values-993924860.html) to see which values you can send to the Next Matter workflow.
If you've configured everything, the result is a newly created instance and a filled-out first step.
As a follow-up, you can make updates to your Jira issue, for example, you can add a comment that is sent to the user who raised the issue originally with an integration step.
You can refer to [Jira documentation](https://confluence.atlassian.com/automation/smart-values-993924860.html) to see which values you can send to the Next Matter workflow.