> ## Documentation Index
> Fetch the complete documentation index at: https://help.nextmatter.com/llms.txt
> Use this file to discover all available pages before exploring further.
# Integrate with Airtable
> Integrate with Airtable to create and update Airtable records.
## Before you begin
* Make sure you have your Airtable API at hand. To generate it, see [Airtable documentation](https://support.airtable.com/docs/creating-and-using-api-keys-and-access-tokens#personal-access-tokens-basic-actions).
* Get your Airtable App ID.
To obtain the ID of your Airtable base, open the Airtable Standard API page and click the Airtable base that you want to use. This will open the API page of the base. The base ID can be found in the URL of the API page of the base. In the URL, the base ID is immediately after [https://airtable.com/](https://airtable.com/) and starts with app .
For details, see [Airtable documentation](https://support.airtable.com/docs/finding-airtable-ids). You can also open the Airtable API documentation directly from your Airtable portal by clicking **Help** and accessing the **API documentation**.
* Get your Airtable table name. You can find it on the table tab. For example:
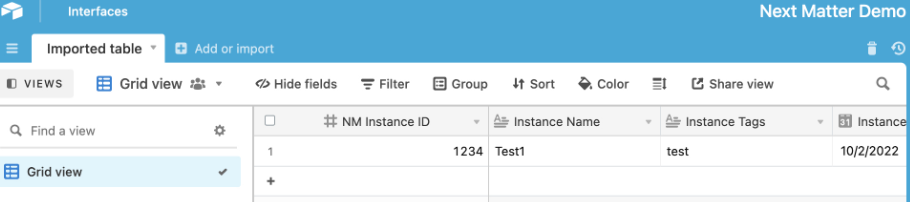 To use the name in the endpoint URL, you need to encode the space to `Imported%20table`.
* To update a record, you also need the `recordId`. You can find it by calling the List records endpoint. For details, see [Airtable documentation](https://airtable.com/developers/web/api/list-records#response-records).
## Create a record
1. In Next Matter select the workflow that should integrate with Airtable, and add a new integration step.
2. Click **Settings** and enter the details (with your data insead of our placeholders)
* **Method**: POST
* **URL**: [`https://api.airtable.com/v0/YOUR_APP_ID/YOUR_TABLE_NAME`](https://api.airtable.com/v0/YOUR_APP_ID/YOUR_TABLE_NAME)
* **Headers**: Content-Type: application/json
* **Headers**: Authorization: `Airtable_API_KEY`
* **Body** might look like the following:
```json JSON theme={null}
{
"records": [
{
"fields": {
FIELDS_FOR_NEW_RECORD //this is a placeholder
}
}
]
}
```
The filled-in Body might look like the folling:
```json JSON theme={null}
"fields": {
"NM Instance ID": 1234,
"Instance Name": "Test1",
"Instance Tags": "test",
"Instance Started Time": "2022-10-02"
}
```
3. Create a variable for the `recordId` with the value of `$.records[0].id`.
4. Save your changes.
You can access the ID of the newly created record in subsequent steps through a data reference. This can be used to update the record later on.
## Update a record
1. In Next Matter select the process that should integrate with Airtable, and add a new integration step.
2. Click **Settings** and enter the following details:
* **Method**: PATCH
* **URL**: [`https://api.airtable.com/v0/YOUR_APP_ID/YOUR_TABLE_NAME/RECORD_ID`](https://api.airtable.com/v0/YOUR_APP_ID/YOUR_TABLE_NAME/RECORD_ID)
* **Headers**: Content-Type: application/json
* **Headers**: Authorization: `Airtable_API_KEY`
* **Body** might look like the following:
```json json theme={null}
{
"fields": {
"field1": "value1",
"field2": "value2"
}
}
```
3. Save your changes.
To use the name in the endpoint URL, you need to encode the space to `Imported%20table`.
* To update a record, you also need the `recordId`. You can find it by calling the List records endpoint. For details, see [Airtable documentation](https://airtable.com/developers/web/api/list-records#response-records).
## Create a record
1. In Next Matter select the workflow that should integrate with Airtable, and add a new integration step.
2. Click **Settings** and enter the details (with your data insead of our placeholders)
* **Method**: POST
* **URL**: [`https://api.airtable.com/v0/YOUR_APP_ID/YOUR_TABLE_NAME`](https://api.airtable.com/v0/YOUR_APP_ID/YOUR_TABLE_NAME)
* **Headers**: Content-Type: application/json
* **Headers**: Authorization: `Airtable_API_KEY`
* **Body** might look like the following:
```json JSON theme={null}
{
"records": [
{
"fields": {
FIELDS_FOR_NEW_RECORD //this is a placeholder
}
}
]
}
```
The filled-in Body might look like the folling:
```json JSON theme={null}
"fields": {
"NM Instance ID": 1234,
"Instance Name": "Test1",
"Instance Tags": "test",
"Instance Started Time": "2022-10-02"
}
```
3. Create a variable for the `recordId` with the value of `$.records[0].id`.
4. Save your changes.
You can access the ID of the newly created record in subsequent steps through a data reference. This can be used to update the record later on.
## Update a record
1. In Next Matter select the process that should integrate with Airtable, and add a new integration step.
2. Click **Settings** and enter the following details:
* **Method**: PATCH
* **URL**: [`https://api.airtable.com/v0/YOUR_APP_ID/YOUR_TABLE_NAME/RECORD_ID`](https://api.airtable.com/v0/YOUR_APP_ID/YOUR_TABLE_NAME/RECORD_ID)
* **Headers**: Content-Type: application/json
* **Headers**: Authorization: `Airtable_API_KEY`
* **Body** might look like the following:
```json json theme={null}
{
"fields": {
"field1": "value1",
"field2": "value2"
}
}
```
3. Save your changes.