> ## Documentation Index
> Fetch the complete documentation index at: https://help.nextmatter.com/llms.txt
> Use this file to discover all available pages before exploring further.
# Connect to OpenAI
> Analyze and generate text, process images, and use web search, file search, and code interpreter.
Use a code-free OpenAI step to analyze text and images, generate content, and give the model built-in tools such as web search, file search, and code interpreter.
## Before you begin
* In your Next Matter portal, go to **Automations library**, click **Connect** in the **OpenAI** app tile, and enter your OpenAI API key.
## Analyze or generate text
1. Click **Workflows > + Create new\... > Create a new workflow** and give your workflow a name. If you have a workflow ready, click **... > Edit workflow**.
2. Click **+ Add step** and select **Integrations > OpenAI**.
3. Click the step and click **Configure integration**.
4. Select **Process/generate text with AI** in **OpenAI action**.
5. Enter the prompt and select the AI model and the output type.
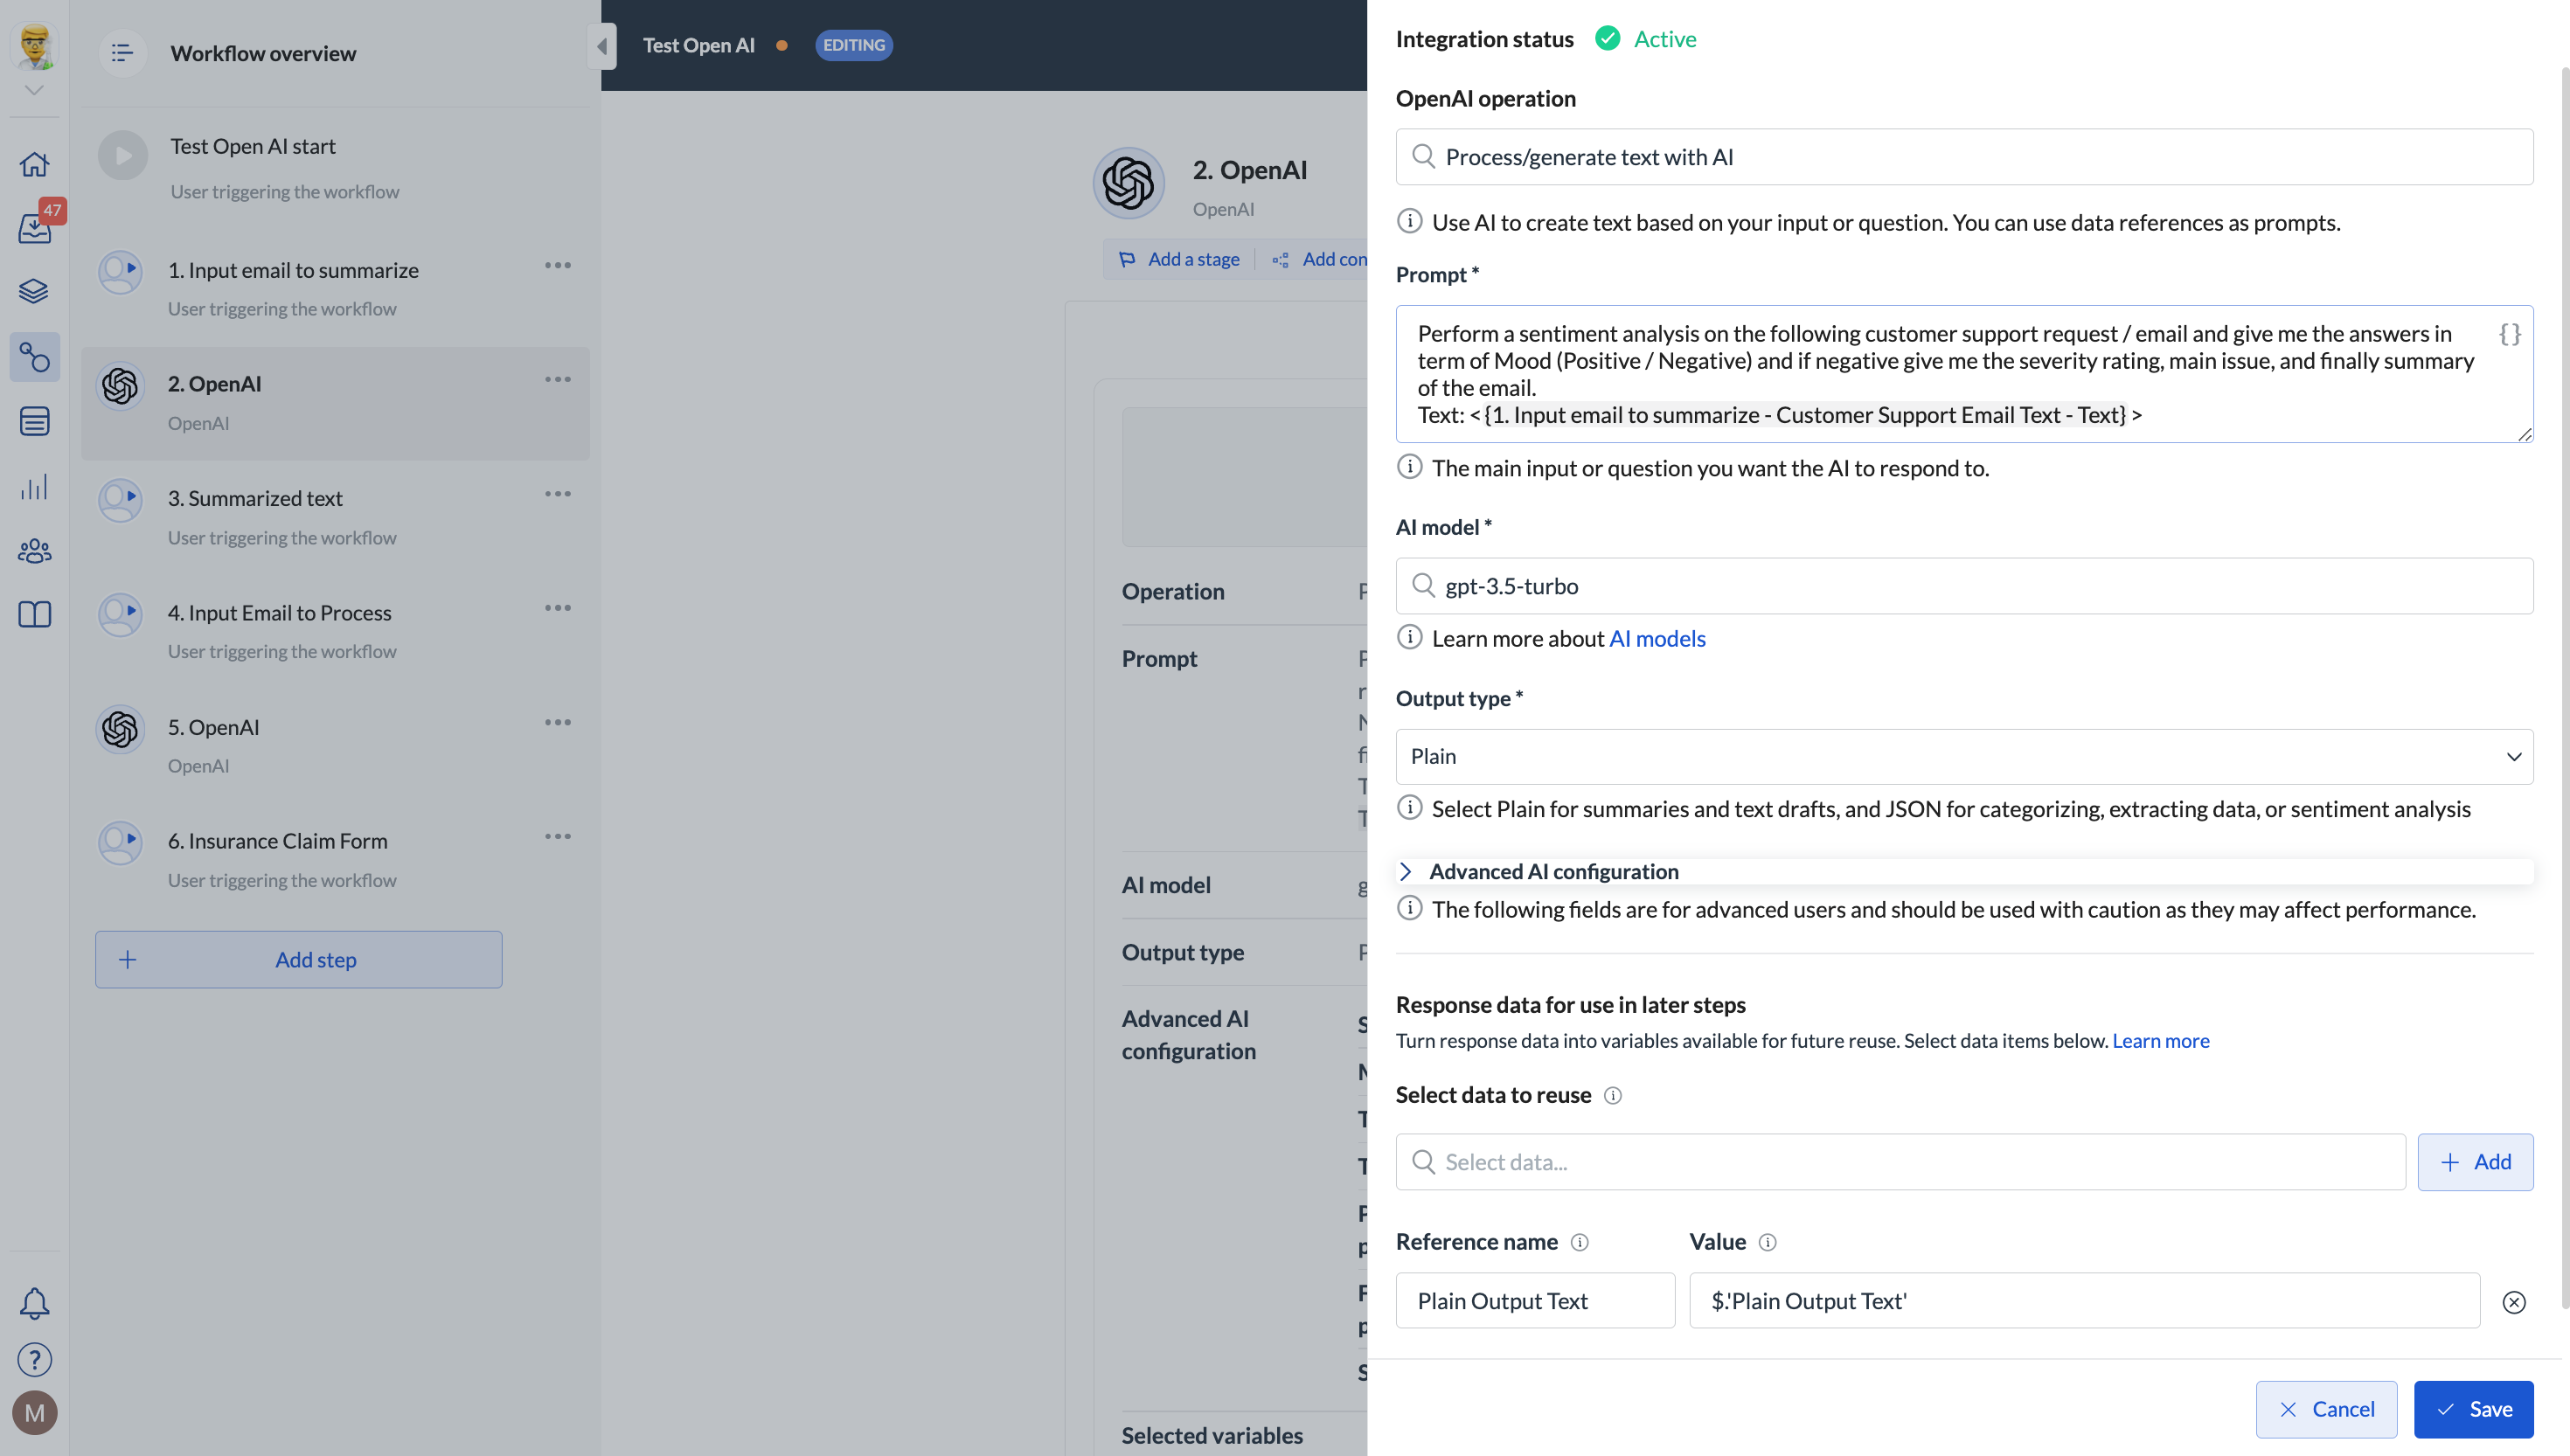 6. (Optional) If needed, you can tweak the request by providing data in the **Advanced AI configuration** dropdown.
7. Select the output text as a variable you can refer to later on.
8. Save your changes.
### Use cases
* You can use the no-code step to, for example, analyze customer emails for the support team, surface the email's main points, and measure the sentiment.
* You can analyze customer emails to automatically input data into insurance claim forms that customers can review and confirm.
## Process images
1. Click **Workflows > + Create new\... > Create a new workflow** and give your workflow a name. If you have a workflow ready, click **... > Edit workflow**.
2. Click **+ Add step** and select **Integrations > OpenAI**.
3. Click the step and click **Configure integration**.
4. Select **Process images with AI** in **OpenAI action**.
6. (Optional) If needed, you can tweak the request by providing data in the **Advanced AI configuration** dropdown.
7. Select the output text as a variable you can refer to later on.
8. Save your changes.
### Use cases
* You can use the no-code step to, for example, analyze customer emails for the support team, surface the email's main points, and measure the sentiment.
* You can analyze customer emails to automatically input data into insurance claim forms that customers can review and confirm.
## Process images
1. Click **Workflows > + Create new\... > Create a new workflow** and give your workflow a name. If you have a workflow ready, click **... > Edit workflow**.
2. Click **+ Add step** and select **Integrations > OpenAI**.
3. Click the step and click **Configure integration**.
4. Select **Process images with AI** in **OpenAI action**.
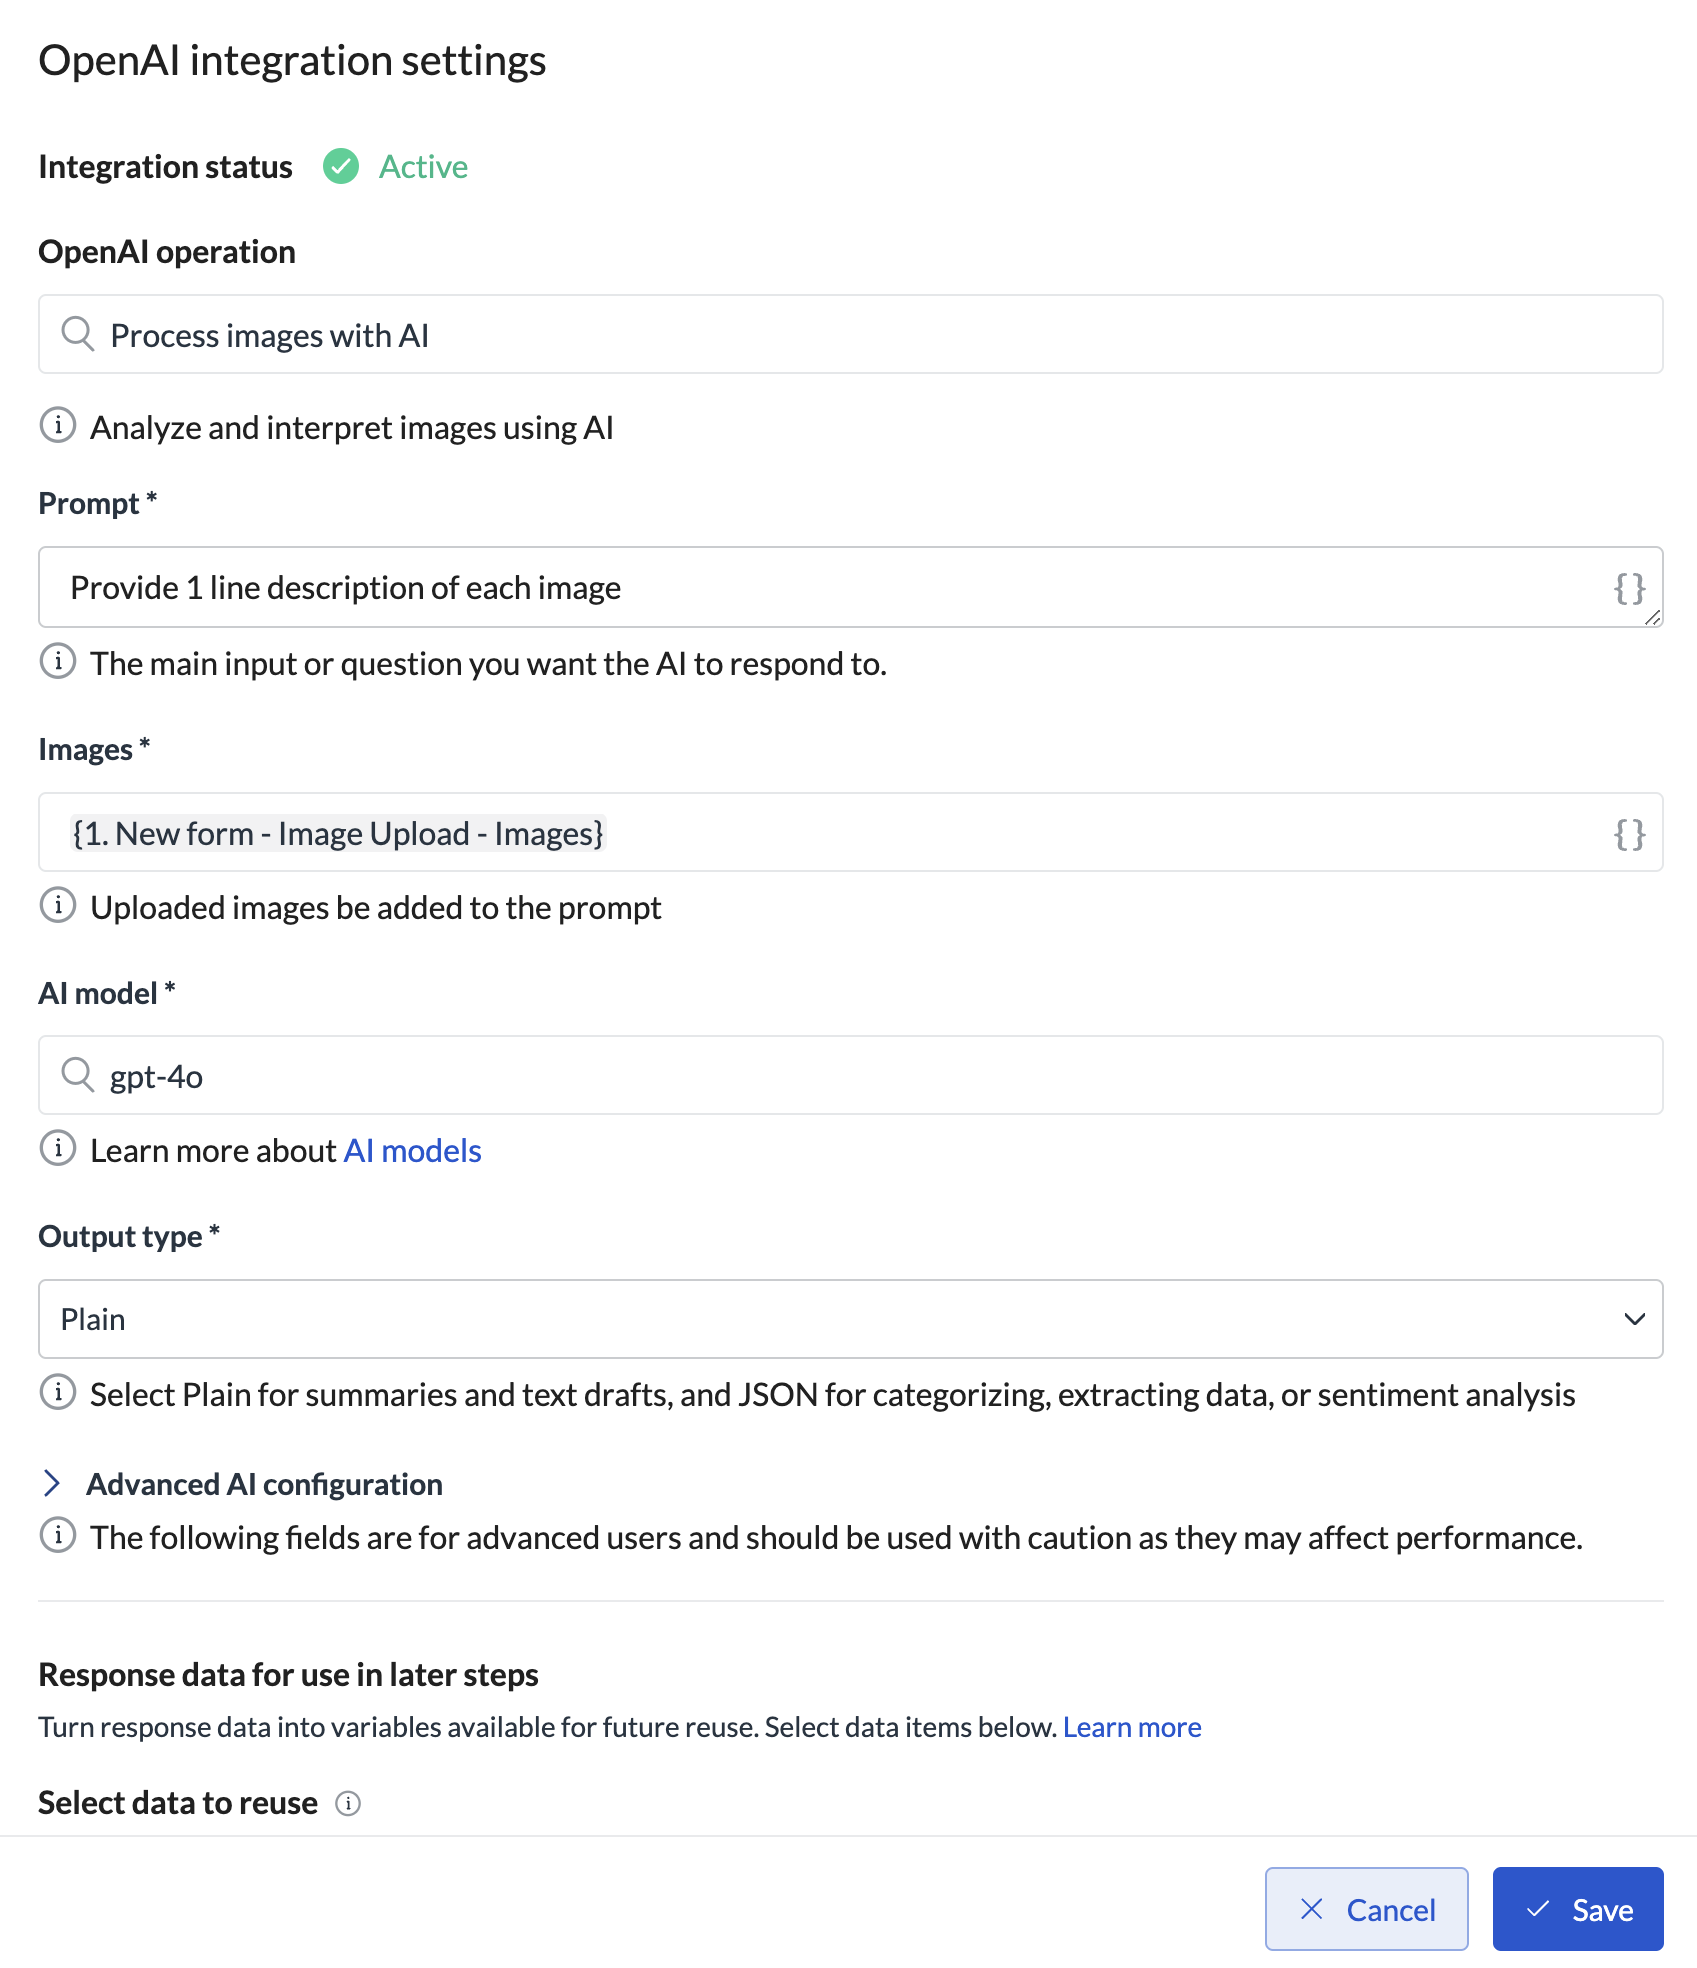 5. Enter the prompt and select the AI model and the output type.
6. Select the data reference to the images uploaded in any of the previous steps. PDF files aren't supported.
7. (Optional) If needed, you can tweak the request by providing data in the **Advanced AI configuration** dropdown.
You can use decimals to set **Temperature**. In German and other European locales, use a comma (,) instead of a point (.) as the decimal separator.
8. Select the output text as a variable you can refer to later on.
9. Save your changes.
Make sure the images do not exceed 30 megapixels each. Large images might cause the step to fail.
## Use web search, file search, and code interpreter
Give the model access to OpenAI's built-in tools when you need up-to-date answers, need it to search files you've already indexed with OpenAI, or need it to run code.
1. Click **Workflows > + Create new\... > Create a new workflow** and give your workflow a name. If you have a workflow ready, click **... > Edit workflow**.
2. Click **+ Add step** and select **Integrations > OpenAI**.
3. Click the step and click **Configure integration**.
4. Select **Process/generate text with OpenAI Responses API** in **OpenAI action**.
5. Enter the prompt and select the AI model and the output type.
6. In the **Tools** field, add any of the following:
* **Web Search** — lets the model search the web for current information. You can set the search context size and, optionally, a country, region, or city to focus the results.
* **File Search** — lets the model search vector stores you've already created in OpenAI. Enter the vector store IDs to search, and optionally set a maximum number of results and metadata filters.
* **Code Interpreter** — lets the model write and run Python code, for example to analyze data or do calculations. You can set a memory limit for the container that runs the code.
7. (Optional) Use the **Files** field to attach documents or images by URL as extra context for the model. This is separate from the File Search tool, which searches vector stores instead.
8. (Optional) If needed, you can tweak the request by providing data in the **Advanced AI configuration** dropdown.
9. Select the output text as a variable you can refer to later on.
10. Save your changes.
Web search, file search, and code interpreter are only available with the **Process/generate text with OpenAI Responses API** action. The legacy **Process/generate text with AI** and **Process images with AI** actions don't support these tools.
This documentation is built and hosted on [Mintlify](https://mintlify.com), a developer documentation platform.
5. Enter the prompt and select the AI model and the output type.
6. Select the data reference to the images uploaded in any of the previous steps. PDF files aren't supported.
7. (Optional) If needed, you can tweak the request by providing data in the **Advanced AI configuration** dropdown.
You can use decimals to set **Temperature**. In German and other European locales, use a comma (,) instead of a point (.) as the decimal separator.
8. Select the output text as a variable you can refer to later on.
9. Save your changes.
Make sure the images do not exceed 30 megapixels each. Large images might cause the step to fail.
## Use web search, file search, and code interpreter
Give the model access to OpenAI's built-in tools when you need up-to-date answers, need it to search files you've already indexed with OpenAI, or need it to run code.
1. Click **Workflows > + Create new\... > Create a new workflow** and give your workflow a name. If you have a workflow ready, click **... > Edit workflow**.
2. Click **+ Add step** and select **Integrations > OpenAI**.
3. Click the step and click **Configure integration**.
4. Select **Process/generate text with OpenAI Responses API** in **OpenAI action**.
5. Enter the prompt and select the AI model and the output type.
6. In the **Tools** field, add any of the following:
* **Web Search** — lets the model search the web for current information. You can set the search context size and, optionally, a country, region, or city to focus the results.
* **File Search** — lets the model search vector stores you've already created in OpenAI. Enter the vector store IDs to search, and optionally set a maximum number of results and metadata filters.
* **Code Interpreter** — lets the model write and run Python code, for example to analyze data or do calculations. You can set a memory limit for the container that runs the code.
7. (Optional) Use the **Files** field to attach documents or images by URL as extra context for the model. This is separate from the File Search tool, which searches vector stores instead.
8. (Optional) If needed, you can tweak the request by providing data in the **Advanced AI configuration** dropdown.
9. Select the output text as a variable you can refer to later on.
10. Save your changes.
Web search, file search, and code interpreter are only available with the **Process/generate text with OpenAI Responses API** action. The legacy **Process/generate text with AI** and **Process images with AI** actions don't support these tools.
This documentation is built and hosted on [Mintlify](https://mintlify.com), a developer documentation platform.